| Posición | Pos. | Icono | Texto breve | Descripción |
|---|
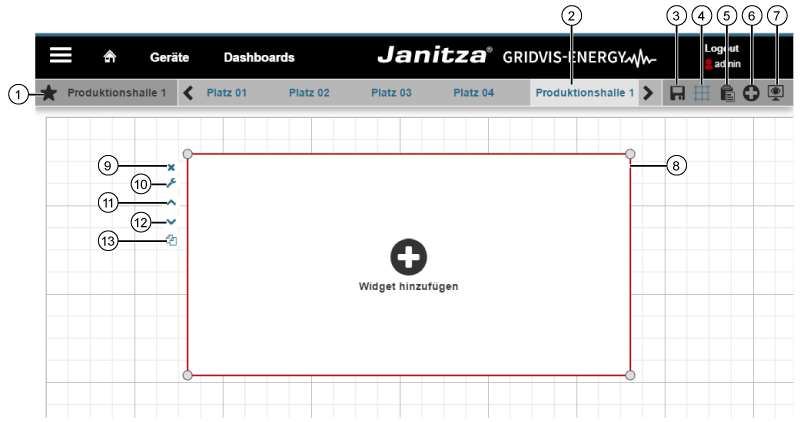
1 Image Removed Image Removed | Indicador «Favoritos» | «panel» «Paneles favoritos» - Paneles favoritos aparece el icono
- Image Modified
|
| 2 | Barra de menús «Favoritos» | - Se muestran los «paneles» marcados con un
- Image Modified
|
3 Image Removed Image Removed | Botón «Guardar panel» | - Se guardan los cambios en el panel.
- Aparece tras realizar los cambios en el panel.
- Aparece en color «azul» cuando azul cuando se mantiene el puntero del ratón sobre el icono.
|
4 Image Removed Image Removed | Botón «Mostrar cuadrícula» | - Se activa y desactiva la cuadrícula.
- Aparece en color «azul» cuando azul cuando la cuadrícula está activada.
|
5 Image Removed Image Removed | Botón «Pegar portapapeles» | - El «widget» El widget (pos. 13) copiado anteriormente en el portapapeles se pega en el panel actual.
- Se puede aplicar en cualquier panel de la «vista vista general de paneles»paneles .
- Aparece en color «azul» cuando azul cuando se mantiene el puntero del ratón sobre el icono.
- Los «widgets» se widgets se posicionan en el panel con el puntero del ratón o con las teclas de dirección del teclado.
|
| 6 |  Image Removed Image Removed | Botón «Añadir visualización» (añadir widget) | | «widgets» en - widgets en el panel.
- Aparece en color
| «azul» cuando - azul cuando se mantiene el puntero del ratón sobre el icono.
|
| 7 |  Image Removed Image Removed | Botón «Mostrar panel» (modo de visualización) | | «modo | visualización»- visualización del panel.
- Aparece una consulta Sí/No si los cambios no se han guardado.
- Aparece en color
| «azul» cuando - azul cuando se mantiene el puntero del ratón sobre el icono.
|
| 8 | «Cuadro del widget» con «vértices» | | «cuadro | widget» activado - widget activado en color rojo.
- Puede escalar el cuadro manteniendo presionado el botón del ratón y arrastrando los
| «vértices» hasta - vértices hasta obtener el tamaño deseado.
|
| 9 |  Image Removed
 | Botón «Eliminar visualización» | | «cuadro | widget»- widget (junto con el contenido).
|
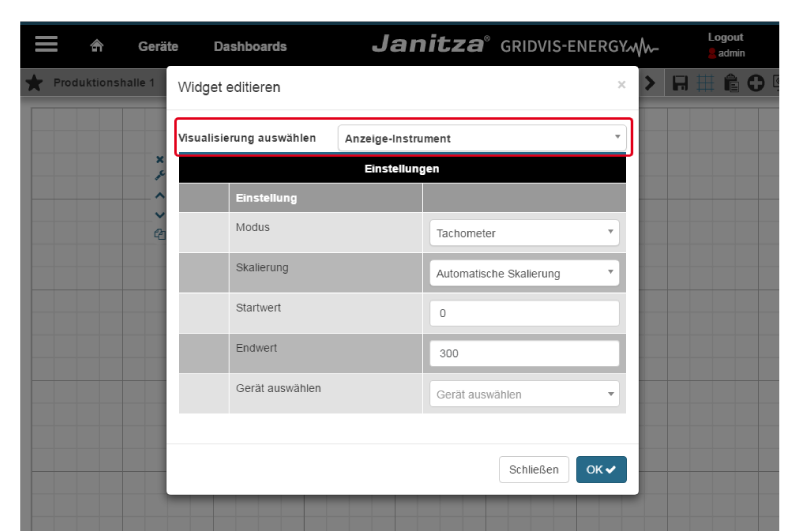
| 10 |  Image Removed Image Removed | Botón «Editar visualización» | | «Editar widget» - Editar widget para configurar
| «widgets» |
| 11 |  Image Removed Image Removed | Botón «Gradualmente hacia arriba» | | «widget» - widget se mueve gradualmente un nivel hacia adelante.
|
| 12 |  Image Removed Image Removed | Botón «Gradualmente hacia abajo» | | «widget» se - widget se mueve gradualmente un nivel hacia atrás.
|
| 13 |  Image Removed Image Removed | Botón «Copiar» | | «widget» marcado - widget marcado en la memoria caché.
- A través de la memoria caché (pos. 5
| « - Image Modified
| » | «widget» - widget en cualquier panel de la
| «vista | paneles» |