
| Sv translation | |||||||||||
|---|---|---|---|---|---|---|---|---|---|---|---|
| |||||||||||
| Anker | allgemeines_raeume | allgemeines_raeume | Allgemeine Beschreibung|||||||||
| Anker | oeffnen_raeume | oeffnen_raeume | Wie öffne ich die Funktion?|||||||||
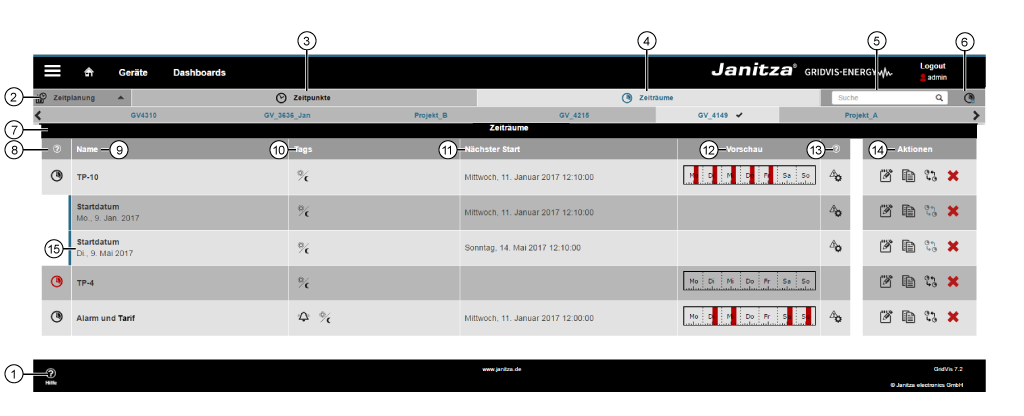
| Anker | uebersicht_raeume | uebersicht_raeume | Funktion Zeitplanung > Fenster Zeiträume - Übersicht|||||||||
| Pos. | Icon | Kurztext | Beschreibung | ||||||||
| 1 | Schaltfläche Hilfe |
| |||||||||
| 2 | Funktion Zeitplanung > Fenster Zeiträume - Übersicht |
| |||||||||
| 3 | | Schaltfläche Zeitpunkte |
| ||||||||
| 4 | | Schaltflächen Zeiträume |
| 5 | Such- und Sortierfilter-Funktion | ||||||
| 6 | Schaltfläche Zeitraum hinzufügen | Ein Klick
| 7 | Bereich Zeiträume | Übersichtsbereich aller Zeiträume und Sub-Zeiträume. | ||||||
| 8 | Spalte Aktiv / Inaktiv | Anzeige Zeitraum Aktiv oder Inaktiv:
| 9 | Name |
| 10 | Tags | Anzeige Tags - Funktionen die im eingestellten Zeitraum (mit Ausnahmen) ausgeführt werden.
| 11 | Nächster Start |
| 12 | Vorschau |
|
| 13 | Spalte Ausnahmen |
| 14 | Bereich Aktionen | Zeigt verschiedene Schaltflächen zur Bearbeitung Ihrer Zeiträume. | ||||||
| |||||||||||
| |||||||||||
| |||||||||||
| 15 | Anzeige Sub-Zeitraum | Sub-Zeiträume erlauben mehrere Ausführungen von Aktionen/Funktionen zu verschiedenen Zeiträumen mit Ausnahmen.
| ||||||||
| Anker | einstellungen_raeume | einstellungen_raeume | Funktion Zeitplanung > Fenster Zeiträume > Einstellungen|||||||||
| Pos. | Icon | Kurztext | Beschreibung | ||||||||
| 1 | Schaltfläche Hilfe |
| |||||||||
| 2 | | Schaltfläche Zurück |
| ||||||||
| 3 | Fenster Zeiträume |
| |||||||||
| 4 | Schaltfläche Einstellungen |
| |||||||||
| 5 | Schaltfläche Ausnahmen |
| |||||||||
| 6 | Schaltfläche Speichern |
| 7 | Anzeige Wochenübersicht | Anzeige der Wochenübersicht der eingestellten Zeiträume mit Ausnahmen:
| 8 | Schaltflächen Kalenderwoche |
| 9 | Auswahl Jahr |
| 10 | Bereich Zeitraum |
|
| 11 | Eingabefeld Gruppenname und Schieberegler Aktiv |
| 12 | Schaltflächen Tags |
Verfügbare Tags/Funktionen:
| 13 | Eingabefeld mit Auswahlliste Startdatum |
| 14 | Auswahlliste Wiederholungstyp | Zeitraum-Optionen (Darstellung mit Symbolen): |
Stündliche Ausführung der unter Tags gewählten Aktion(en)/Funktion(en).
| |||||||||||
Tägliche Ausführung der unter Tags gewählten Aktion(en)/Funktion(en).
| |||||||||||
Wöchentliche Ausführung der unter Tags gewählten Aktion(en)/Funktion(en).
| |||||||||||
Jährliche Ausführung der unter Tags gewählten Aktion(en)/Funktion(en).
| |||||||||||
Einmalige Ausführung der unter Tags gewählten Aktion(en)/Funktion(en).
| 15 | Eingabefeld(er) Zeitraum |
| 16 | Nächster Start |
| 17 | Nächster Anfang in |
| ||
| 18 | Schaltfläche Zeitraum löschen |
| |||||||||
| 19 | Schaltfläche Zeitraum hinzufügen |
| |||||||||
| Anker | ausnahmen_raeume | ausnahmen_raeume | Funktion Zeitplanung > Fenster Zeiträume > Ausnahmen|||||||||
| Pos. | Icon | Kurztext | Beschreibung | ||||||||
| 1 | Schaltfläche Hilfe |
| |||||||||
| 2 | Schaltfläche Zurück |
| |||||||||
| 3 | Fenster Zeiträume |
| |||||||||
| 4 | Schaltfläche Einstellungen |
| |||||||||
| 5 | Register Ausnahmen |
| |||||||||
| 6 | Schaltfläche Speichern |
| 7 | Anzeige Wochenübersicht | Anzeige der Wochenübersicht der eingestellten Zeiträumen mit Ausnahmen:
| 8 | Schaltflächen Kalenderwoche |
| 9 | Auswahl Jahr |
| 10 | Bereich Ausnahmen | Konfigurationsbereich Ausnahmen. | 11 | Auswahlliste Wiederholungstyp | Zeitraum-Optionen (Darstellung mit Symbolen) - Ausnahmen der Ausführung innerhalb des eingestellten Zeitraums: |
Stündliche Ausführung der Ausnahmen für Aktion(en)/Funktion(en).
| |||||||||||
Tägliche Ausführung der Ausnahmen für Aktion(en)/Funktion(en).
| |||||||||||
Wöchentliche Ausführung der Ausnahmen für Aktion(en)/Funktion(en).
| |||||||||||
Jährliche Ausführung der Ausnahmen für Aktion(en)/Funktion(en).
| |||||||||||
Einmalige Ausführung der Ausnahmen für Aktion(en)/Funktion(en).
| 12 | Eingabefeld Startzeit |
| 13 | Nächste Ausnahme |
| 14 | Nächste Ausnahme in |
| ||
| 15 | Schaltfläche Löschen |
| |||||||||
| 16 | Schaltfläche Ausnahmen hinzufügen |
| |||||||||
| Sv translation | |||||||||||
| |||||||||||
| Anker | allgemeines_raeume | allgemeines_raeume | General description|||||||||
| Anker | oeffnen_raeume | oeffnen_raeume | How do I open the function?|||||||||
Zeiträume sind immer in einem bestimmten Intervall aktiv, z. B. von Montag 13:00 Uhr bis Freitag 16:00 Uhr. In diesem Zeitraum sind z. B. Alarmpläne und Alarmquellen aktiv. Diese überwachen Zustände auf Abweichungen oder Störungen. Gehen Sie wie folgt vor, um einen Zeitraum zu erstellen:
Sie gelangen zum Fenster Ausnahmen. Hier definieren Sie wann, der zuvor konfigurierte Zeitraum nicht aktiv sein soll. Gehen Sie wie folgt vor, um eine Ausnahme zu definieren:
|


| Sv translation | ||
|---|---|---|
| ||
Time periods are always active in a certain interval, e.g. from Monday 13:00 to Friday 16:00. Alarm plans and alarm sources are active during this period, for example. These monitor states for deviations or faults. Proceed as follows to create a time period:
The Exceptions window appears. Here you can define when the previously configured time period should not be active. Proceed as follows to define an exception:
|


| Sv translation | ||
|---|---|---|
| ||
Los periodos de tiempo siempre están activos en un determinado intervalo, p. ej., de lunes a las 13:00 horas a viernes a las 16:00 horas. En este periodo de tiempo están activos, p. ej., planes y fuentes de alarma. Estos monitorizan los estados en cuanto a desviaciones o fallos. Para crear un periodo de tiempo, proceda como se indica a continuación:
Accederá a la ventana Excepciones. Aquí podrá definir cuándo no deberá estar activo el periodo de tiempo anteriormente configurado. Para definir una excepción, proceda como se indica a continuación:
|
| Sv translation | ||||||||||||||||||||||||||||||||||||||||||||||||||||||||||||||||||||||||||||||||||||||||||||||||||||||||||||||||||||||||||||||||||||||||||||||||||||||||||||||||||||||||||||||||||||||||||||||||||||||||||||||||||||||||||||||||||||||||||||||
|---|---|---|---|---|---|---|---|---|---|---|---|---|---|---|---|---|---|---|---|---|---|---|---|---|---|---|---|---|---|---|---|---|---|---|---|---|---|---|---|---|---|---|---|---|---|---|---|---|---|---|---|---|---|---|---|---|---|---|---|---|---|---|---|---|---|---|---|---|---|---|---|---|---|---|---|---|---|---|---|---|---|---|---|---|---|---|---|---|---|---|---|---|---|---|---|---|---|---|---|---|---|---|---|---|---|---|---|---|---|---|---|---|---|---|---|---|---|---|---|---|---|---|---|---|---|---|---|---|---|---|---|---|---|---|---|---|---|---|---|---|---|---|---|---|---|---|---|---|---|---|---|---|---|---|---|---|---|---|---|---|---|---|---|---|---|---|---|---|---|---|---|---|---|---|---|---|---|---|---|---|---|---|---|---|---|---|---|---|---|---|---|---|---|---|---|---|---|---|---|---|---|---|---|---|---|---|---|---|---|---|---|---|---|---|---|---|---|---|---|---|---|---|---|---|---|---|---|---|---|---|---|---|---|---|---|---|---|---|
| ||||||||||||||||||||||||||||||||||||||||||||||||||||||||||||||||||||||||||||||||||||||||||||||||||||||||||||||||||||||||||||||||||||||||||||||||||||||||||||||||||||||||||||||||||||||||||||||||||||||||||||||||||||||||||||||||||||||||||||||
I periodi sono sempre attivi in un determinato intervallo, ad esempio da lunedì alle 13:00 a venerdì alle 16:00. Ad esempio, durante questo periodo, i piani di allarme e le sorgenti di allarme sono attivi e monitorano gli stati per rilevare eventuali deviazioni o malfunzionamenti. Per creare un periodo, procedere come segue:
Viene visualizzata la finestra Eccezioni. Qui è possibile definire quando il periodo precedentemente configurato non deve essere attivo. Per impostare un'eccezione, procedere come segue:
| ||||||||||||||||||||||||||||||||||||||||||||||||||||||||||||||||||||||||||||||||||||||||||||||||||||||||||||||||||||||||||||||||||||||||||||||||||||||||||||||||||||||||||||||||||||||||||||||||||||||||||||||||||||||||||||||||||||||||||||||
| Anker | uebersicht_raeume | uebersicht_raeume | "Time planning" function > "Time periods" window - Overview
Item | Icon | Short text | Description |
|---|---|---|---|
1 | | “Help” button |
|
2 | "Time planning" function > "Time periods" window - Overview |
| |
3 |
| “Time points” button |
|
4 |
| "Time periods" buttons |
|
5 |
| Searching and sorting filter function |
|
6 | "Insert time period" button | One click
| |
7 |
| "Time periods” area | Overview area with all time periods and sub-time periods. |
8 |
| "Active" / "Inactive" column | Display of "Active" or "Inactive" time period:
|
9 |
| Name |
|
10 |
| Tags | Display of "Tags" - functions that are executed within the set time period (with exceptions).
|
11 |
| "Next start" |
|
12 |
| “Preview” |
|
13 | | "Exceptions" column |
|
14 |
| "Actions" area | Shows various buttons for editing your time periods. |
|
| ||
|
| ||
|
| ||
|
| ||
15 |
| Display of "sub-time period" | Sub-time periods enable the multiple execution of actions/functions in various time periods with exceptions.
|
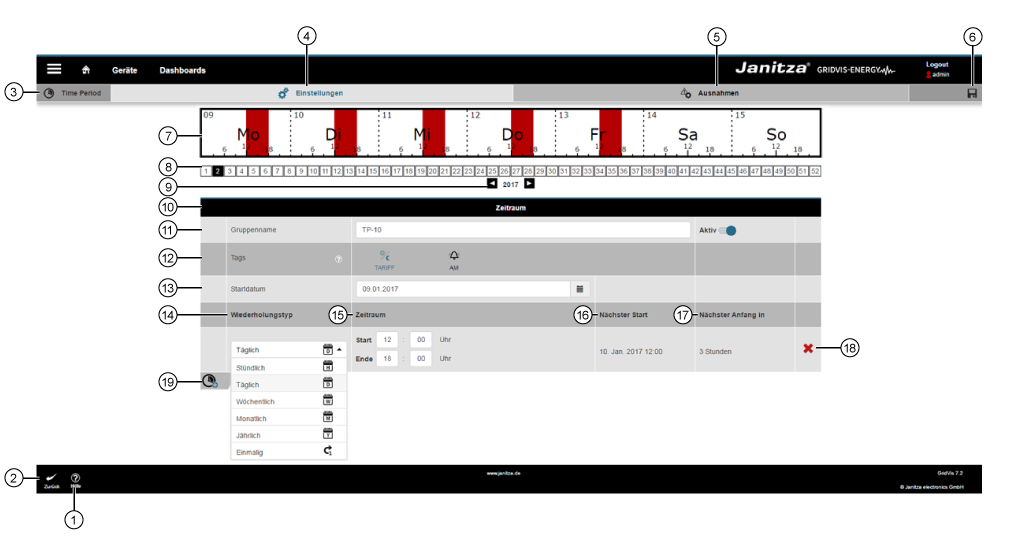
Example “Settings” for an action with the time period displayed at the top in the figure:
- Display of the action: 2. Calender week 2017. (Exception: Sat. and Sun. - see settings "Exceptions").
- Time period name/group name: TP-10.
- (Action) time periods apply for the function "Tariff".
- Start date of the action: 09/01/2017.
- Daily action in the time from 12:00 to 18:00 hrs (red area).
- Next start of the action on 10 Jan. 2017 at 12:00 hrs - in 3 hours.
Item
Icon
Short text
Description
1
![]()
“Help” button
- Direct help.
- Leads to this help screen. Closing the help screen takes you back to the previous screen.
2
![]()
“Back” button
- One click takes you back to the window Time planning > Time periods “Overview”.
3
"Time periods" window
- You are in the "Time periods" window, in the "Time planning" function.
4
“Settings” button
- One click opens the "Settings" for the "Time periods" function.
- Configuration of the time periods for the functions Tariff and Alarm management.
5
“Exceptions” button
6
“Save” button
- One click saves your settings/configuration.
- The saved settings in the GridVis web interface (Energy) are also available and can be configured in the GridVis Desktop.
7
“Week overview” display
Display of the week overview for the set time periods with exceptions:
- Days of the month.
- Weekday.
- Hour scale (bottom border).
- The set time periods (shown in “red”) of the executions with exceptions (in the example: Sat. and Sun.).
8
"Calendar week" buttons
- Selection of the calendar week for display of the "Week overview".
9
Selection of the "Year"
- Year navigation - left/right - for display of the "Week overview".
10
"Time period" area
- "Time period" configuration area.
11
Input field "Group name" and slide controller "Active"
- Input field for the name of your time period. Names apply for the group.
- Further configurations (sub-time periods) appear as drop-down lines with a start date in the name column.
- The slide controller "Active" activates your configured time period. The preview in the overview "Time periods" of the "Time planning" window is active (black "symbol
 ").
"). - The "Time periods" overview of the "Time planning" window shows deactivated "Time periods" with a red "symbol
 ".
".
12
"Tags" buttons
- One click activates the corresponding tag/function. Selected tags/functions appear in blue.
- The set time period applies for activated tags/functions.
- Multiple selection of tags/functions is possible.
Available tags/functions:
- Tariff tag "
 ". Tool tip: "Time period can be used as tariff".
 - AM tag (alarm management) "
 ". Tool tip: "Time period can be used in the alarm management".
| Info | ||
|---|---|---|
| ||
The tariff name (time period of the tariff formation):
|
13
Input field with selection list "Start date"
- Input field or selection list "Start date" of the time period.
- Default setting: "Today".
14
"Repetition type" selection list
Time period options (representation with symbols):
Hourly execution of the action(s)/function(s) selected under "Tags".
"Time period" setting (item 15):
- "Start” input field: Input of the start minute
- "End" input field: Input of the end minute.
![]() Daily
Daily
Daily execution of the action(s)/function(s) selected under "Tags".
"Time period" setting (item 15):
- "Start” input field: Input of the start hour and minute
- "End" input field: Input of the end hour and minute.
![]() Weekly
Weekly
Weekly execution of the action(s)/function(s) selected under "Tags".
"Time period" setting (item 15):
- "Start" input field (hour and minute) with selection list "Days" (week day).
- "End" input field (hour and minute) with selection list "Days" (week day).
![]() Monthly
Monthly
Monthly execution of the action(s)/function(s) selected under "Tags".
"Time period" setting (item 15):
- "Start" input field (hour and minute) with selection list "Days of the month" and button "Last day
 " .
" . - "End" input field (hour and minute) with selection list "Days of the month" and button "Last day " .
![]() Yearly
Yearly
Yearly execution of the action(s)/function(s) selected under "Tags".
"Time period" setting (item 15):
- "Start" input field (hour and minute) with selection lists "Day" (days of the month) and "Month" .
- "End" input field (hour and minute) with selection lists "Day" (days of the month) and "Month" .
![]() One-off
One-off
One-off execution of the action(s)/function(s) selected under "Tags".
"Time period" setting (item 15):
- "Start" input field (date and time) with selection list "Date".
- "End" input field (date and time) with selection list "Date".
15
"Time period" input field(s)
- Time period selection with start and end time.
- Depending on the setting "Repetition type"
(see item 14).
16
Next start
- Display of the next execution (day, date, time).
17
Next start in
- Display of the remaining time until next execution.
18
"Delete time period" button
- Deletes the respective "time period".
19
"Insert time period" button
- One click creates a new configuration line "Time period" with the entries "Repetition type", "Time period", "Next start", "Next start in".
- Creation of multiple time periods possible (sub-time periods).
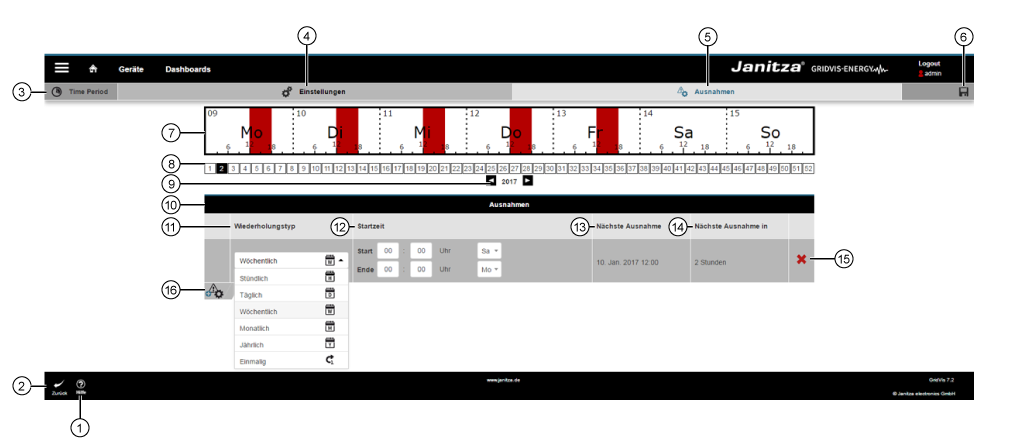
Example “exceptions” for the set time period:
- Display of the action exceptions: 2. Calender week 2017.
- Exception: Weekly, Sat. and Sun. (inclusive) - Setting "Mon.".
- Next exception to the action on 10 Jan. 2017 at 12:00 hrs - in 2 hours.
Item
Icon
Short text
Description
1
“Help” button
- Direct help.
- Button leads to this help screen. Closing the help screen takes you back to the previous screen.
2
“Back” button
- One click takes you back to the window Time planning > Time periods “Overview”.
3
"Time periods" window
- You are in the "Time periods" window, in the "Time planning" function.
4
“Settings” button
5
"Exceptions" tab
6
“Save” button
- One click saves your settings/configuration.
- The saved settings in the GridVis web interface (Energy) are also available and can be configured in the GridVis Desktop.
7
“Week overview” display
Display of the week overview for the set time periods with exceptions:
- Days of the month.
- Weekday.
- Hour scale (bottom border).
- The set time periods (shown in “red”) of the executions with exceptions (in the example: Sat. and Sun.).
8
"Calendar week" buttons
- Selection of the calendar week for display of the "Week overview".
9
Selection of the "Year"
- Year navigation - left/right - for display of the "Week overview".
10
"Exceptions" area
"Exceptions" configuration area.
11
"Repetition type" selection list
Time period options (representation with symbols) - Exceptions to execution within the set time period:
Hourly execution of the exceptions for action(s)/function(s).
"Start time" setting (item 12):
- "Start” input field: Input of the start minute.
- "End" input field: Input of the end minute.
![]() Daily
Daily
Daily execution of the exceptions for action(s)/function(s).
"Start time" setting (item 12):
- "Start” input field: Input of the start hour and minute.
- "End" input field: Input of the end hour and minute.
![]() Weekly
Weekly
Weekly execution of the exceptions for action(s)/function(s).
"Start time" setting (item 12):
- "Start" input field (hour and minute) with selection list "Days" (week day).
- "End" input field (hour and minute) with selection list "Days" (week day).
![]() Monthly
Monthly
Monthly execution of the exceptions for action(s)/function(s).
"Start time" setting (item 12):
- "Start" input field (hour and minute) with selection list "Days of the month" and button "Last day " .
- "End" input field (hour and minute) with selection list "Days of the month" and button "Last day " .
![]() Yearly
Yearly
Yearly execution of the exceptions for action(s)/function(s).
"Start time" setting (item 12):
- "Start" input field (hour and minute) with selection lists "Day" (days of the month) and "Month" .
- "End" input field (hour and minute) with selection lists "Day" (days of the month) and "Month" .
![]() One-off
One-off
One-off execution of the exceptions for action(s)/function(s).
"Start time" setting (item 12):
- "Start" input field (date and time) with selection list "Date".
- "End" input field (date and time) with selection list "Date".
12
"Start time" input field
- Exceptions selection with start and end time.
- Depending on the setting "Repetition type"
(see item 11).
13
Next exception
- Display of the next exception to execution (date, time).
14
Next exception in
- Display of the remaining time until next exception to execution.
15
"Delete" button
- Deletes the respective "exception" for the time period.
16
"Insert exceptions" button
- Adds a new time period exception.
| language | es |
|---|
En la pestaña «Periodos de tiempo» de la función «Programación», puede configurar periodos de tiempo para acciones y funciones, como las siguientes:
- Creación de tarifas.
- Gestión de alarmas.
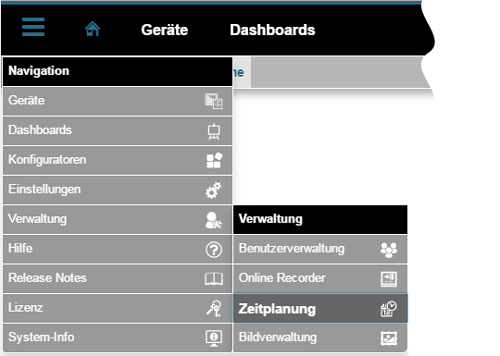
- En la barra de navegación, haga clic en el botón«Navegación
 ».
». - La función «Programación
 » se encuentra en el menú desplegable de «Administración
 ».
». - En la ventana «Programación», haga clic en el botón «Periodos de tiempo».
Fig.: menú «Navegación» >menú desplegable «Administración» > «Programación»
| Pos. | Icono | Texto breve | Descripción |
|---|---|---|---|
| 1 | Botón «Ayuda» |
| |
| 2 | Función «Programación» > ventana «Periodos de tiempo»: vista general |
| |
| 3 | | Botón «Puntos de tiempo» |
|
| 4 | | Botón «Periodos de tiempo» |
|
| 5 | Función para filtrar el orden y la búsqueda | ||
| 6 | Botón «Añadir periodo de tiempo» | Haciendo clic se llevan a cabo las siguientes acciones:
| |
| 7 | Panel «Periodos de tiempo» | Panel con una vista general de todos los periodos y subperiodos de tiempo. | |
| 8 | Columna «Activo» / «Inactivo» | Visualización del periodo de tiempo como «activo» o «inactivo»:
| |
| 9 | Nombre |
| |
| 10 | Etiquetas | Indicador «Etiquetas»: funciones que se ejecutan en el periodo de tiempo establecido (con excepciones).
| |
| 11 | «Próximo inicio» |
| |
| 12 | «Vista previa» |
| |
| 13 | Columna «Excepciones» |
| |
| 14 | Panel «Acciones» | Se muestran diferentes botones para editar sus periodos de tiempo. | |
| |||
| |||
| |||
| |||
| 15 | Visualización«Subperiodo de tiempo» | Los subperiodos de tiempo permiten llevar a cabo varias ejecuciones de acciones o funciones de distintos periodos de tiempo con excepciones.
|
Ejemplo de «ajustes» de una acción con el periodo de tiempo mostrado en la figura de arriba:
- Visualización de la acción: segunda semana del año 2017. (Excepción: sáb. y dom.; véanse los ajustes de las «excepciones»).
- Nombre del periodo de tiempo/Nombre del grupo: TP-10.
- Los periodos de tiempo de acciones se aplican a la función «Tarifa».
- Fecha de inicio de la acción: 09/01/2017.
- Acción diaria entre las 12:00 y las 18:00 horas (área de color rojo).
- Próximo inicio de la acción: 10 ene. 2017 a las 12:00 horas: en 3 horas.
| Pos. | Icono | Texto breve | Descripción | |||||
|---|---|---|---|---|---|---|---|---|
| 1 | Botón «Ayuda» |
| ||||||
| 2 | | Botón «Atrás» |
| |||||
| 3 | Ventana «Periodos de tiempo» |
| ||||||
| 4 | Botón «Ajustes» |
| ||||||
| 5 | Botón «Excepciones» |
| ||||||
| 6 | Botón «Guardar» |
| ||||||
| 7 | Visualización «Vista general de la semana» | Visualización de la vista general de la semana de los periodos de tiempo establecidos con excepciones:
| ||||||
| 8 | Botones «Número de la semana» |
| ||||||
| 9 | Selección «Año» |
| ||||||
| 10 | Panel «Periodo de tiempo» |
| ||||||
| 11 | Campo de entrada«Nombre del grupo»y control deslizante«activo» |
| ||||||
| 12 | Botones«Etiquetas» |
Etiquetas y funciones disponibles:
| ||||||
| 13 | Campo de entrada con lista de selección«Fecha de inicio» |
| ||||||
| 14 | Lista de selección«Tipo de repetición» | Opciones de periodos de tiempo (representación con símbolos): | ||||||
Ejecución horaria de las acciones o funciones elegidas en «Etiquetas» .
| ||||||||
Ejecución diaria de las acciones o funciones elegidas en «Etiquetas» .
| ||||||||
Ejecución semanalde las acciones o funciones elegidas en «Etiquetas» .
| ||||||||
Ejecución mensualde las acciones o funciones elegidas en «Etiquetas» .
| ||||||||
Ejecución anual de las acciones o funciones elegidas en «Etiquetas» .
| ||||||||
Ejecución puntual (una vez) de las acciones o funciones elegidas en «Etiquetas» .
| ||||||||
| 15 | Campo(s) de entrada «Periodo de tiempo» |
| ||||||
| 16 | Próximo inicio |
| ||||||
| 17 | Próximo comienzo en |
| ||||||
| 18 | Botón«Eliminar periodo de tiempo» |
| ||||||
| 19 | Botón «Añadir periodo de tiempo» |
|
Ejemplo de «excepciones» para el periodo de tiempo establecido:
- Visualización de las excepciones de la acción: segunda semana del año 2017.
- Excepción: semanal; sáb. y dom. (incluido); ajuste «lun.».
- Próxima excepción de la acción: 10 ene. 2017 a las 12:00 horas: en 2 horas.
- Ayuda directa.
- Con el botón se accede a esta página de ayuda. Al cerrar la página de ayuda se accede a la página anterior.
- Haciendo clic se vuelve a la ventana «Programación» > «Vista general» de los periodos de tiempo.
- Usted se encuentra ahora en la ventana «Periodos de tiempo» de la función «Programación».
- Haciendo clic se abren los «ajustes»de la función«Periodos de tiempo».
- Configuración de los periodos de tiempo para las funciones de tarifas y gestión de alarmas.
- Haciendo clic se abren las «excepciones»de la función«Periodos de tiempo».
- Configuración de las excepciones de los periodos de tiempo en los cuales no se ejecutan las funciones de tarifas y gestión de alarmas.
- Haciendo clic se guardan sus ajustes o configuración.
- Los ajustes guardados en la interfaz web de GridVis (Energy) también están disponibles y pueden configurarse en GridVis Desktop.
Visualización de la vista general de la semana de los periodos de tiempo establecidos con excepciones:
- Días del mes.
- Día de la semana.
- Escala de horas (borde inferior).
- Periodos de tiempo establecidos (representados en color «rojo») para las ejecuciones con excepciones (en el ejemplo, sáb. y dom.).
- Selección del número de semana para la visualización «Vista general de la semana».
- Navegación de año —izquierda y derecha— para la visualización «Vista general de la semana».
Opciones de periodos de tiempo (representación con símbolos): excepciones de la ejecución dentro del periodo de tiempo ajustado:
Ejecución horaria de las excepciones para las acciones o funciones.
Ajuste «Tiempo de inicio» (pos. 12):
- Campo de entrada «Inicio»: introducción del minuto de inicio.
- Campo de entrada«Fin»: introducción del minuto de finalización.
Ejecución diaria de las excepciones para las acciones o funciones.
Ajuste «Tiempo de inicio» (pos. 12):
- Campo de entrada «Inicio»: introducción de la hora y el minuto de inicio.
- Campo de entrada«Fin»: introducción de la hora y el minuto de finalización.
Ejecución semanal de las excepciones para las acciones o funciones.
Ajuste «Tiempo de inicio» (pos. 12):
- Campo de entrada «Inicio» (hora y minuto) con lista de selección«Días» (día de la semana).
- Campo de entrada«Fin» (hora y minuto) con lista de selección«Días» (día de la semana).
Ejecuciónmensual de las excepciones para las acciones o funciones.
Ajuste «Tiempo de inicio» (pos. 12):
- Campo de entrada «Inicio» (hora y minuto) con lista de selección«Días del mes» y los botones «Último día » .
- Campo de entrada«Fin» (hora y minuto) con lista de selección «Días del mes» y los botones «Último día » .
Ejecución anual de las excepciones para las acciones o funciones.
Ajuste «Tiempo de inicio» (pos. 12):
- Campo de entrada «Inicio» (hora y minuto) con las listas de selección «Día»(días del mes) y «Mes».
- Campo de entrada «Fin» (hora y minuto) con las listas de selección «Día»(días del mes) y «Mes».
Ejecución puntual (una vez) de las excepciones para las acciones o funciones.
Ajuste «Tiempo de inicio» (pos. 12):
- Campo de entrada «Inicio» (fecha y hora) con lista de selección «Fecha» .
- Campo de entrada «Fin» (fecha y hora) con lista de selección «Fecha» .
- Selección de excepción con tiempo de inicio y finalización.
- En función del ajuste «Tipo de repetición» (véase pos. 11).
| Info |
|---|
Si aparece el mensaje de error«¡El rango de tiempo es demasiado grande!»,cambie el rango de tiempo. |
- Visualización de la próxima excepción de la ejecución(fecha y hora).
- Visualización del tiempo restante hasta la próxima excepción de la ejecución.
- Se elimina la correspondiente «excepción» para el periodo de tiempo.
- Se añade una nueva excepción del periodo de tiempo.
| language | it |
|---|
> Funzione “Periodi" - impostazioni
> Funzione “Periodi" - eccezioni
Nella scheda “Periodi" della funzione “Programmazione" è possibile configurare i periodi in cui devono avvenire azioni e funzioni, come ad es.
- Formazione delle tariffe.
- Gestione degli allarmi.
- Fare clic sul pulsante “Navigazione” nella barra di navigazione .
- La funzione “Programmazione " si raggiunge nel menu a discesa alla voce “Gestione ".
- Fare clic nella finestra “Programmazione" sul tasto “Periodi".
Fig.: Menu “Navigazione” >Menu a comparsa "Amministrazione" > “Programmazione"
- Guida diretta.
- Porta a questa pagina della guida. Chiudendo la pagina della guida si torna alla pagina precedente.
- Funzione "Programmazione" come pulsante per il menu a discesa “Progetti".
- Non appena il numero di progetti nel sistema è >1, appare il menu a discesa “Progetti".
- Il simbolo "
 " contrassegna il progetto attivo.
 - La funzione "Programmazione" contiene i pulsanti “Momenti" e “Periodi". Facendo clic si accede alla relativa panoramica.
- Con un clic si accede alla panoramica “Momenti".
- I pulsanti attivi vengono visualizzati in "Blu".
- Con un clic si accede alla panoramica “Periodi".
- I pulsanti attivi vengono visualizzati in "Blu".
Facendo clic
- crea un nuovo “Momento".
- apre nella finestra “Impostazioni" la funzione “Periodi".
Periodo di visualizzazione “Attivo" o “Inattivo":
- Periodo attivo = "simbolo “ nero
- Periodo inattivo = "simbolo" rosso
- Visualizzazione del nome del periodo.
- I nomi si applicano al gruppo.
- Ulteriori configurazioni (periodi secondari) vengono visualizzati come righe a comparsa con la data di inizio nella colonna del nome.
Visualizzazione "Tag" - Funzioni eseguite nel periodo stabilito (salvo eccezioni).
Tag disponibili (funzioni):
- Tag tariffa ""
- Tag AM (Gestione degli allarmi) ""
- Visualizzazione della prossima esecuzione (giorno della settimana, data, ora).
- Rappresentazione grafica "Panoramica settimanale" della settimana in corso (colore dei periodi = rosso).
- Il simbolo indica che sono configurate eccezioni per questo “Periodo".
- Apre nella finestra “Impostazioni" la funzione “Periodi".
- Copia il “Periodo" con i “Periodi secondari", se presenti.
- Apre una copia “Impostazioni" della funzione "Periodi" da modificare.
- Crea “Periodi secondari".
- Viene visualizzata la finestra "Impostazioni" di un nuovo periodo secondario.
- Cancella il periodo interessato tramite un “prompt sì/no".
I periodi secondari consentono l'esecuzione multipla di azioni/funzioni in tempi diversi, con alcune eccezioni.
- "periodi secondari” vengono visualizzati come righe a comparsa con la data di inizio nella colonna del nome.
- Un bordo blu contrassegna il “Periodo secondario".
Esempio di "Impostazioni" di un'azione con il periodo mostrato nella figura precedente:
- Visualizzazione dell'azione: 2. Settimana calendariale 2017. (Eccezione: Sab. e dom. - vedere impostazioni "Eccezioni").
- Nome del periodo/nome del gruppo: TP-10.
- Periodi (azioni) si applicano alla funzione “Tariffa”.
- Data di inizio dell'azione: 09/01/2017
- Azione giornaliera nel periodo dalle 12:00 alle 18:00 (area rossa).
- Il prossimo inizio dell'azione è il 10 gen. 2017 alle 12:00 - tra 3 ore.
- Guida diretta.
- Porta a questa pagina della guida. Chiudendo la pagina della guida si torna alla pagina precedente.
- Un clic riporta alla finestra Programmazione > Periodi “Panoramica".
- Ci si trova nella finestra “Periodi" della funzione “Programmazione".
- Con un clic si apre la finestra “Impostazioni" della funzione “Periodi".
- Configurazione dei periodi per le funzioni tariffe e gestione degli allarmi.
- Con un clic si aprono le "Eccezioni" della funzione “Periodi".
- Configurazione delle eccezioni dei periodi per le funzioni tariffe e gestione degli allarmi.
- Con un clic si salvano le impostazioni/configurazioni.
- Le impostazioni salvate nell'interfaccia web di GridVis (Energy) sono disponibili e configurabili anche in GridVis desktop.
Visualizzazione della panoramica settimanale dei periodi impostati con eccezioni:
- Giorno del mese.
- Giorno della settimana.
- Scala oraria (bordo inferiore).
- I periodi di esecuzione (linee “rosse”) con eccezioni (nell'esempio: Sab. e dom.).
- Selezione della settimana calendariale per la schermata “Panoramica settimanale".
- Navigazione anno - sinistra/destra - per la schermata “Panoramica settimanale".
- Area di configurazione “Periodo".
- Campo di immissione del nome del periodo. I nomi si applicano al gruppo.
- Ulteriori configurazioni (periodi secondari) vengono visualizzati come righe a comparsa con la data di inizio nella colonna del nome.
- Il cursore "Attivo" attiva il periodo configurato. L'anteprima nella panoramica “Periodi" della finestra “Programmazione" è attiva (“Simbolo” nero ).
- La panoramica “Periodi" della finestra “Programmazione" mostra i “Periodi" disattivati con un "simbolo“ rosso.
- Un clic attiva il tag / la funzione corrispondente. I tag/ le funzioni selezionate appaiono in blu.
- Il periodo impostato si applica ai tag o alle funzioni attivate.
- È possibile la selezione multipla di tag/funzioni.
Tag/funzioni disponibili:
- Tag tariffa "“. Tooltip: "Il periodo può essere utilizzato come tariffa".
- Tag AM (Gestione degli allarmi) "“. Tooltip: "Il periodo può essere utilizzato nella gestione degli allarmi".
| Info | ||
|---|---|---|
| ||
Il nome della tariffa (periodo di formazione della tariffa):
|
- Campo di immissione o elenco di selezione “data di inizio" del periodo.
- Preimpostazione: "Oggi".
Esecuzione oraria delle azioni o delle funzioni selezionate in "Tag".
Configurazione “Periodo" (Pos. 15):
- Campo di immissione “Inizio": Inserire il minuto di inizio
- Campo di immissione “Fine": Inserire il minuto di fine.
Esecuzione giornaliera delle azioni o delle funzioni selezionate in "Tag".
Configurazione “Periodo" (Pos. 15):
- Campo di immissione “Inizio": Immissione dell'ora e dei minuti di inizio
- Campo di immissione “Fine": Immissione dell'ora e dei minuti di fine.
Esecuzione settimanale delle azioni o delle funzioni selezionate in "Tag".
Configurazione “Periodo" (Pos. 15):
- Campo di immissione “Inizio" (Ora e minuti) con elenco di selezione “Giorni" (Giorno della settimana).
- Campo di immissione “Fine" (Ora e minuti) con elenco di selezione “Giorni" (Giorno della settimana).
Esecuzione mensile delle azioni o delle funzioni selezionate in "Tag".
Configurazione “Periodo" (Pos. 15):
Campo di immissione “Fine" (Ora e minuti) con elenco di selezione"Giorno del mese" e pulsante "Ultimo giorno
Esecuzione annuale delle azioni o delle funzioni selezionate in "Tag".
Configurazione “Periodo" (Pos. 15):
- Campo di immissione “Inizio" (Ora e minuti) con gli elenchi di selezione “Giorno" (Giorno del mese) e “Mese".
- Campo di immissione “Fine" (Ora e minuti) con gli elenchi di selezione “Giorno" (Giorno del mese) e “Mese".
Esecuzione unica delle azioni o delle funzioni selezionate in "Tag".
Configurazione “Periodo" (Pos. 15):
- Campo di immissione “Inizio" (Data e ora) con elenco di selezione “Data".
- Campo di immissione “Fine" (Data e ora) con elenco di selezione “Data".
- Selezione del periodo con ora di inizio e fine.
- A seconda dell'impostazione "Tipo di ripetizione" (vedere pos. 14).
| Info |
|---|
Se viene visualizzato il messaggio di errore "L'intervallo di tempo è troppo ampio!" configurare un intervallo di tempo più ridotto. |
- Visualizzazione della prossima esecuzione (giorno, data, ora).
- Schermata del tempo rimanente fino alla prossima esecuzione.
- Cancella il “periodo" interessato.
- Con un clic si crea una nuova linea di configurazione “Periodo" con le voci "Tipo di ripetizione", “Periodo", “Prossimo inizio", “Prossimo inizio tra".
- Possibilità di creare più periodi (Periodi secondari).
Esempio "Eccezioni" per il periodo impostato:
- Visualizzazione delle eccezioni dell'azione: 2. Settimana calendariale 2017.
- Eccezione: Settimanale, sab. e dom. (compresi) - impostazione “lun”.
- Prossima eccezione dell'azione il 10 gen. 2017 alle 12:00 - tra 2 ore.
- Guida diretta.
- Il pulsante porta a questa pagina della guida. Chiudendo la pagina della guida si torna alla pagina precedente.
- Un clic riporta alla finestra Programmazione > Periodi “Panoramica".
- Ci si trova nella finestra “Periodi" della funzione “Programmazione".
- Con un clic si aprono le "Impostazioni" della funzione “Periodi".
- Configurazione dei periodi per le funzioni tariffe e gestione degli allarmi.
- Con un clic si apre la finestra “Eccezioni" della funzione “Periodi".
- Configurazione delle eccezioni dei periodi in cui le funzioni di gestione delle tariffe e degli allarmi non vengono eseguite.
- Con un clic si salvano le impostazioni/configurazioni.
- Le impostazioni salvate nell'interfaccia web di GridVis (Energy) sono disponibili e configurabili anche in GridVis desktop.
Visualizzazione della panoramica settimanale dei periodi impostati con eccezioni:
- Giorno del mese.
- Giorno della settimana.
- Scala oraria (bordo inferiore).
- I periodi di esecuzione (linee “rosse”) con eccezioni (nell'esempio: Sab. e dom.).
- Selezione della settimana calendariale per la schermata “Panoramica settimanale".
- Navigazione anno - sinistra/destra - per la schermata “Panoramica settimanale".
Opzioni del periodo (rappresentazione con simboli) - Eccezioni dell'esecuzione entro il periodo impostato:
Esecuzione oraria delle eccezioni per le azioni/funzioni.
Impostazione “Ora di inizio" (Pos. 12):
- Campo di immissione “Inizio": Inserire il minuto di inizio.
- Campo di immissione “Fine": Inserire il minuto di fine.
Esecuzione giornaliera delle eccezioni per le azioni/funzioni.
Impostazione “Ora di inizio" (Pos. 12):
- Campo di immissione “Inizio": Immissione dell'ora e dei minuti di inizio.
- Campo di immissione “Fine": Immissione dell'ora e dei minuti di fine.
Esecuzione settimanale delle eccezioni per le azioni/funzioni.
Impostazione “Ora di inizio" (Pos. 12):
- Campo di immissione “Inizio" (Ora e minuti) con elenco di selezione “Giorni" (Giorno della settimana).
- Campo di immissione “Fine" (Ora e minuti) con elenco di selezione “Giorni" (Giorno della settimana).
Esecuzione mensiledelle eccezioni per le azioni/funzioni.
Impostazione “Ora di inizio" (Pos. 12):
Campo di immissione “Fine" (Ora e minuti) con elenco di selezione"Giorno del mese" e pulsante "Ultimo giorno
Esecuzione annualedelle eccezioni per le azioni/funzioni.
Impostazione “Ora di inizio" (Pos. 12):
- Campo di immissione “Inizio" (Ora e minuti) con gli elenchi di selezione “Giorno" (Giorno del mese) e “Mese".
- Campo di immissione “Fine" (Ora e minuti) con gli elenchi di selezione “Giorno" (Giorno del mese) e “Mese".
Esecuzione unicadelle eccezioni per le azioni/funzioni.
Impostazione “Ora di inizio" (Pos. 12):
- Campo di immissione “Inizio" (Data e ora) con elenco di selezione “Data".
- Campo di immissione “Fine" (Data e ora) con elenco di selezione “Data".
- Selezione dell'eccezione con ora di inizio e fine.
- A seconda dell'impostazione "Tipo di ripetizione" (vedere pos. 11).
| Info |
|---|
Se viene visualizzato il messaggio di errore "L'intervallo di tempo è troppo ampio!" modificare l’intervallo. |
- Visualizzazione dell'eccezione di esecuzione successiva (Data, ora).
- Schermata del tempo rimanente fino alla prossima eccezione dell’esecuzione.
- Elimina la relativa “Eccezione" per il periodo.