
Gültig für
| GridVis-Editionen | Software-Plattform |
|---|---|
|
|

 Benutzerverwaltung
Über die Benutzerverwaltung vergeben und verwalten Sie einfach und intuitiv Zugriffsrechte. Den Status des angemeldeten Benutzers zeigt ein farbiges Icon in der Navigationsleiste oben rechts, vor dem Benutzernamen. Die Anmeldung des Benutzers erfolgt ebenfalls im oberen rechten Teil der Navigationsleiste. Nachfolgend sind die drei Bereiche der Benutzerverwaltung (Benutzerdaten, Rollen und Aktionen) beschrieben. Rollen sind ein Zusammenschluss von Rechten und geben übergeordnet an, welche Zugriffsrechte der Benutzer hat.
Hinweis
Eine erstellte Benutzerverwaltung in der GridVis-Web wird auch im Projekt der GridVis-Desktop dargestellt.
Besonderheiten: Der Benutzer admin
- ist im System immer vorhanden.
- kann nicht deaktiviert oder gelöscht werden.
- besitzt alle 5 Rollen (nicht entfernbar).
- besitzt eingeschränkte Profil-Einstellungen.
- Name kann nicht geändert werden.
Hinweis
- Ändern Sie das Passwort nach der ersten Konfiguration.
- Das Passwort des Benutzers admin ist auch unter Menüeintrag Einstellungen > System > Server konfigurierbar.
Ihr neues Passwort muss folgende Bedingungen erfüllen:
- Es muss zwischen 8 und 20 Zeichen lang sein.
- Es muss mindestens ein Sonderzeichen und eine Zahl enthalten.
- Es muss mindestens einen Kleinbuchstaben und einen Großbuchstaben enthalten.
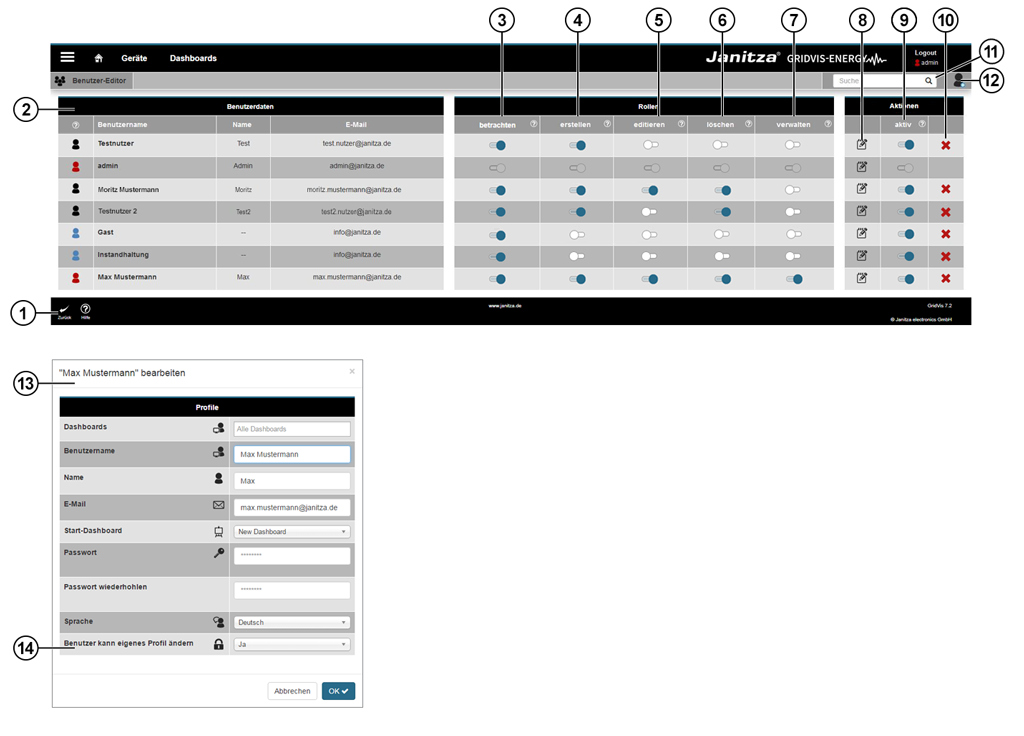
Menü -> Benutzerverwaltung
| Position | Beschreibung |
|---|---|
| 1 |
|
| 2 |
|
| 3 | Mit aktivierter Check-Box kann der Benutzer:
Ein Benutzer, der nur die Rolle betrachten besitzt, bekommt vom System ein blaues Icon |
| 4 | Mit aktivierter Check-Box darf der Benutzer in den Projekten
Hinweis Der Benutzer darf mit diesem Recht nicht automatisch editieren oder löschen. |
| 5 | Mit aktivierter Check-Box darf der Benutzer in den Projekten
Hinweis Der Benutzer darf mit diesem Recht keine Dashboards/Templates erstellen oder Bilder hochladen. |
| 6 | Mit aktivierter Check-Box darf der Benutzer in den Projekten
Hinweis Der Benutzer darf mit diesem Recht keine hinzufügen- oder editieren-Operation ausführen. |
| 7 | Mit aktivierter Check-Box hat der Benutzer
|
| 8 | Über die Schaltfläche konfigurieren Sie die Benutzerdaten des ausgewählten Benutzers. |
| 9 | Mit diesen Kontrollkästchen aktivieren oder deaktivieren Sie Benutzer. Deaktivierte Benutzer
Aktivierte Benutzer
|
| 10 | Mit dieser Schaltfläche löschen Sie Benutzer aus dem System. Hinweis Die Aktion löschen verlangt eine Bestätigung. |
| 11 | Im Such- und Filter-Feld suchen und filtern Sie Benutzer. |
| 12 | Erstellen eines neuen Benutzer-Profils. |
| 13 | Weitere Informationen zu den Benutzerdaten finden Sie unter Profil. |
| 14 | Ist dieser Dialogeintrag aktiviert (ja), kann der Benutzer das eigene Profil ändern (Grundeinstellung). |