| Pos. | Icono | Texto breve | Descripción |
|---|
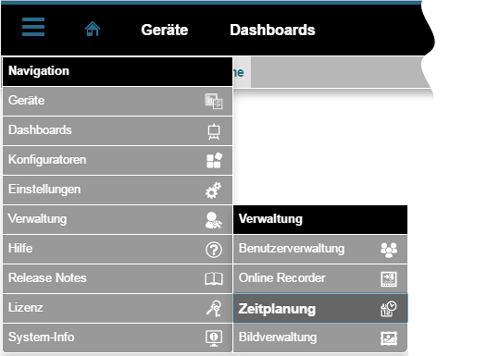
| 1 |  | Botón «Ayuda» | - Ayuda directa.
- Se accede a esta página de ayuda. Al cerrar la página de ayuda se accede a la página anterior.
|
| 2 |  | Botón «Atrás» | - Haciendo clic se vuelve a la ventana «Programación» > «Vista general» de los puntos de tiempo.
|
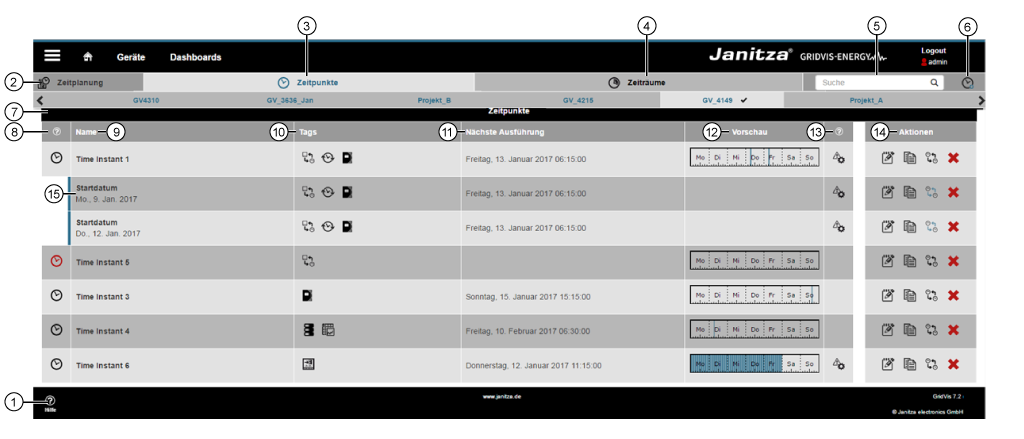
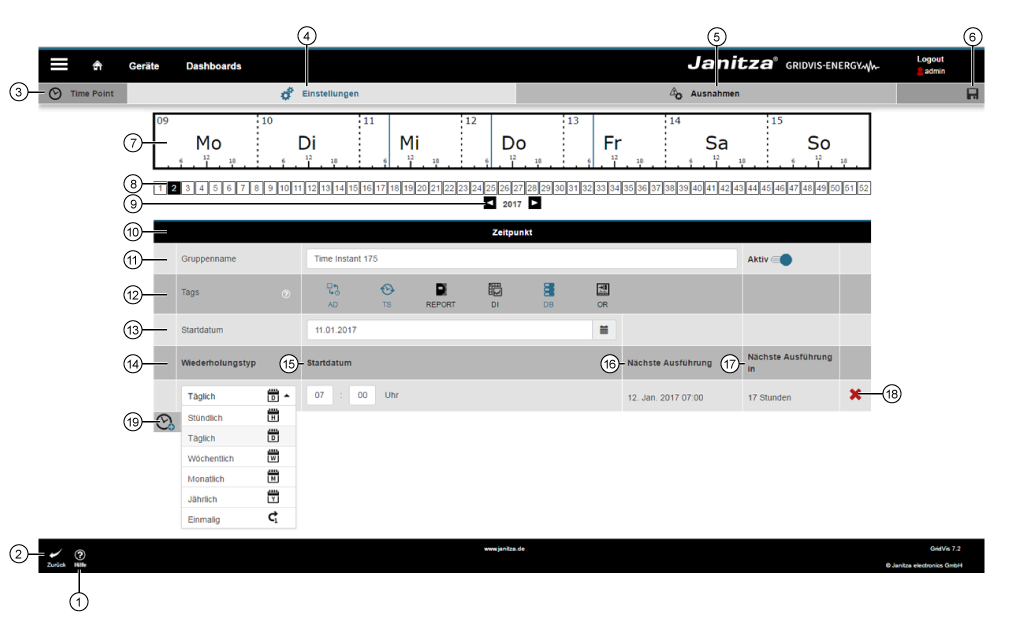
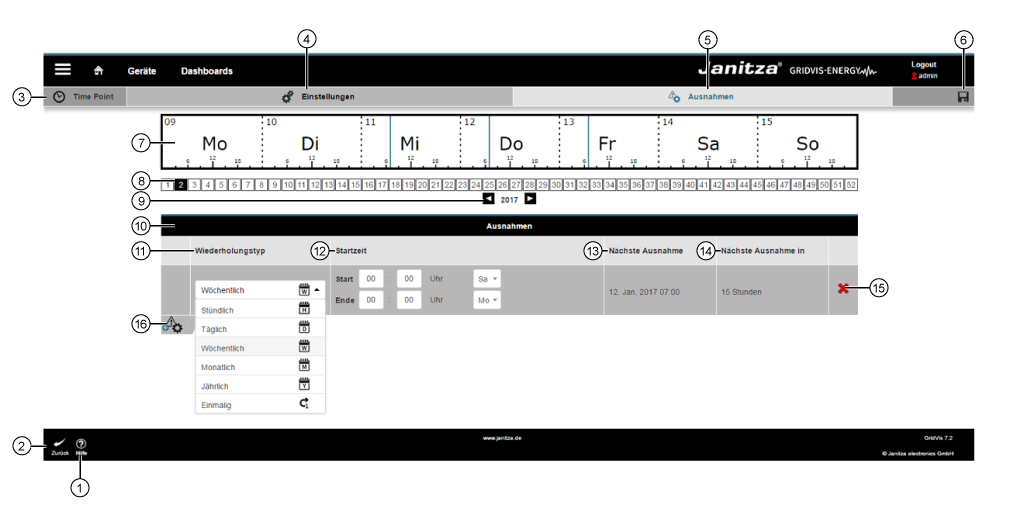
| 3 |  | Ventana «Puntos de tiempo» | - Usted se encuentra ahora en la ventana «Puntos de tiempo» de la función «Programación».
|
| 4 |  | Botón «Ajustes» | - Haciendo clic se abren los «ajustes»de la función«Puntos de tiempo».
- Configuración de los periodos de tiempo para las funciones de gráfica, descarga automática, sincronización de hora, informe, importación de datos, acción de la base de datos, registros en línea y gestión de alarmas.
|
| 5 |  | Botones «Excepciones» | - Haciendo clic se abren las «excepciones»de la función«Puntos de tiempo».
- Configuración de las excepciones de los puntos de tiempo para las funciones de gráfica, descarga automática, sincronización de hora, informe, importación de datos, acción de la base de datos, registros en línea y gestión de alarmas.
|
| 6 |  | Botón «Guardar» | - Haciendo clic se guardan sus ajustes o configuración.
- Los ajustes guardados en la interfaz web de GridVis (Energy) también están disponibles y pueden configurarse en GridVis Desktop.
|
| 7 | | Visualización «Vista general de la semana» | Visualización de la vista general de la semana de los puntos de tiempo establecidos con excepciones: - Días del mes.
- Día de la semana.
- Escala de horas (borde inferior).
- Puntos de tiempo establecidos (líneas azules) para las ejecuciones con excepciones (en el ejemplo, sáb. y dom.).
|
| 8 | | Botones «Número de la semana» | - Selección del número de semana para la visualización «Vista general de la semana».
|
| 9 | | Selección «Año» | - Navegación de año —izquierda y derecha— para la visualización «Vista general de la semana».
|
| 10 | | Panel «Punto de tiempo» | - Panel de configuración «Punto de tiempo».
|
| 11 |   | Campo de entrada«Nombre del grupo»y control deslizante«Activo» | - Campo de entrada para el nombre de su punto de tiempo. Los nombres se aplican al grupo.
- Las demás configuraciones (subpuntos de tiempo) aparecen como filas desplegables con la fecha de inicio en la columna del nombre.
- El control deslizante «Activo» activa su punto de tiempo configurado. La vista previa de la vista general «Puntos de tiempo» de la ventana «Programación» está activa («icono » de color negro).
- La vista general «Puntos de tiempo» de la ventana «Programación» muestra «puntos de tiempo» desactivados con un «icono
 » de color rojo. » de color rojo.
|
| 12 | | Botones«Etiquetas» | - Haciendo clic se activa la correspondiente etiqueta o función. Las etiquetas o funciones elegidas aparecen en color azul.
- El punto de tiempo establecido se aplica a las etiquetas o funciones activadas.
- Es posible hacer una selección múltiple de etiquetas o funciones.
Etiquetas y funciones disponibles: - Etiqueta AD (descarga automática) «
 »; información sobre herramientas: «El punto de tiempo puede emplearse para la descarga automática (dispositivo de lectura)». »; información sobre herramientas: «El punto de tiempo puede emplearse para la descarga automática (dispositivo de lectura)». - Etiqueta TS (sincronización de hora) «
 »; información sobre herramientas. «El punto de tiempo puede emplearse para la sincronización automática de la hora». »; información sobre herramientas. «El punto de tiempo puede emplearse para la sincronización automática de la hora». - Etiqueta de informe «
 »; información sobre herramientas: «El punto de tiempo puede emplearse para la generación automática de informes». »; información sobre herramientas: «El punto de tiempo puede emplearse para la generación automática de informes». - Etiqueta DI (importación de datos) «
 »; información sobre herramientas: «El punto de tiempo puede emplearse para la importación automática de datos». »; información sobre herramientas: «El punto de tiempo puede emplearse para la importación automática de datos». - Etiqueta DB (acción de la base de datos) «
 »; información sobre herramientas: «El punto de tiempo puede emplearse para acciones de bases de datos». »; información sobre herramientas: «El punto de tiempo puede emplearse para acciones de bases de datos». - Etiqueta OR (registrador en línea) «
 »; información sobre herramientas: «El punto de tiempo para restablecer el contador de errores». »; información sobre herramientas: «El punto de tiempo para restablecer el contador de errores».
|
| 13 | | Campo de entrada con lista de selección«Fecha de inicio» | - Campo de entrada o lista de selección «Fecha de inicio» del punto de tiempo.
- Ajuste predeterminado: «Hoy».
|
| 14 | | Lista de selección«Tipo de repetición» | Opciones de punto de tiempo (representación con símbolos): |
 Horario Horario | Ejecución horaria de las acciones o funciones elegidas en «Etiquetas» .
Ajuste «Fecha de inicio» (pos. 15): - Campo de entrada: introducción del minuto de inicio.
|
 Diario Diario | Ejecución diaria de las acciones o funciones elegidas en «Etiquetas» .
Ajuste «Fecha de inicio» (pos. 15): - Campo de entrada: introducción de la hora y el minuto de inicio.
|
 Semanal Semanal | Ejecución semanal de las acciones o funciones elegidas en «Etiquetas» .
Ajuste «Fecha de inicio» (pos. 15): - Campos de entrada: introducción de la hora de inicio, minuto de inicio y día de la semana.
|
 Mensual Mensual | Ejecución mensual de las acciones o funciones elegidas en «Etiquetas» .
Ajuste «Fecha de inicio» (pos. 15): - Campos de entrada: introducción de la hora y el minuto de inicio.
- Lista de selección «Días del mes» y los botones«Último día
 ». ».
|
 Anual Anual | Ejecución anual de las acciones o funciones elegidas en «Etiquetas» .
Ajuste «Fecha de inicio» (pos. 15): - Campos de entrada: introducción de la hora y el minuto de inicio.
- Listas de selección:«Día del mes» y «Mes».
|
 Una vez Una vez | Ejecución puntual (una vez) de las acciones o funciones elegidas en «Etiquetas» .
Ajuste «Fecha de inicio» (pos. 15): - Campo de entrada con lista de selección: «Fecha y hora».
|
| 15 | | Campo(s) de entrada «Fecha de inicio» | - Punto de tiempo de inicio.
- En función del ajuste «Tipo de repetición» (véase pos. 14).
|
| 16 | | Próxima ejecución | - Visualización de la próxima ejecución (día, fecha y hora).
|
| 17 | | Próxima ejecución en | - Visualización del tiempo restantehasta la próxima ejecución.
|
| 18 |  | Botón«Eliminar punto de tiempo» | - Se elimina el correspondiente «punto de tiempo».
|
| 19 |  | Botón«Añadir punto de tiempo» | - Haciendo clic se crea una nueva fila de configuración «Punto de tiempo» con las entradas «Tipo de repetición», «Fecha de inicio», «Próxima ejecución», «Próxima ejecución en».
- Es posible crear varios puntos de tiempo (subpuntos de tiempo).
|