Versionen im Vergleich

Schlüssel

  • Diese Zeile wurde hinzugefügt.
  • Diese Zeile wurde entfernt.
  • Formatierung wurde geändert.
Kommentar: Mittels Scroll Versions veröffentlicht aus dem Bereich GVH und Version 1.0.
Sv translation
languagede


Anker
Berichtseinstellungen

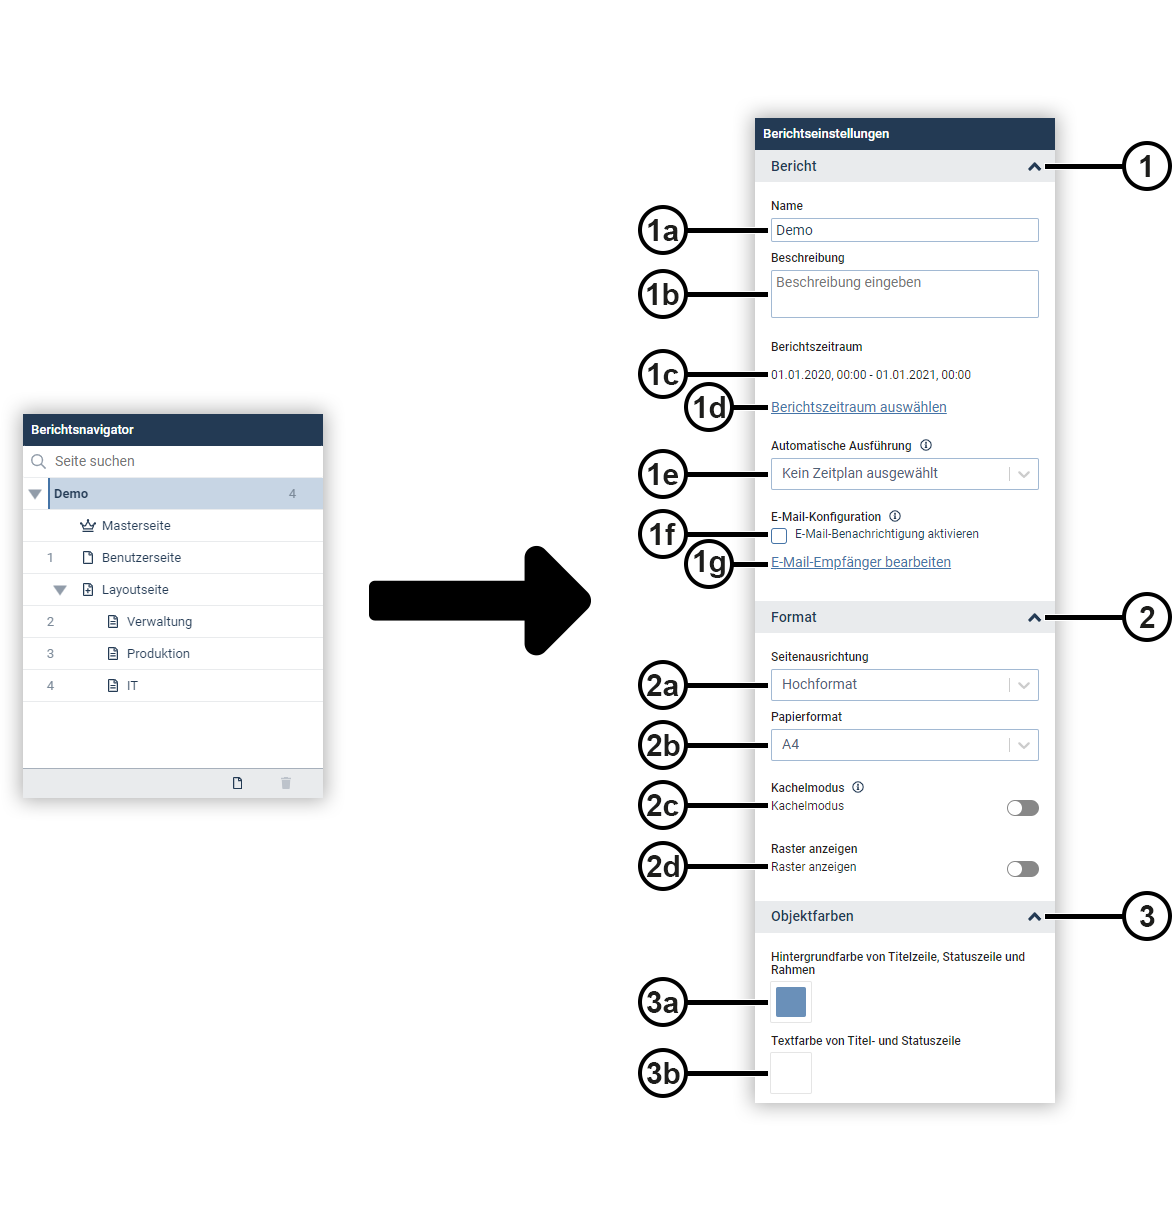
Treffen Sie die globalen Einstellungen für Ihren Bericht.

PositionIconBezeichnungBeschreibung
1

Gruppe BerichtAllgemeine Berichtseinstellungen (ein- bzw. ausklappbar).
1a
BerichtsnameTextfeld zur Eingabe des Berichtsnamens.
1b
BerichtsbeschreibungTextfeld zur Eingabe einer Berichtsbeschreibung (optional).
1c
BerichtszeitraumZeigt den eingestellten Berichtszeitraum an.
1d
Berichtszeitraum auswählen

Öffnet das Fenster zur Auswahl des Berichtszeitraums (siehe Berichtszeitraum auswählen).

1e

Automatische Ausführung

Drop-Down-Feld zur Auswahl von Zeitpunkten, an denen der Bericht automatisch ausgeführt wird.

Info
titleHinweis
  • Die angebotenen Zeitpunkte können über das GridVis®-Zeitmanagement beliebig angepasst werden.
  • Die automatische Ausführung wird durch die Option Kein Zeitplan ausgewählt deaktiviert.
1f

E-Mail-Benachrichtigung aktivieren

Der Bericht wird als E-Mail an die eingestellten Empfänger versendet.

Info
titleHinweis

Die E-Mail-Benachrichtigung erfolgt nur, wenn ein Zeitplan bei der automatischen Ausführung ausgewählt wurde.

1g
E-Mail-Empfänger bearbeiten

Öffnet das Fenster zur Verwaltung der E-Mail-Empfänger.

Info
titleHinweis
  • Es können bis zu zehn E-Mail-Empfänger eingegeben werden.
  • Für den E-Mail-Versand muss ein E-Mail-Server in den Einstellungen der GridVis®-Web konfiguriert sein (siehe GridVis®-Service).
2

Gruppe FormatEinstellungen zum Format des Berichts (ein- bzw. ausklappbar).
2a

Seitenausrichtung

Drop-Down-Feld zur Auswahl der Seitenausrichtung.
Zur Auswahl stehen

  • Hochformat
  • Querformat
2b

Papierformat

Drop-Down-Feld zur Auswahl des Papierformats.
Zur Auswahl stehen

  • A3
  • A4
  • A5
  • US Letter
  • US Legal
2c

KachelmodusBei aktiviertem Kachelmodus werden Objekte ohne Überlappungen platziert.
2d

Raster anzeigenZeigt ein Raster als Positionierungshilfe auf den Berichtsseiten an. Diese Einstellung hat keine Auswirkung auf das generierte PDF-Dokument.
3

Gruppe ObjektfarbenEinstellungen zum Farbschema der Objekte (ein- bzw. ausklappbar).
3a
HintergrundfarbeFarbauswahl für die Hintergrundfarbe der Titelzeile, Statuszeile und Rahmen von allen Objekten.
3b
TextfarbeFarbauswahl für die Textfarbe der Titel- und Statuszeile von allen Objekten.


Anker
BerichtszeitraumAuswaehlen
Berichtszeitraum auswählen

Legen Sie den Berichtszeitraum fest. Nutzen Sie entweder vorgegebene Zeiträume oder legen Sie einen benutzerdefinierten Zeitraum fest.

PositionIconBezeichnungBeschreibung
1
Kalender

Zeigt den eingestellten Zeitraum als Kalenderansicht. Das Start- bzw. Enddatum kann durch Anklicken festgelegt werden.

2

Zeitraum

Drop-Down-Feld zur Auswahl eines vorgegebenen Zeitraumes.
Zur Auswahl stehen

  • Letzte 7 Tage
  • Letzte 14 Tage
  • Letzte 30 Tage
  • Heute
  • Gestern
  • Vorgestern
  • Diese Woche
  • Letzte Woche
  • Dieser Monat
  • Letzter Monat
  • Dieses Quartal
  • Letztes Quartal
  • Dieses Jahr
  • Letztes Jahr
  • Letzte 3 Jahre
  • Letzte 5 Jahre
  • Letzte 10 Jahre

Info
titleHinweis

Bei Eingabe eines von der Vorgabe abweichenden Zeitraums erhält das Feld automatisch den Wert Benutzerdefiniert.

3

StartdatumStartdatum des Berichtszeitraumes. Kann manuell geändert werden.
4

StartzeitStartzeit des Berichtszeitraumes. Kann manuell geändert werden.
5

EnddatumEnddatum des Berichtszeitraumes. Kann manuell geändert werden.
6

EndzeitEndzeit des Berichtszeitraumes. Kann manuell geändert werden.
Sv translation
languageen


Anker
Berichtseinstellungen
Report Settings

Make the global settings for your report.

PositionIconDesignationDescription
1

Report groupGeneral report settings (can be expanded or collapsed).
1a
Report nameText field for entering the report name.
1b
Report descriptionText field for entering a report description (optional).
1c
Report periodDisplays the set report period.
1d
Select report period

Opens the window for selecting the report period (see Select Report Period).

1e

Automatic execution

Drop-down field to select time instants when the report will be run automatically.

Info
titleNote
  • The time instants offered can be modified as desired via the GridVis® time management.
  • Automatic execution can be disabled using the option No schedule selected .
1f

Enable email notification

The report is sent as an email to the set recipients.

Info
titleNote

The email notification will only occur if a schedule has been selected for automatic execution.

1g
Edit email recipients

Opens the window for managing email recipients.

Info
titleNote
  • Up to ten email recipients can be entered.
  • An email server must be configured in the GridVis® Web settings for sending emails (see GridVis® Service).
2

Format groupSettings for the format of the report (can be expanded or collapsed).
2a

Page orientation

Drop-down field to select the page orientation.
The selection offered is

  • Portrait
  • Landscape
2b

Paper size

Drop-down field for selecting the paper size.
The selection offered is

  • A3
  • A4
  • A5
  • US Letter
  • US Legal
2c

Tile modeWhen Tile mode is enabled, objects are positioned without overlapping.
2d

Show gridDisplays a grid as a positioning guide on the report pages. This setting has no effect on the generated PDF document.
3

Object colors groupSettings for the color scheme of the objects (can be expanded or collapsed).
3a
Background colorColor selection for the background color of the title bar, status bar and frames of all objects.
3b
Text colorColor selection for the title and status bar text color of all objects.


Anker
BerichtszeitraumAuswaehlen
Select Report Period

Set the report period. Either use predefined time periods or set a user-defined time period.

PositionIconDesignationDescription
1
Calendar

Shows the set period as a calendar view. The start or end date can be set by clicking on it.

2

Period

Drop-down field for selecting a specified time period.
The selection offered is

  • Last 7 days
  • Last 14 days
  • Last 30 days
  • Today
  • Yesterday
  • Day before yesterday
  • This week
  • Last week
  • This month
  • Last month
  • This quarter
  • Last quarter
  • This year
  • Last year
  • Last 3 years
  • Last 5 years
  • Last 10 years

Info
titleNote

If you enter a time period that differs from the default, the field is automatically given the value User-defined.

3

Start dateStart date of the report period. Can be changed manually.
4

Start timeStart time of the report period. Can be changed manually.
5

End dateEnd date of the report period. Can be changed manually.
6

End TimeEnd time of the report period. Can be changed manually.
Sv translation
languagees


Anker
Berichtseinstellungen
Ajustes de informe

Realice los ajustes globales para su informe.

PosiciónIconoDenominaciónDescripción
1

Grupo InformeAjustes generales del informe (contraíble y expandible).
1a
Nombre del informeCampo de texto para introducir el nombre del informe.
1b
Descripción del informeCampo de texto para introducir una descripción del informe (opcional).
1c
Periodo de tiempo del informeMuestra el periodo de tiempo ajustado del informe.
1d
Seleccionar el periodo de tiempo del informe

Abre la ventana para seleccionar el periodo de tiempo del informe (véase Seleccionar el periodo de tiempo del informe).

1e

Ejecución automática

Cuadro desplegable para seleccionar los momentos en los que el informe se ejecuta automáticamente.

Info
titleNota
  • Los momentos ofrecidos pueden adaptarse a discreción a través de la gestión de tiempo de GridVis®.
  • La ejecución automática se desactiva a través de la opción Ninguna programación seleccionada .
1f

Activar notificación por correo electrónico

El informe se envía como correo electrónico a los destinatarios ajustados.

Info
titleNota

La notificación por correo electrónico se realiza únicamente si se seleccionó una programación para la ejecución automática.

1g
Editar destinatarios de correo electrónico

Abre la ventana para administrar los destinatarios de correo electrónico.

Info
titleNota
  • Pueden introducirse hasta diez destinatarios de correo electrónico.
  • Para el envío de correos electrónicos tiene que estar configurado un servidor de correo electrónico en los ajustes de GridVis®-Web (véase GridVis® Service).
2

Grupo FormatoAjustes acerca del formato del informe (contraíble y expandible).
2a

Orientación de página

Cuadro desplegable para seleccionar la orientación de página.
Pueden seleccionarse las siguientes opciones:

  • Formato vertical
  • Formato horizontal
2b

Formato de papel

Cuadro desplegable para seleccionar el formato de papel.
Pueden seleccionarse las siguientes opciones:

  • A3
  • A4
  • A5
  • US Letter
  • US Legal
2c

Modo de mosaicoSi está activado el modo de mosaico, los objetos se colocan sin superposiciones.
2d

Mostrar cuadrículaMuestra una cuadrícula como ayuda de posicionamiento en las páginas del informe. Este ajuste no influye en el documento PDF generado.
3

Grupo Colores del objetoAjustes acerca del esquema de colores de los objetos (contraíble y expandible).
3a
Color de fondoSelección para el color de fondo de la barra de título, la línea de estado y el marco de todos los objetos.
3b
Color de textoSelección para el color de texto de la barra de título y la línea de estado de todos los objetos.


Anker
BerichtszeitraumAuswaehlen
Seleccionar el periodo de tiempo del informe

Establezca el periodo de tiempo del informe. Utilice los periodos de tiempo predeterminados o determine un periodo de tiempo personalizado.

PosiciónIconoDenominaciónDescripción
1
Calendario

Muestra el periodo de tiempo ajustado como vista de calendario. Las fechas de inicio y fin pueden determinarse con un clic.

2

Periodo de tiempo

Cuadro desplegable para seleccionar un periodo de tiempo predeterminado.
Pueden seleccionarse las siguientes opciones:

  • Últimos 7 días
  • Últimos 14 días
  • Últimos 30 días
  • Hoy
  • Ayer
  • Anteayer
  • Esta semana
  • Última semana
  • Este mes
  • Último mes
  • Este trimestre
  • Último trimestre
  • Este año
  • Último año
  • Últimos 3 años
  • Últimos 5 años
  • Últimos 10 años

Info
titleNota

Si se introduce un periodo de tiempo que difiere de un valor predeterminado, el campo automáticamente recibe el valor Personalizado.

3

Fecha de inicioFecha de inicio del periodo de tiempo del informe. Puede cambiarse manualmente.
4

Hora de inicioHora de inicio del periodo de tiempo del informe. Puede cambiarse manualmente.
5

Fecha de finalizaciónFecha de finalización del periodo de tiempo del informe. Puede cambiarse manualmente.
6

Hora de finalizaciónHora de finalización del periodo de tiempo del informe. Puede cambiarse manualmente.
Sv translation
languageit


Anker
Berichtseinstellungen
Impostazioni del report

Configurare le impostazioni globali per il report.

PosizioneIconaDenominazioneDescrizione
1

Report di gruppoImpostazioni generali del report (può essere aperto o chiuso).
1a
Nome del reportCampo di testo per l’inserimento del nome del report.
1b
Descrizione del reportCampo di testo per l’inserimento di una descrizione del report (opzionale).
1c
Periodo del reportMostra il periodo del report impostato.
1d
Selezionare il periodo del report

Apre la finestra per la selezione del periodo del report (vedere Selezionare il periodo del report).

1e

Esecuzione automatica

Campo a discesa per selezionare gli orari in cui il report viene eseguito automaticamente.

Info
titleNota
  • I momenti disponibili possono essere regolati liberamente tramite la gestione del tempo di GridVis®.
  • L’esecuzione automatica viene disattivata dall’opzione Nessuna programmazione selezionata.
1f

Attivare le notifiche via e-mail

Il report viene inviato come e-mail ai destinatari impostati.

Info
titleNota

La notifica via e-mail viene inviata solo se è stata selezionata una programmazione durante l’esecuzione automatica.

1g
Modifica dei destinatari delle e-mail

Apre la finestra per la gestione dei destinatari delle e-mail.

Info
titleNota
  • È possibile inserire fino a dieci destinatari.
  • Per l’invio di e-mail, è necessario configurare un server di posta elettronica nelle impostazioni di GridVis®-Web (vedere GridVis®-Service).
2

Formato dei gruppiImpostazioni per il formato del report (può essere aperto o chiuso).
2a

Orientamento della pagina

Campo a discesa per la selezione dell’orientamento della pagina.
È possibile scegliere tra

  • Formato verticale
  • Formato orizzontale
2b

Formato carta

Campo a discesa per la selezione del formato della carta.
È possibile scegliere tra

  • A3
  • A4
  • A5
  • US Letter
  • US Legal
2c

Modalità tileQuando è attivata la modalità tile, gli oggetti vengono posizionati senza sovrapposizioni.
2d

Mostra grigliaMostra una griglia come aiuto per il posizionamento nelle pagine dei report. Questa impostazione non ha alcun effetto sul documento PDF generato.
3

Gruppo colori oggettiImpostazioni per la combinazione di colori degli oggetti (possono essere aperte o chiuse).
3a
Colore di sfondoSelezione del colore per lo sfondo della barra del titolo, della barra di stato e della cornice di tutti gli oggetti.
3b
Colore del testoSelezione del colore del testo del titolo e della riga di stato di tutti gli oggetti.


Anker
BerichtszeitraumAuswaehlen
Selezionare il periodo del report

Impostare il periodo del report. Utilizzare periodi predefiniti o impostare un periodo personalizzato.

PosizioneIconaDenominazioneDescrizione
1
Calendario

Mostra il periodo impostato come visualizzazione del calendario. È possibile impostare la data di inizio o di fine facendovi clic.

2

Intervallo

Campo a discesa per la selezione di un periodo specifico.
È possibile scegliere tra

  • Ultimi 7 giorni
  • Ultimi 14 giorni
  • Ultimi 30 giorni
  • Oggi
  • Ieri
  • L’altroieri
  • Questa settimana
  • La settimana scorsa
  • Questo mese
  • Il mese scorso
  • Questo trimestre
  • Il trimestre scorso
  • Quest’anno
  • L’anno scorso
  • Gli ultimi 3 anni
  • Gli ultimi 5 anni
  • Gli ultimi 10 anni

Info
titleNota

Se si inserisce un periodo che si discosta da quello predefinito, nel campo viene inserito automaticamente il valore Definito dall’utente.

3

Data di inizioData di inizio del periodo del report. Può essere modificato manualmente.
4

Ora di inizioOra di inizio del periodo del report. Può essere modificato manualmente.
5

Ora di fineData di fine del periodo del report. Può essere modificato manualmente.
6

Ora di fineOra di fine del periodo del report. Può essere modificato manualmente.