| Pos. | Icon | Kurztext | Beschreibung |
|---|
| 1 |
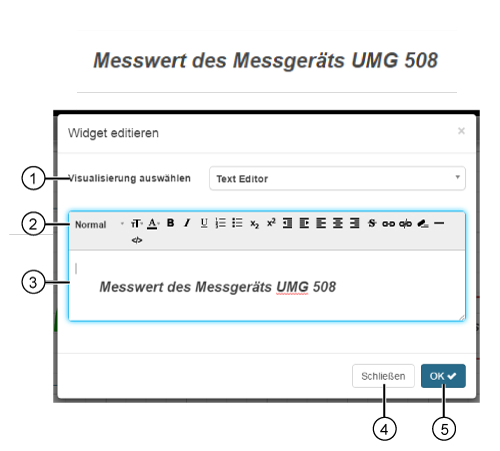
| Auswahlliste Visualisierung auswählen | - Wahl des Widgets (der Visualisierung).
- Text-Editor gewählt.
|
| 2 |
| Text-Editor Menüleiste | - Die Text-Editor Menüleiste beinhaltet alle Textauszeichnungs- und Textformatierungs-Elemente.
|
 | Auswahlliste Textformat-Vorlagen | - Auswahl zwischen 8 Textformat- und Überschriftenformat-Vorlagen.
|
 | Auswahlliste Schriftgröße | - Auswahl von Schriftgrößen für den markierten Text.
|
 | Auswahlliste Textfarbe | - Öffnet eine Farbpalette zur Auswahl der Schriftfarbe des markierten Textes.
|
 | Schaltfläche Fett | - Formatiert den markierten Text Fett.
|
 | Schaltfläche Kursiv | - Formatiert den markierten Text Kursiv.
|
 | Schaltfläche Unterstreichen | - Unterstreicht den markierten Text.
|
 | Schaltfläche Nummerierung | - Erstellt eine nummerierte Liste.
|
 | Schaltfläche Aufzählung | - Erstellt eine Aufzählung.
|
 | Schaltfläche Tiefgestellt | - Stellt den markierten Text tiefer.
|
 | Schaltfläche Hochgestellt | - Stellt den markierten Text höher.
|
 | Schaltfläche Einzug verkleinern | - Verkleinert den Abstand zum Rand.
|
 | Schaltfläche Einzug vergrößern | - Vergrößert den Abstand zum Rand.
|
 | Schaltfläche Linksbündig ausrichten | - Text am linken Rand ausrichten.
|
 | Schaltfläche Zentrieren | |
 | Schaltfläche Rechtsbündig ausrichten | - Text am rechten Rand ausrichten.
|
 | Schaltfläche Durchstreichen | - Streicht den markierten Text durch.
|
 | Schaltfläche Link einfügen | Markierten Text verlinken mit: - einer Web-Adresse.
- einer E-Mail-Adresse.
- einer Picture-URL.
|
 | Schaltfläche Link entfernen | - Entfernt den Link eines markierten Textes.
|
 | Schaltfläche Alle Formatierungen löschen | - Löscht die die Formatierung eines markierten Textes.
|
 | Schaltfläche Horizontale Linie einfügen | - Erstellt eine horizontale Linie im Text-Editor Eingabebereich und damit im Widget-Rahmen.
|
 | Schaltfläche Quelltext | - Wechselt in das html-Quelltext-Format.
- Durch wiederholtes Klicken der Schaltfläche gelangt man zurück in den Text-Editor.
|
| 3 |
| Text-Editor Eingabebereich | - Eingabebereich Ihres Textes.
|
| 4 |
| Schaltfläche Schließen | - Schließt den Assistent Widget editieren ohne die Eingaben zu speichern.
|
| 5 |
| Schaltfläche OK | - Speichert Ihre Konfiguration.
- Das Widget erscheint auf dem Dashboard.
|