
| Sv translation | |||||||||||
|---|---|---|---|---|---|---|---|---|---|---|---|
| |||||||||||
| Anker | allgemeines_punkte | allgemeines_punkte | Allgemeine Beschreibung|||||||||
| Anker | oeffnen_punkte | oeffnen_punkte | Wie öffne ich die Funktion?|||||||||
| Anker | uebersicht_punkte | uebersicht_punkte | Funktion Zeitplanung > Fenster Zeitpunkte - Übersicht|||||||||
| Pos. | Icon | Kurztext | Beschreibung | ||||||||
| 1 | Schaltfläche Hilfe |
| |||||||||
| 2 | Funktion Zeitplanung > Fenster Zeitpunkte - Übersicht |
| |||||||||
| 3 | Schaltfläche Zeitpunkte |
| |||||||||
| 4 | Schaltflächen Zeiträume |
| 5 | Such- und Sortierfilter-Funktion | |||||||
| 6 | Schaltfläche Zeitpunkt hinzufügen | Ein Klick
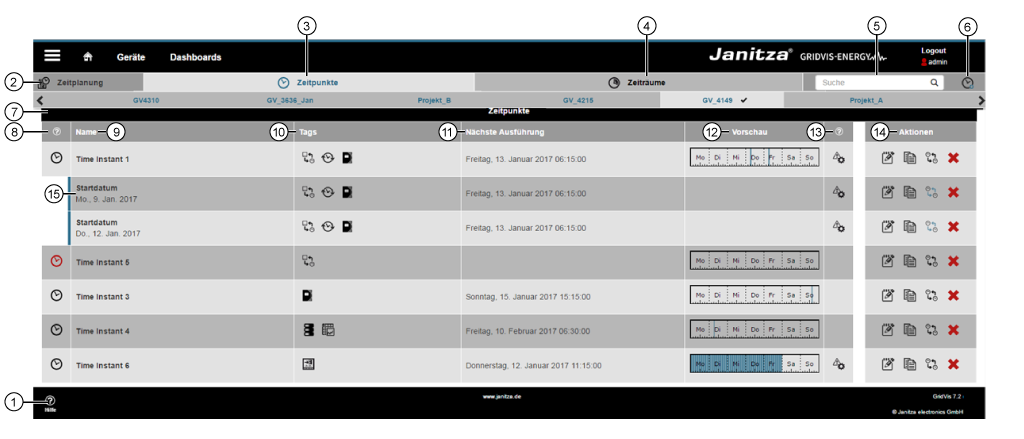
| 7 | Bereich Zeitpunkte | Übersichtsbereich aller Zeitpunkte und Sub-Zeitpunkte. | ||||||
| 8 | Spalte Aktiv / Inaktiv mit Direkthilfe | Anzeige Zeitraum Aktiv oder Inaktiv:
| 9 | Name |
| 10 | Tags | Anzeige Tags - Funktionen die zum eingestellten Zeitpunkt (mit Ausnahmen) ausgeführt werden.
| 11 | Nächste Ausführung |
| 12 | Vorschau |
|
| 13 | Spalte Ausnahmen mit Direkthilfe |
| 14 | Bereich Aktionen | Zeigt verschiedene Schaltflächen zur Bearbeitung Ihrer Zeitpunkte. | ||||||
| |||||||||||
| |||||||||||
| |||||||||||
| 15 | Anzeige Sub-Zeitpunkt | Sub-Zeitpunkte erlauben mehrere Ausführungen von Aktionen/Funktionen zu verschiedenen Zeitpunkten mit Ausnahmen.
| ||||||||
| Anker | einstellungen_punkte | einstellungen_punkte | Funktion Zeitplanung > Fenster Zeitpunkte > Einstellungen|||||||||
| Pos. | Icon | Kurztext | Beschreibung | ||||||||
| 1 | Schaltfläche Hilfe |
| |||||||||
| 2 | Schaltfläche Zurück |
| |||||||||
| 3 | Fenster Zeitpunkte |
| 4 | Schaltfläche Einstellungen | Ein Klick öffnet die Einstellungen der FunktionZeitpunkte.|||||||
| 5 | Schaltflächen Ausnahmen |
| |||||||||
| 6 | Schaltfläche Speichern |
| 7 | Anzeige Wochenübersicht | Anzeige der Wochenübersicht der eingestellten Zeitpunkte mit Ausnahmen:
| 8 | Schaltflächen Kalenderwoche |
| 9 | Auswahl Jahr |
| 10 | Bereich Zeitpunkt |
|
| 11 | Eingabefeld Gruppenname und Schieberegler Aktiv |
| 12 | Schaltflächen Tags |
Verfügbare Tags/Funktionen:
| 13 | Eingabefeld mit Auswahlliste Startdatum |
| 14 | Auswahlliste Wiederholungstyp | Zeitpunkt-Optionen (Darstellung mit Symbolen): |
Stündliche Ausführung der unter Tags gewählten Aktion(en)/Funktion(en).
| |||||||||||
Tägliche Ausführung der unter Tags gewählten Aktion(en)/Funktion(en).
| |||||||||||
Tägliche Ausführung der unter Tags gewählten Aktion(en)/Funktion(en).
| |||||||||||
Monatliche Ausführung der unter Tags gewählten Aktion(en)/Funktion(en).
| |||||||||||
Jährliche Ausführung der unter Tags gewählten Aktion(en)/Funktion(en).
| |||||||||||
Einmalige Ausführung der unter Tags gewählten Aktion(en)/Funktion(en).
| 15 | Eingabefeld(er) Startdatum |
| 16 | Nächste Ausführung |
| 17 | Nächste Ausführung in |
| ||
| 18 | Schaltfläche Zeitpunkt löschen |
| |||||||||
| 19 | Schaltfläche Zeitpunkt hinzufügen |
| |||||||||
| Anker | ausnahmen_punkte | ausnahmen_punkte | Funktion Zeitplanung > Fenster Zeitpunkte > Ausnahmen|||||||||
| Pos. | Icon | Kurztext | Beschreibung | ||||||||
| 1 | Schaltfläche Hilfe |
| |||||||||
| 2 | Schaltfläche Zurück |
| |||||||||
| 3 | Fenster Zeitpunkte |
| 4 | Schaltfläche Einstellungen | Ein Klick öffnet die Einstellungen der FunktionZeitpunkte.|||||||
| 5 | Schaltfläche Ausnahmen |
| |||||||||
| 6 | Schaltfläche Speichern |
| 7 | Anzeige Wochenübersicht | Anzeige der Wochenübersicht der eingestellten Zeitpunkte mit Ausnahmen:
| 8 | Schaltflächen Kalenderwoche |
| 9 | Auswahl Jahr |
| 10 | Bereich Ausnahmen |
| 11 | Auswahlliste Wiederholungstyp | Zeitpunkt-Optionen (Darstellung mit Symbolen) - Ausnahmen der Ausführung für die eingestellten Zeitpunkte: |
Stündliche Ausführung der Ausnahmen für Aktion(en)/Funktion(en).
| |||||||||||
Tägliche Ausführung der Ausnahmen für Aktion(en)/Funktion(en).
| |||||||||||
Wöchentliche Ausführung der Ausnahmen für Aktion(en)/Funktion(en).
| |||||||||||
Jährliche Ausführung der Ausnahmen für Aktion(en)/Funktion(en).
| |||||||||||
Einmalige Ausführung der Ausnahmen für Aktion(en)/Funktion(en).
| 12 | Eingabefeld Startzeit |
| 13 | Nächste Ausnahme |
| 14 | Nächste Ausnahme in |
| ||
| 15 | Schaltfläche Löschen |
| |||||||||
| 16 | Schaltfläche Ausnahmen hinzufügen |
| |||||||||
| Sv translation | |||||||||||
| |||||||||||
| Anker | allgemeines_punkte | allgemeines_punkte | General description|||||||||
| Anker | oeffnen_punkte | oeffnen_punkte | How do I open the function?|||||||||
| Anker | uebersicht_punkte | uebersicht_punkte | "Time Management" function > "Time points" window - Overview

Item | Icon | Short text | Description |
|---|---|---|---|
1 | “Help” button |
| |
2 | "Time Management" function > "Time points" window - Overview |
| |
3 | “Time points” button |
| |
4 | "Time periods" buttons |
| |
5 |
| Searching and sorting filter function |
|
6 | "Insert time point" button | One click
| |
7 |
| "Time points" area | Overview area with all time points and sub-time points. |
8 |
| "Active" / "Inactive" column with direct help "" | Display of "Active" or "Inactive" time period:
|
9 |
| Name |
|
10 |
| Tags | Display of "Tags" - functions that are executed at the set time point (with exceptions).
|
11 |
| Next execution |
|
12 |
| Preview |
|
13 | "Exceptions" column with direct help " |
| |
14 |
| "Actions" area | Shows various buttons for editing your time points. |
|
| ||
|
| ||
|
| ||
|
| ||
15 |
| Display of "sub-time point" | Sub-time points enable the multiple execution of actions/functions at various time points with exceptions.
|
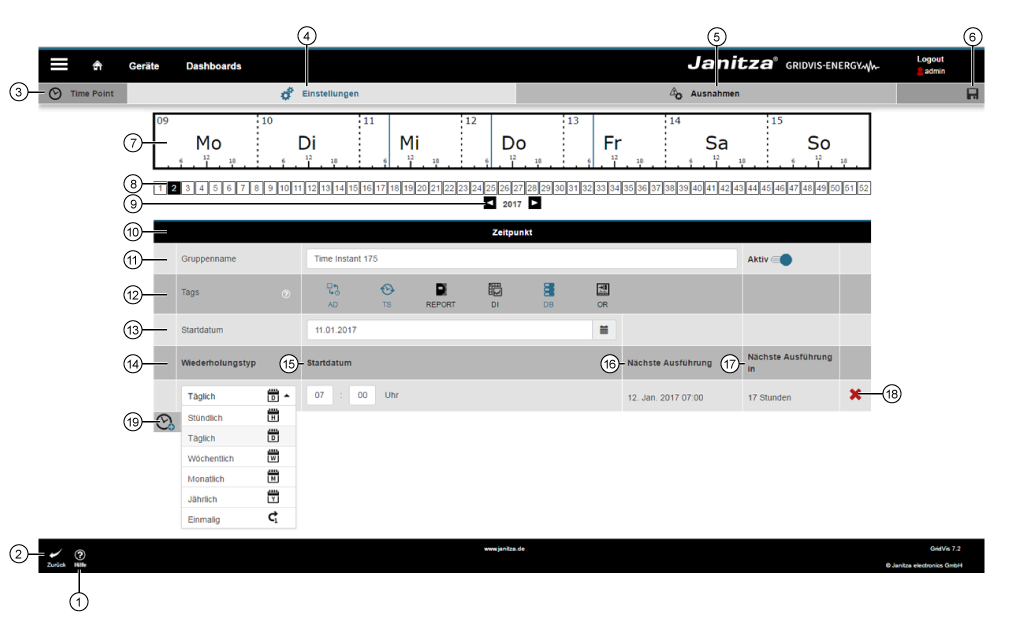
Example “Settings” for an action with the time point displayed at the top in the figure:
- Display of the action: 2. Calender week 2017. (Exception: Sat. and Sun. - see settings "Exceptions").
- Time point name/group name: Time instant 175.
- (Action) time points apply for the functions automatic download, time synchronisation and database.
- Start date of the action: 11/01/2017.
- Daily action at 07:00 hrs (blue lines).
- Next start of the action on 12 Jan. 2017 at 07:00 hrs - in 17 hours.
Item
Icon
Short text
Description
1
“Help” button
- Direct help.
- Leads to this help screen. Closing the help screen takes you back to the previous screen.
2
“Back” button
- One click takes you back to the window Time Management > Time points “Overview”.
3
"Time points" window
- You are in the "Time points" window, in the "Time Management" function.
4
“Settings” button
- One click opens the "Settings" for the "Time points" function.
- Configuration of the time periods for the functions graphs, automatic download, time synchronisation, report, data import, database action, online recordings and alarm management.
Zeitpunkte sind immer zu einer zuvor definierten Uhrzeit aktiv. Zu dieser Uhrzeit wird z. B. eine Datenbankaktion ausgeführt oder ein Report erstellt. Gehen Sie wie folgt vor, um einen Zeitpunkt zu erstellen:
- Klicken Sie auf die Schaltfläche Zeitpunkt hinzufügen.
- Benennen Sie den Zeitpunkt und wählen Sie aus, ob dieser direkt aktiv sein soll. Sie können Ihre Zeitpunkte in der Übersicht jederzeit aktivieren und deaktivieren.
- Wählen Sie die Tags aus. Tags definieren, in welcher Funktion der Zeitpunkt genutzt werden kann.
- Wählen Sie das Startdatum aus.
- Klicken Sie auf die Schaltfläche Eintrag hinzufügen.
- Wählen Sie den Wiederholungstypen aus und geben Sie das Startdatum an.
- Klicken Sie anschließend auf die Schaltfläche Zeitpunkt speichern.
Sie gelangen zum Fenster Ausnahmen. Hier definieren Sie, wann der zuvor konfigurierte Zeitraum nicht aktiv sein soll. Gehen Sie wie folgt vor, um eine Ausnahme zu definieren:
- Klicken Sie auf die Schaltfläche Ausnahme hinzufügen.
- Wählen Sie den Wiederholungstypen aus.
- Wählen Sie das Startzeit und ggf. das Startdatum aus.
- Klicken Sie abschließend auf die Schaltfläche Zeitpunkt speichern.


| Sv translation | ||
|---|---|---|
| ||
Time instants are always active at a previously defined time. At this time, a database action is executed or a report is created, for example. Proceed as follows to create a time instant:
The Exceptions window appears. Here you can define when the previously configured time period should not be active. Proceed as follows to define an exception:
|


| Sv translation | ||
|---|---|---|
| ||
Los puntos de tiempo siempre están activos a una hora definida con anterioridad. A esta hora, por ejemplo, se ejecuta una acción de base de datos o se crea un informe. Para crear un punto de tiempo, proceda como se indica a continuación:
Accederá a la ventana Excepciones. Aquí podrá definir cuándo no deberá estar activo el periodo de tiempo anteriormente configurado. Para definir una excepción, proceda como se indica a continuación:
|
| Sv translation | |||||||||||||||||||||||||||||||||||||||||||||||||||||||||||||||||||||||||||||||||||||||||||||||||||||||||||||||||||||||||||||||||||||||||||||||||||||||||||||||||||||||||||||||||||||||||||||||||||||||||||||||||||||||||||||||||||||||
|---|---|---|---|---|---|---|---|---|---|---|---|---|---|---|---|---|---|---|---|---|---|---|---|---|---|---|---|---|---|---|---|---|---|---|---|---|---|---|---|---|---|---|---|---|---|---|---|---|---|---|---|---|---|---|---|---|---|---|---|---|---|---|---|---|---|---|---|---|---|---|---|---|---|---|---|---|---|---|---|---|---|---|---|---|---|---|---|---|---|---|---|---|---|---|---|---|---|---|---|---|---|---|---|---|---|---|---|---|---|---|---|---|---|---|---|---|---|---|---|---|---|---|---|---|---|---|---|---|---|---|---|---|---|---|---|---|---|---|---|---|---|---|---|---|---|---|---|---|---|---|---|---|---|---|---|---|---|---|---|---|---|---|---|---|---|---|---|---|---|---|---|---|---|---|---|---|---|---|---|---|---|---|---|---|---|---|---|---|---|---|---|---|---|---|---|---|---|---|---|---|---|---|---|---|---|---|---|---|---|---|---|---|---|---|---|---|---|---|---|---|---|---|---|---|---|---|---|---|---|---|---|
| |||||||||||||||||||||||||||||||||||||||||||||||||||||||||||||||||||||||||||||||||||||||||||||||||||||||||||||||||||||||||||||||||||||||||||||||||||||||||||||||||||||||||||||||||||||||||||||||||||||||||||||||||||||||||||||||||||||||
Gli orari sono sempre attivi in un momento predefinito. In questo momento, ad esempio, viene eseguita un'azione del database o viene creato un report. Per creare un orario, procedere come segue:
Viene visualizzata la finestra Eccezioni. Qui è possibile definire quando il periodo precedentemente configurato non deve essere attivo. Per impostare un'eccezione, procedere come segue:
| 5 | | “Exceptions” buttons | One click opens the "Exceptions"for the "Time points" function.||||||||||||||||||||||||||||||||||||||||||||||||||||||||||||||||||||||||||||||||||||||||||||||||||||||||||||||||||||||||||||||||||||||||||||||||||||||||||||||||||||||||||||||||||||||||||||||||||||||||||||||||||||||||||||||||||||
6 | | “Save” button |
| ||||||||||||||||||||||||||||||||||||||||||||||||||||||||||||||||||||||||||||||||||||||||||||||||||||||||||||||||||||||||||||||||||||||||||||||||||||||||||||||||||||||||||||||||||||||||||||||||||||||||||||||||||||||||||||||||||||
7 |
| “Week overview” display | Display of the week overview for the set time points with exceptions:
| ||||||||||||||||||||||||||||||||||||||||||||||||||||||||||||||||||||||||||||||||||||||||||||||||||||||||||||||||||||||||||||||||||||||||||||||||||||||||||||||||||||||||||||||||||||||||||||||||||||||||||||||||||||||||||||||||||||
8 |
| "Calendar week" buttons |
| ||||||||||||||||||||||||||||||||||||||||||||||||||||||||||||||||||||||||||||||||||||||||||||||||||||||||||||||||||||||||||||||||||||||||||||||||||||||||||||||||||||||||||||||||||||||||||||||||||||||||||||||||||||||||||||||||||||
9 |
| Selection of the "Year" |
| ||||||||||||||||||||||||||||||||||||||||||||||||||||||||||||||||||||||||||||||||||||||||||||||||||||||||||||||||||||||||||||||||||||||||||||||||||||||||||||||||||||||||||||||||||||||||||||||||||||||||||||||||||||||||||||||||||||
10 |
| "Time point" area |
| ||||||||||||||||||||||||||||||||||||||||||||||||||||||||||||||||||||||||||||||||||||||||||||||||||||||||||||||||||||||||||||||||||||||||||||||||||||||||||||||||||||||||||||||||||||||||||||||||||||||||||||||||||||||||||||||||||||
11 | | Input field "Group name" and slide controller "Active" |
| ||||||||||||||||||||||||||||||||||||||||||||||||||||||||||||||||||||||||||||||||||||||||||||||||||||||||||||||||||||||||||||||||||||||||||||||||||||||||||||||||||||||||||||||||||||||||||||||||||||||||||||||||||||||||||||||||||||
12 |
| "Tags" buttons |
Available tags/functions:
| ||||||||||||||||||||||||||||||||||||||||||||||||||||||||||||||||||||||||||||||||||||||||||||||||||||||||||||||||||||||||||||||||||||||||||||||||||||||||||||||||||||||||||||||||||||||||||||||||||||||||||||||||||||||||||||||||||||
13 |
| Input field with selection list "Start date" |
| ||||||||||||||||||||||||||||||||||||||||||||||||||||||||||||||||||||||||||||||||||||||||||||||||||||||||||||||||||||||||||||||||||||||||||||||||||||||||||||||||||||||||||||||||||||||||||||||||||||||||||||||||||||||||||||||||||||
14 |
| "Repetition type" selection list | Time point options (representation with symbols): | ||||||||||||||||||||||||||||||||||||||||||||||||||||||||||||||||||||||||||||||||||||||||||||||||||||||||||||||||||||||||||||||||||||||||||||||||||||||||||||||||||||||||||||||||||||||||||||||||||||||||||||||||||||||||||||||||||||
| Hourly execution of the action(s)/function(s) selected under "Tags".
| ||||||||||||||||||||||||||||||||||||||||||||||||||||||||||||||||||||||||||||||||||||||||||||||||||||||||||||||||||||||||||||||||||||||||||||||||||||||||||||||||||||||||||||||||||||||||||||||||||||||||||||||||||||||||||||||||||||||
| Daily execution of the action(s)/function(s) selected under "Tags".
| Daily execution of the action(s)/function(s) selected under "Tags".
| Monthly execution of the action(s)/function(s) selected under "Tags".
| Yearly execution of the action(s)/function(s) selected under "Tags".
| |||||||||||||||||||||||||||||||||||||||||||||||||||||||||||||||||||||||||||||||||||||||||||||||||||||||||||||||||||||||||||||||||||||||||||||||||||||||||||||||||||||||||||||||||||||||||||||||||||||||||||||||||||||||||||||||||||
| One-off execution of the action(s)/function(s) selected under "Tags".
| ||||||||||||||||||||||||||||||||||||||||||||||||||||||||||||||||||||||||||||||||||||||||||||||||||||||||||||||||||||||||||||||||||||||||||||||||||||||||||||||||||||||||||||||||||||||||||||||||||||||||||||||||||||||||||||||||||||||
15 |
| "Start date" input field(s) |
| ||||||||||||||||||||||||||||||||||||||||||||||||||||||||||||||||||||||||||||||||||||||||||||||||||||||||||||||||||||||||||||||||||||||||||||||||||||||||||||||||||||||||||||||||||||||||||||||||||||||||||||||||||||||||||||||||||||
16 |
| Next execution |
| ||||||||||||||||||||||||||||||||||||||||||||||||||||||||||||||||||||||||||||||||||||||||||||||||||||||||||||||||||||||||||||||||||||||||||||||||||||||||||||||||||||||||||||||||||||||||||||||||||||||||||||||||||||||||||||||||||||
17 |
| Next execution in |
| ||||||||||||||||||||||||||||||||||||||||||||||||||||||||||||||||||||||||||||||||||||||||||||||||||||||||||||||||||||||||||||||||||||||||||||||||||||||||||||||||||||||||||||||||||||||||||||||||||||||||||||||||||||||||||||||||||||
18 | "Delete time point" button |
| |||||||||||||||||||||||||||||||||||||||||||||||||||||||||||||||||||||||||||||||||||||||||||||||||||||||||||||||||||||||||||||||||||||||||||||||||||||||||||||||||||||||||||||||||||||||||||||||||||||||||||||||||||||||||||||||||||||
19 | "Insert time point" button |
| |||||||||||||||||||||||||||||||||||||||||||||||||||||||||||||||||||||||||||||||||||||||||||||||||||||||||||||||||||||||||||||||||||||||||||||||||||||||||||||||||||||||||||||||||||||||||||||||||||||||||||||||||||||||||||||||||||||
| Anker | ausnahmen_punkte | ausnahmen_punkte | Time Management function > "Time points" window > "Exceptions"|||||||||||||||||||||||||||||||||||||||||||||||||||||||||||||||||||||||||||||||||||||||||||||||||||||||||||||||||||||||||||||||||||||||||||||||||||||||||||||||||||||||||||||||||||||||||||||||||||||||||||||||||||||||||||||||||||||
Item | Icon | Short text | Description | ||||||||||||||||||||||||||||||||||||||||||||||||||||||||||||||||||||||||||||||||||||||||||||||||||||||||||||||||||||||||||||||||||||||||||||||||||||||||||||||||||||||||||||||||||||||||||||||||||||||||||||||||||||||||||||||||||||
1 | “Help” button |
| |||||||||||||||||||||||||||||||||||||||||||||||||||||||||||||||||||||||||||||||||||||||||||||||||||||||||||||||||||||||||||||||||||||||||||||||||||||||||||||||||||||||||||||||||||||||||||||||||||||||||||||||||||||||||||||||||||||
2 | “Back” button |
| |||||||||||||||||||||||||||||||||||||||||||||||||||||||||||||||||||||||||||||||||||||||||||||||||||||||||||||||||||||||||||||||||||||||||||||||||||||||||||||||||||||||||||||||||||||||||||||||||||||||||||||||||||||||||||||||||||||
3 | "Time points" window |
| 4 | “Settings” button | One click opens the "Settings"for the "Time points" function.5 | “Exceptions” button | One click opens the "Exceptions"for the "Time points" function.|||||||||||||||||||||||||||||||||||||||||||||||||||||||||||||||||||||||||||||||||||||||||||||||||||||||||||||||||||||||||||||||||||||||||||||||||||||||||||||||||||||||||||||||||||||||||||||||||||||||||||||||||||||||||||||||||
6 | “Save” button |
| |||||||||||||||||||||||||||||||||||||||||||||||||||||||||||||||||||||||||||||||||||||||||||||||||||||||||||||||||||||||||||||||||||||||||||||||||||||||||||||||||||||||||||||||||||||||||||||||||||||||||||||||||||||||||||||||||||||
7 |
| “Week overview” display | Display of the week overview for the set time points with exceptions:
| ||||||||||||||||||||||||||||||||||||||||||||||||||||||||||||||||||||||||||||||||||||||||||||||||||||||||||||||||||||||||||||||||||||||||||||||||||||||||||||||||||||||||||||||||||||||||||||||||||||||||||||||||||||||||||||||||||||
8 |
| "Calendar week" buttons |
| ||||||||||||||||||||||||||||||||||||||||||||||||||||||||||||||||||||||||||||||||||||||||||||||||||||||||||||||||||||||||||||||||||||||||||||||||||||||||||||||||||||||||||||||||||||||||||||||||||||||||||||||||||||||||||||||||||||
9 |
| Selection of the "Year" |
| ||||||||||||||||||||||||||||||||||||||||||||||||||||||||||||||||||||||||||||||||||||||||||||||||||||||||||||||||||||||||||||||||||||||||||||||||||||||||||||||||||||||||||||||||||||||||||||||||||||||||||||||||||||||||||||||||||||
10 |
| "Exceptions" area |
| ||||||||||||||||||||||||||||||||||||||||||||||||||||||||||||||||||||||||||||||||||||||||||||||||||||||||||||||||||||||||||||||||||||||||||||||||||||||||||||||||||||||||||||||||||||||||||||||||||||||||||||||||||||||||||||||||||||
11 |
| "Repetition type" selection list | Time point options (representation with symbols) - Exceptions to execution for the set time points: | Hourly execution of the exceptions for action(s)/function(s).
| |||||||||||||||||||||||||||||||||||||||||||||||||||||||||||||||||||||||||||||||||||||||||||||||||||||||||||||||||||||||||||||||||||||||||||||||||||||||||||||||||||||||||||||||||||||||||||||||||||||||||||||||||||||||||||||||||||
| Daily execution of the exceptions for action(s)/function(s).
| ||||||||||||||||||||||||||||||||||||||||||||||||||||||||||||||||||||||||||||||||||||||||||||||||||||||||||||||||||||||||||||||||||||||||||||||||||||||||||||||||||||||||||||||||||||||||||||||||||||||||||||||||||||||||||||||||||||||
| Weekly execution of the exceptions for action(s)/function(s).
| Monthly execution of the exceptions for action(s)/function(s).
| Yearly execution of the exceptions for action(s)/function(s).
| One-off execution of the exceptions for action(s)/function(s).
| |||||||||||||||||||||||||||||||||||||||||||||||||||||||||||||||||||||||||||||||||||||||||||||||||||||||||||||||||||||||||||||||||||||||||||||||||||||||||||||||||||||||||||||||||||||||||||||||||||||||||||||||||||||||||||||||||||
12 |
| "Start time" input field |
| ||||||||||||||||||||||||||||||||||||||||||||||||||||||||||||||||||||||||||||||||||||||||||||||||||||||||||||||||||||||||||||||||||||||||||||||||||||||||||||||||||||||||||||||||||||||||||||||||||||||||||||||||||||||||||||||||||||
13 |
| Next exception |
| ||||||||||||||||||||||||||||||||||||||||||||||||||||||||||||||||||||||||||||||||||||||||||||||||||||||||||||||||||||||||||||||||||||||||||||||||||||||||||||||||||||||||||||||||||||||||||||||||||||||||||||||||||||||||||||||||||||
14 |
| Next exception in |
| ||||||||||||||||||||||||||||||||||||||||||||||||||||||||||||||||||||||||||||||||||||||||||||||||||||||||||||||||||||||||||||||||||||||||||||||||||||||||||||||||||||||||||||||||||||||||||||||||||||||||||||||||||||||||||||||||||||
15 | "Delete" button |
| |||||||||||||||||||||||||||||||||||||||||||||||||||||||||||||||||||||||||||||||||||||||||||||||||||||||||||||||||||||||||||||||||||||||||||||||||||||||||||||||||||||||||||||||||||||||||||||||||||||||||||||||||||||||||||||||||||||
16 | "Insert exceptions" button |
| |||||||||||||||||||||||||||||||||||||||||||||||||||||||||||||||||||||||||||||||||||||||||||||||||||||||||||||||||||||||||||||||||||||||||||||||||||||||||||||||||||||||||||||||||||||||||||||||||||||||||||||||||||||||||||||||||||||
| Sv translation | |||||||||||||||||||||||||||||||||||||||||||||||||||||||||||||||||||||||||||||||||||||||||||||||||||||||||||||||||||||||||||||||||||||||||||||||||||||||||||||||||||||||||||||||||||||||||||||||||||||||||||||||||||||||||||||||||||||||
| |||||||||||||||||||||||||||||||||||||||||||||||||||||||||||||||||||||||||||||||||||||||||||||||||||||||||||||||||||||||||||||||||||||||||||||||||||||||||||||||||||||||||||||||||||||||||||||||||||||||||||||||||||||||||||||||||||||||
| Anker | allgemeines_punkte | allgemeines_punkte | Descripción general|||||||||||||||||||||||||||||||||||||||||||||||||||||||||||||||||||||||||||||||||||||||||||||||||||||||||||||||||||||||||||||||||||||||||||||||||||||||||||||||||||||||||||||||||||||||||||||||||||||||||||||||||||||||||||||||||||||
| Anker | oeffnen_punkte | oeffnen_punkte | ¿Cómo abro la función?|||||||||||||||||||||||||||||||||||||||||||||||||||||||||||||||||||||||||||||||||||||||||||||||||||||||||||||||||||||||||||||||||||||||||||||||||||||||||||||||||||||||||||||||||||||||||||||||||||||||||||||||||||||||||||||||||||||
| Anker | uebersicht_punkte | uebersicht_punkte | Función «Programación» >ventana «Puntos de tiempo»: vista general
| Pos. | Icono | Texto breve | Descripción |
|---|---|---|---|
| 1 | Botón «Ayuda» |
| |
| 2 | Función «Programación» > ventana «Puntos de tiempo»: vista general |
| |
| 3 | Botón «Puntos de tiempo» |
| |
| 4 | Botones «Periodos de tiempo» |
| |
| 5 | Función para filtrar el orden y la búsqueda | ||
| 6 | Botón «Añadir punto de tiempo» | Haciendo clic se llevan a cabo las siguientes acciones:
| |
| 7 | Panel «Puntos de tiempo» | Panel con una vista general de todos los puntos y subpuntos de tiempo. | |
| 8 | Columna «Activo» / «Inactivo»conayuda directa « | Visualización del periodo de tiempo como «activo» o «inactivo»:
| |
| 9 | Nombre |
| |
| 10 | Etiquetas | Indicador «Etiquetas»: funciones que se ejecutan en el punto de tiempo establecido (con excepciones).
| |
| 11 | Próxima ejecución |
| |
| 12 | Vista previa |
| |
| 13 | Columna «Excepciones»conayuda directa « |
| |
| 14 | Panel «Acciones» | Se muestran diferentes botones para editar sus puntos de tiempo. | |
| |||
| |||
| |||
| |||
| 15 | Visualización «Subpunto de tiempo» | Los subpuntos de tiempo permiten llevar a cabo varias ejecuciones de acciones o funciones de distintos puntos de tiempo con excepciones.
|
Ejemplo de «ajustes» de una acción con el punto de tiempo mostrado en la figura de arriba:
- Visualización de la acción: segunda semana del año 2017. (Excepción: sáb. y dom.; véanse los ajustes de las «excepciones»).
- Nombre del punto de tiempo/Nombre del grupo: Time Instant 175.
- Los puntos de tiempo de acciones se aplican a las funciones de descarga automática, sincronización de tiempo y base de datos.
- Fecha de inicio de la acción: 11/01/2017.
- Acción diaria a las 07:00 horas (líneas azules).
- Próximo inicio de la acción: 12 ene. 2017 a las 07:00 horas: en 17 horas.
| Pos. | Icono | Texto breve | Descripción |
|---|---|---|---|
| 1 | Botón «Ayuda» |
| |
| 2 | Botón «Atrás» |
| |
| 3 | Ventana «Puntos de tiempo» |
| |
| 4 | Botón «Ajustes» |
| |
| 5 | Botones «Excepciones» |
| |
| 6 | Botón «Guardar» |
| |
| 7 | Visualización «Vista general de la semana» | Visualización de la vista general de la semana de los puntos de tiempo establecidos con excepciones:
| |
| 8 | Botones «Número de la semana» |
| |
| 9 | Selección «Año» |
| |
| 10 | Panel «Punto de tiempo» |
| |
| 11 | Campo de entrada«Nombre del grupo»y control deslizante«Activo» |
| |
| 12 | Botones«Etiquetas» |
Etiquetas y funciones disponibles:
| |
| 13 | Campo de entrada con lista de selección«Fecha de inicio» |
| |
| 14 | Lista de selección«Tipo de repetición» | Opciones de punto de tiempo (representación con símbolos): | |
Ejecución horaria de las acciones o funciones elegidas en «Etiquetas» .
| |||
Ejecución diaria de las acciones o funciones elegidas en «Etiquetas» .
| |||
Ejecución semanal de las acciones o funciones elegidas en «Etiquetas» .
| |||
Ejecución mensual de las acciones o funciones elegidas en «Etiquetas» .
| |||
Ejecución anual de las acciones o funciones elegidas en «Etiquetas» .
| |||
Ejecución puntual (una vez) de las acciones o funciones elegidas en «Etiquetas» .
| |||
| 15 | Campo(s) de entrada «Fecha de inicio» |
| |
| 16 | Próxima ejecución |
| |
| 17 | Próxima ejecución en |
| |
| 18 | Botón«Eliminar punto de tiempo» |
| |
| 19 | Botón«Añadir punto de tiempo» |
|
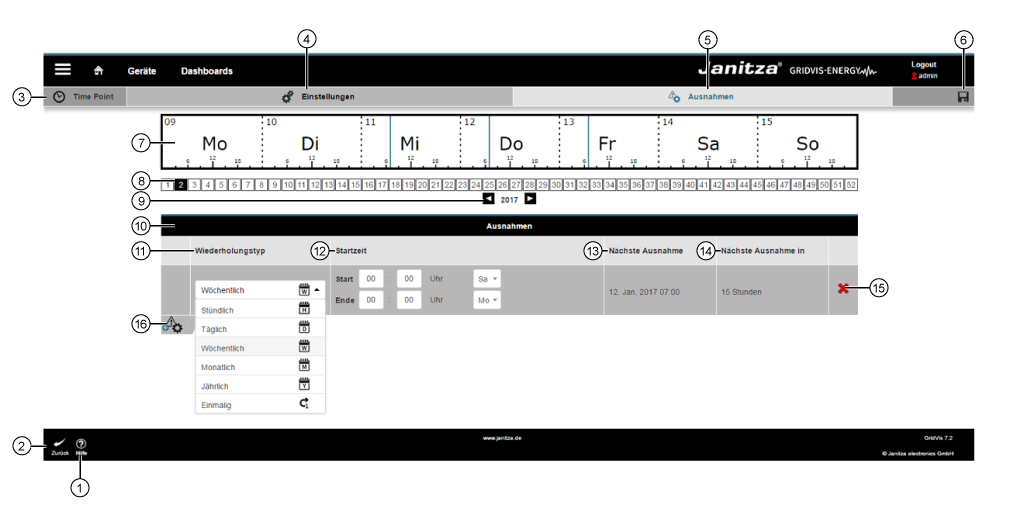
Ejemplo de «excepciones» para el punto de tiempo establecido:
- Visualización de las excepciones de la acción: segunda semana del año 2017.
- Excepción: semanal; sáb. y dom. (incluido); ajuste «lun.».
- Próxima excepción de la acción: 12 ene. 2017 a las 07:00 horas: en 15 horas.
| Pos. | Icono | Texto breve | Descripción | ||
|---|---|---|---|---|---|
| 1 | Botón «Ayuda» |
| |||
| 2 | Botón «Atrás» |
| |||
| 3 | Ventana «Puntos de tiempo» |
| |||
| 4 | Botón «Ajustes» |
| |||
| 5 | Botón «Excepciones» |
| |||
| 6 | Botón «Guardar» |
| |||
| 7 | Visualización «Vista general de la semana» | Visualización de la vista general de la semana de los puntos de tiempo establecidos con excepciones:
| |||
| 8 | Botones «Número de la semana» |
| |||
| 9 | Selección «Año» |
| |||
| 10 | Panel «Excepciones» |
| |||
| 11 | Lista de selección«Tipo de repetición» | Opciones de puntos de tiempo (representación con símbolos): excepciones de ejecución para los puntos de tiempo ajustados: | |||
Ejecución horaria de las excepciones para las acciones o funciones.
| |||||
Ejecución diaria de las excepciones para las acciones o funciones.
| |||||
Ejecución semanal de las excepciones para las acciones o funciones.
| |||||
Ejecuciónmensual de las excepciones para las acciones o funciones.
| |||||
Ejecución anual de las excepciones para las acciones o funciones.
| |||||
Ejecución puntual (una vez) de las excepciones para las acciones o funciones.
| |||||
| 12 | Campo de entrada «Tiempo de inicio» |
| |||
| 13 | Siguiente excepción |
| |||
| 14 | Siguiente excepción en |
| |||
| 15 | Botón«Eliminar» |
| |||
| 16 | Botón«Añadir excepciones» |
|
| language | it |
|---|
Nella scheda “Momenti" della funzione “Programmazione" è possibile configurare i momenti in cui devono avvenire azioni e funzioni, come ad es.
- Lettura automatica.
- Ripristini.
- Sincronizzazioni.
- Creazione di report.
- Importazioni di dati.
- Azioni del database.
- Registrazioni online.
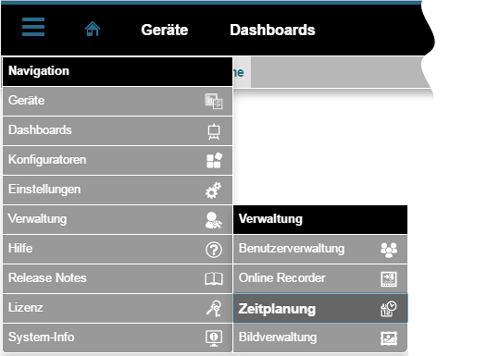
- Fare clic sul pulsante “Navigazione” nella barra di navigazione
 .
. - La funzione “Programmazione
 " si raggiunge nel menu a discesa alla voce “Gestione
  ".
". - Fare clic nella finestra “Programmazione"sul tasto “Momenti”.
Fig.: Menu “Navigazione” >Menu a comparsa "Amministrazione" > “Programmazione"
- Guida diretta.
- Porta a questa pagina della guida. Chiudendo la pagina della guida si torna alla pagina precedente.
- Funzione "Programmazione" come pulsante per il menu a discesa “Progetti".
- Non appena il numero di progetti nel sistema è >1, appare il menu a discesa “Progetti".
- Il simbolo "
 " contrassegna il progetto attivo.
 - La funzione "Programmazione" contiene i pulsanti “Momenti" e “Periodi". Facendo clic si accede alla relativa panoramica.
- Con un clic si accede alla panoramica “Momenti".
- I pulsanti attivi vengono visualizzati in "Blu".
- Con un clic si accede alla panoramica “Periodi".
- I pulsanti attivi vengono visualizzati in "Blu".
Facendo clic
- crea un nuovo “Momento".
- apre nella finestra “Impostazioni" la funzione “Momenti".
Periodo di visualizzazione “Attivo" o “Inattivo":
- Momento attivo = "simbolo" nero

- Momento inattivo = "simbolo" rosso

- Visualizzazione del nome del momento.
- I nomi si applicano al gruppo.
- Ulteriori configurazioni (momenti secondari) vengono visualizzati come righe a comparsa con la data di inizio nella colonna del nome.
Visualizzazione "Tag" - Funzioni eseguite al momento stabilito (salvo eccezioni).
Tag disponibili (funzioni):
- AD-Tag (Download automatico) "
 ".
". - TS-Tag (Sincronizzazione) "
 ".
". - Tag report"
 ".
". - DI-Tag (Importazione dei dati) "
 ".
". - DB-Tag (Azione database) "
 " .
" . - OR-Tag (Registratore online) "
 ".
".
- Visualizzazione della prossima esecuzione (giorno della settimana, data, ora).
- Rappresentazione grafica "Panoramica settimanale" della settimana in corso (colore dei momenti = blu).
- Il simbolo indica che sono configurate eccezioni per questo “Momento".
- Apre nella finestra “Impostazioni" la funzione “Momenti".
- Copia il “Momento" con i “Momenti secondari", se presenti.
- Apre una copia “Impostazioni" della funzione "Momenti" da modificare.
- Crea “Momenti secondari".
- Viene visualizzata la finestra "Impostazioni" di un nuovo momento secondario.
- Cancella il momento interessato tramite un “prompt sì/no".
I momenti secondari consentono l'esecuzione multipla di azioni/funzioni in tempi diversi, con alcune eccezioni.
- I “momenti secondari” vengono visualizzati come righe a comparsa con la data di inizio nella colonna del nome.
- Un bordo blu contrassegna il “Momento secondario".
Esempio di "Impostazioni" di un'azione con il momento mostrato nella figura precedente:
- Visualizzazione dell'azione: 2. Settimana calendariale 2017. (Eccezione: Sab. e dom. - vedere impostazioni "Eccezioni").
- Nome del momento/nome del gruppo: Time Instant 175.
- I momenti delle (azioni) si applicano alle funzioni Download automatico, Sincronizzazione e Database.
- Data di inizio dell'azione: 11/01/2017.
- Azione giornaliera alle 07:00 (linee blu).
- Il prossimo inizio dell'azione è il 12 gen. 2017 alle 07:00 - tra 17 ore.
- Guida diretta.
- Porta a questa pagina della guida. Chiudendo la pagina della guida si torna alla pagina precedente.
- Un clic riporta alla finestra Programmazione > Momenti “Panoramica".
- Ci si trova nella finestra “Momenti" della funzione “Programmazione".
- Con un clic si aprono le "Eccezioni" la funzione "Momenti".
- Configurazione delle Eccezioni temporali per le funzioni grafici, download automatico, sincronizzazione temporale, report, importazione di dati, azione sul database, registrazioni online e gestione degli allarmi.
- Con un clic si salvano le impostazioni/configurazioni.
- Le impostazioni salvate nell'interfaccia web di GridVis (Energy) sono disponibili e configurabili anche in GridVis desktop.
Visualizzazione della panoramica settimanale dei momenti impostati con eccezioni:
- Giorno del mese.
- Giorno della settimana.
- Scala oraria (bordo inferiore).
- I momenti di esecuzione (linee blu) con eccezioni (nell'esempio: Sab. e dom.).
- Selezione della settimana calendariale per la schermata “Panoramica settimanale".
- Navigazione anno - sinistra/destra - per la schermata “Panoramica settimanale".
- Area di configurazione “Momento".
- Campo di immissione del nome del momento. I nomi si applicano al gruppo.
- Ulteriori configurazioni (momenti secondari) vengono visualizzati come righe a comparsa con la data di inizio nella colonna del nome.
- Il cursore "Attivo" attiva il momento configurato. L'anteprima nella panoramica “Momenti” della finestra “Programmazione" è attiva (“Simbolo” nero ).
- La panoramica “Momenti" della finestra “Programmazione" mostra i “Momenti" disattivati con un "simbolo“ rosso.
- Un clic attiva il tag / la funzione corrispondente. I tag/ le funzioni selezionate appaiono in blu.
- Il momento impostato si applica ai tag o alle funzioni attivate.
- È possibile la selezione multipla di tag/funzioni.
Tag/funzioni disponibili:
- AD-Tag (Download automatico) "“ - Tooltip: "Il momento può essere utilizzato per il download automatico (lettura del dispositivo)".
- TS-Tag (Sincronizzazione) "“ - Tooltip "Il momento può essere utilizzato per la sincronizzazione automatica".
- Tag report "" - Tooltip: "Il momento può essere utilizzato per la creazione del report".
- DI-Tag (Importazione dei dati) "" - Tooltip: "Il momento può essere utilizzato per l'importazione automatica dei dati".
- DB-Tag (Azione database) "" - Tooltip: "Il momento può essere utilizzato per le azioni del database".
- OR-Tag (Registratore online) "" - Tooltip: “Momento per l’azzeramento del contatore errori".
- Campo di immissione o elenco di selezione “data di inizio" del momento.
- Preimpostazione: "Oggi".
Esecuzione oraria delle azioni o delle funzioni selezionate in "Tag".
Configurazione “Ora di inizio" (Pos. 15):
- Campo di immissione: Inserire il minuto di inizio.
Esecuzione giornaliera delle azioni o delle funzioni selezionate in "Tag".
Configurazione “Ora di inizio" (Pos. 15):
- Campo di immissione: Immissione dell'ora e dei minuti di inizio.
Esecuzione giornaliera delle azioni o delle funzioni selezionate in "Tag".
Configurazione “Ora di inizio" (Pos. 15):
- Campi di immissione: Inserire l'ora, i minuti e il giorno della settimana di inizio.
Esecuzione mensile delle azioni o delle funzioni selezionate in "Tag".
Configurazione “Ora di inizio" (Pos. 15):
- Campi di immissione: Immissione dell'ora e dei minuti di inizio.
- Elenco di selezione "Giorno del mese" e pulsante “ultimo giorno
 ".
".
Esecuzione annuale delle azioni o delle funzioni selezionate in "Tag".
Configurazione “Ora di inizio" (Pos. 15):
- Campi di immissione: Immissione dell'ora e dei minuti di inizio.
- Elenchi di selezione: "Giorno del mese" e “Mese".
Esecuzione unica delle azioni o delle funzioni selezionate in "Tag".
Configurazione “Ora di inizio" (Pos. 15):
- Campo di immissione con elenco di selezione "Data e ora".
- Momento di inizio.
- A seconda dell'impostazione "Tipo di ripetizione" (vedere pos. 14).
- Visualizzazione della prossima esecuzione (giorno, data, ora).
- Schermata del tempo rimanente fino alla prossima esecuzione.
- Cancella il “momento" interessato.
- Con un clic si crea una nuova linea di configurazione “Momento" con le voci "Tipo di ripetizione", “Data di inizio", “Prossima esecuzione", "Prossima esecuzione tra".
- Possibilità di creare più momenti (Momenti secondari).
Esempio "Eccezioni" per il momento impostato:
- Visualizzazione delle eccezioni dell'azione: 2. Settimana calendariale 2017.
- Eccezione: Settimanale, sab. e dom. (compresi) - impostazione “lun”.
- Prossima eccezione dell'azione il 12 gen. 2017 alle 07:00 - tra 15 ore.
- Guida diretta.
- Porta a questa pagina della guida. Chiudendo la pagina della guida si torna alla pagina precedente.
- Un clic riporta alla finestra Programmazione > Momenti “Panoramica".
- Ci si trova nella finestra “Momenti" della funzione “Programmazione".
- Con un clic si aprono le "Impostazioni" della funzione "Momenti".
- Configurazione dei periodi per le funzioni, download automatico, sincronizzazione temporale, report, importazione di dati, azione sul database e registrazioni online.
- Con un clic si apre la finestra “Eccezioni" della funzione "Momenti".
- Configurazione delle eccezioni dei momenti per le funzioni, download automatico, sincronizzazione temporale, report, importazione di dati, azione sul database e registrazioni online.
- Con un clic si salvano le impostazioni/configurazioni.
- Le impostazioni salvate nell'interfaccia web di GridVis (Energy) sono disponibili e configurabili anche in GridVis desktop.
Visualizzazione della panoramica settimanale dei momenti impostati con eccezioni:
- Giorno del mese.
- Giorno della settimana.
- Scala oraria (bordo inferiore).
- I momenti di esecuzione (linee blu) con eccezioni (nell'esempio: Sab. e dom.).
- Selezione della settimana calendariale per la schermata “Panoramica settimanale".
- Navigazione anno - sinistra/destra - per la schermata “Panoramica settimanale".
- Area configurazione "Eccezioni".
Opzioni momenti (rappresentazione con simboli) - Eccezioni dell'esecuzione dei Momenti impostati:
Esecuzione oraria delle eccezioni per le azioni/funzioni.
Impostazione “Ora di inizio" (Pos. 12):
- Campo di immissione “Inizio": Inserire il minuto di inizio.
- Campo di immissione “Fine": Inserire il minuto di fine.
Esecuzione giornaliera delle eccezioni per le azioni/funzioni.
Impostazione “Ora di inizio" (Pos. 12):
- Campo di immissione “Inizio": Immissione dell'ora e dei minuti di inizio.
- Campo di immissione “Fine": Immissione dell'ora e dei minuti di fine.
Esecuzione settimanale delle eccezioni per le azioni/funzioni.
Impostazione “Ora di inizio" (Pos. 12):
- Campo di immissione “Inizio" (Ora e minuti) con elenco di selezione “Giorni" (Giorno della settimana).
- Campo di immissione “Fine" (Ora e minuti) con elenco di selezione “Giorni" (Giorno della settimana).
Esecuzione mensiledelle eccezioni per le azioni/funzioni.
Impostazione “Ora di inizio" (Pos. 12):
Esecuzione annualedelle eccezioni per le azioni/funzioni.
Impostazione “Ora di inizio" (Pos. 12):
- Campo di immissione “Inizio" (Ora e minuti) con gli elenchi di selezione “Giorno" (Giorno del mese) e “Mese".
- Campo di immissione “Fine" (Ora e minuti) con gli elenchi di selezione “Giorno" (Giorno del mese) e “Mese".
Esecuzione unicadelle eccezioni per le azioni/funzioni.
Impostazione “Ora di inizio" (Pos. 12):
- Campo di immissione “Inizio" (Data e ora) con elenco di selezione “Data".
- Campo di immissione “Fine" (Data e ora) con elenco di selezione “Data".
- Selezione delle eccezioni “Ora di inizio".
- A seconda dell'impostazione "Tipo di ripetizione" (vedere pos. 11).
| Info |
|---|
Se viene visualizzato il messaggio di errore "L'intervallo di tempo è troppo ampio!" configurare un intervallo di tempo più ridotto. |
- Visualizzazione dell'eccezione di esecuzione successiva (Data, ora).
- Schermata del tempo rimanente fino alla prossima eccezione dell’esecuzione.
- Elimina la relativa “Eccezione" per il momento.