Versionen im Vergleich

Schlüssel

  • Diese Zeile wurde hinzugefügt.
  • Diese Zeile wurde entfernt.
  • Formatierung wurde geändert.
Kommentar: Mittels Scroll Versions veröffentlicht aus dem Bereich GVH und Version 1.0.
Sv translation
languagede

Anker
oben
oben
Gültig für

GridVis-Editionen

Software-Plattform

Image Modified

Image Modified

Scroll Ignore
scroll-viewporttrue
scroll-pdftrue
scroll-officetrue
scroll-chmtrue
scroll-docbooktrue
scroll-eclipsehelptrue
scroll-epubtrue
scroll-htmltrue
Layout-Box
floatingleft
Linchpin Teaser
iconlinchpin-teaser-icon-play-circle
varianticon
width150px
aligncenter
titleTUTORIAL
type6
newTabtrue
urlhttps://youtu.be/Yp3zOqdPMkc
height150px

Scroll Only
scroll-viewporttrue
scroll-pdftrue
scroll-officetrue
scroll-chmtrue
scroll-docbooktrue
scroll-eclipsehelptrue
scroll-epubtrue
scroll-htmltrue

Image Added


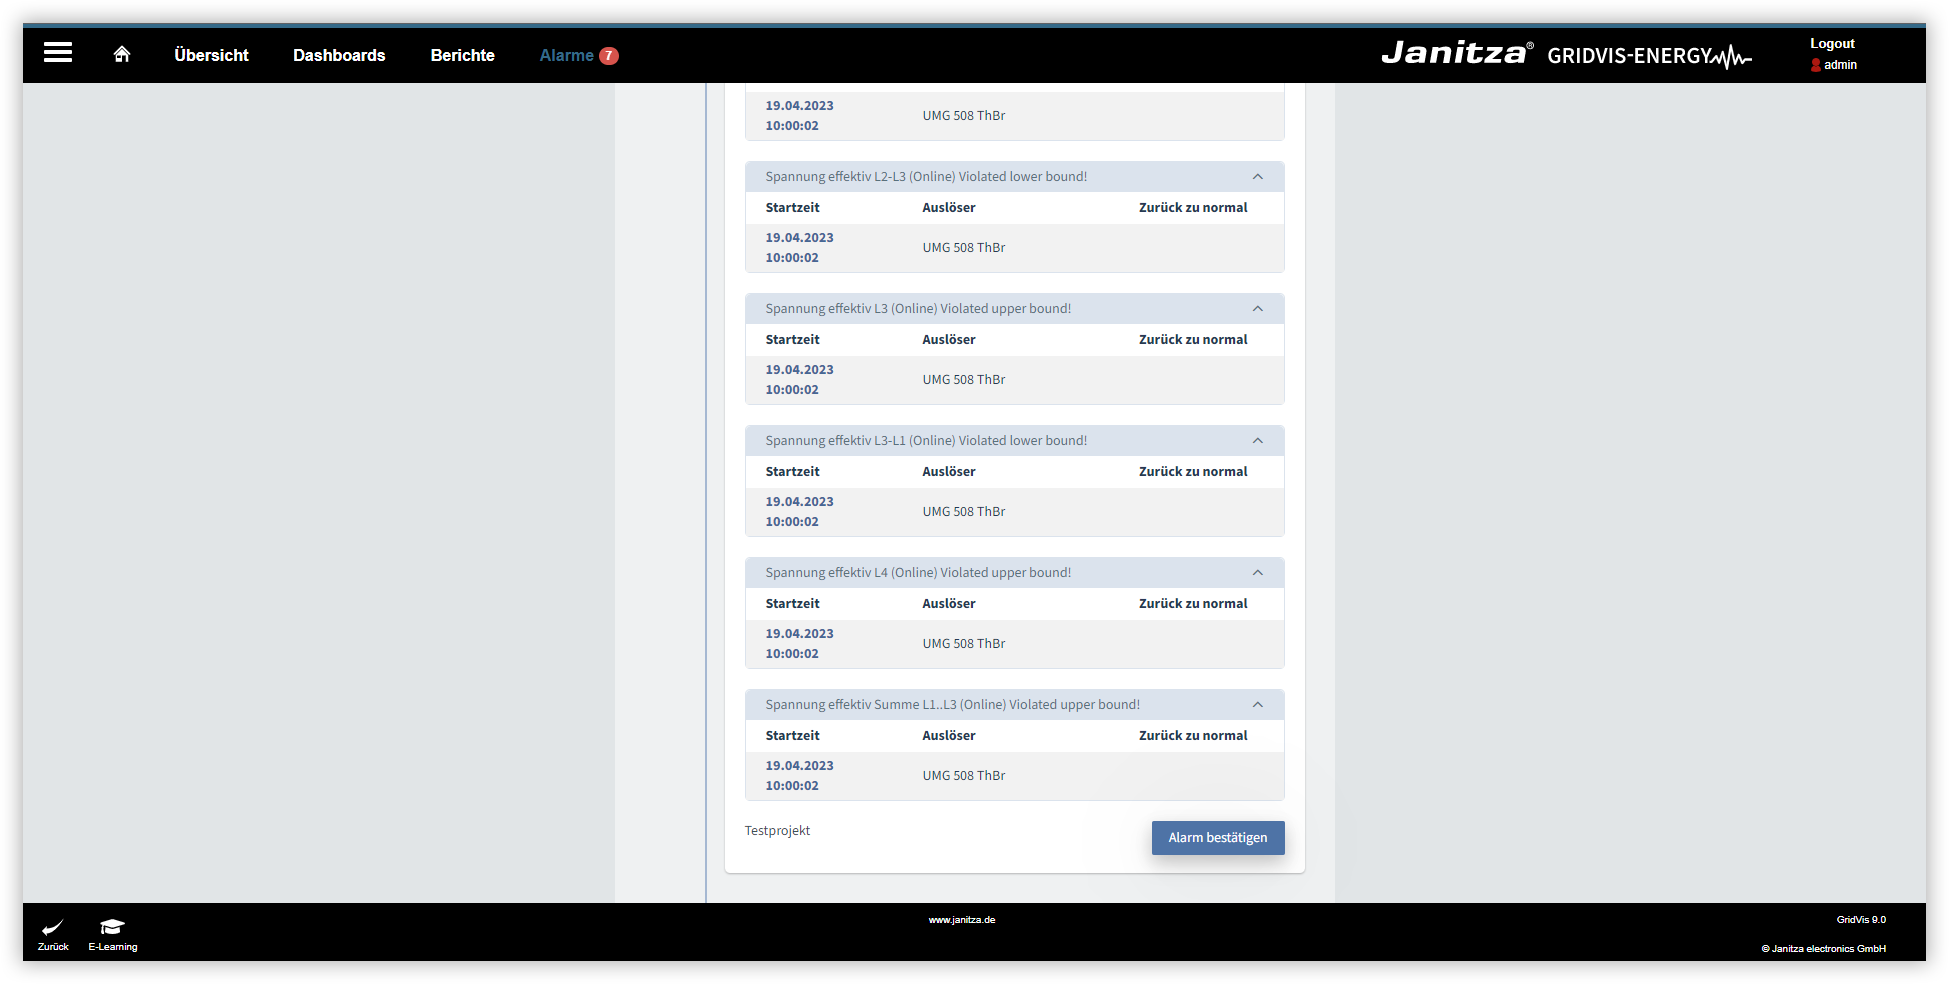
In dieser Anleitung werden Ihnen die Funktionen des Alarmsystems im Web erklärt. Die folgenden Inhalte umfassen das Aufrufen der Alarmliste, das Anzeigen und Quittieren der Alarme sowie das Filtern nach bestimmten Alarmen.

  1. Klicken Sie auf den Hyperlink Alarme. Dieser befindet sich in der Kopfzeile der GridVis-Anwendung.
  2. Klicken Sie im Fenster Offene Alarme auf eine Alarmgruppe, um die einzelnen Alarme dieser Gruppe anzuzeigen.
  3. Um einen Alarm zu bestätigen, klicken Sie auf die Schaltfläche Alarm bestätigen. Über die Auswahlkästchen können sie die Alarme mehrerer Gruppen gleichzeitig bestätigen.
  4. Es öffnet sich das Fenster Alarme bestätigen. Geben Sie einen Kommentar ein und klicken Sie anschließend auf die Schaltfläche Alarme jetzt bestätigen. Beachten Sie, dass ein Kommentar eingegeben werden muss, um einen Alarm zu bestätigen.
  5. Klicken Sie auf Zurück, um in die Alarmübersicht zu gelangen.


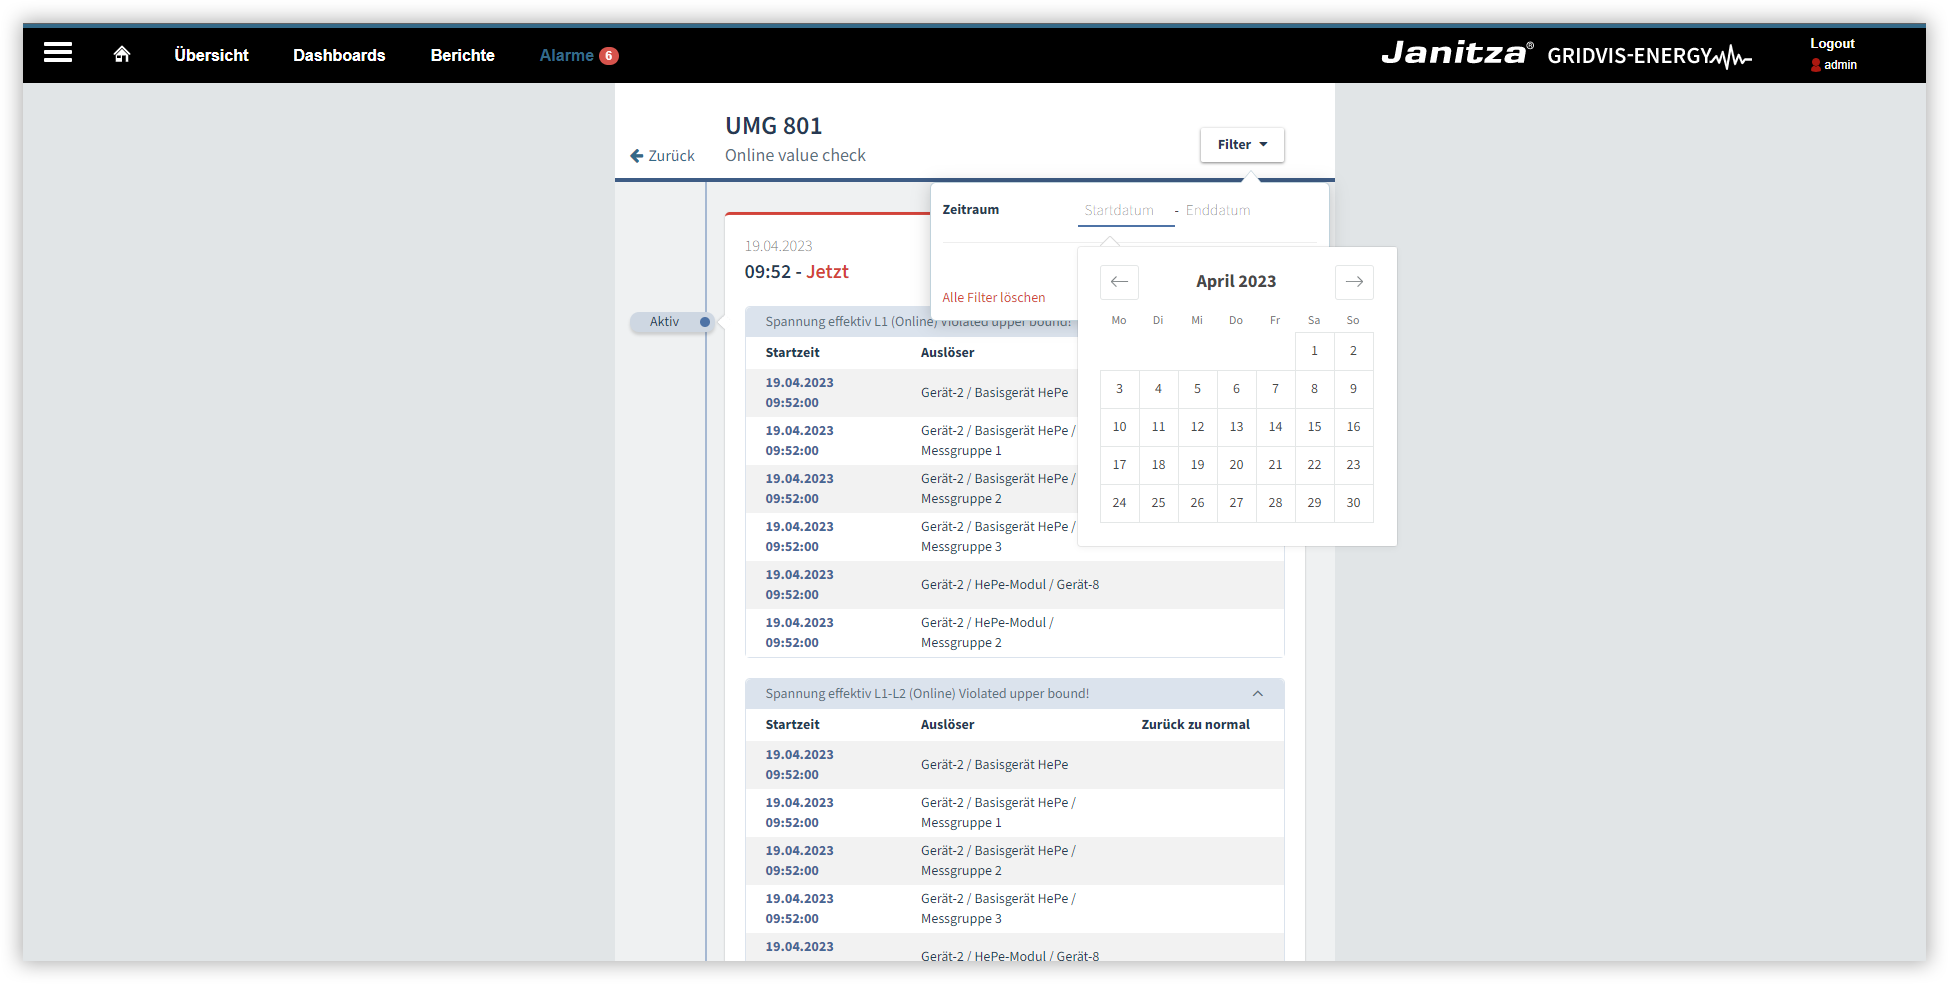
Sie können sowohl offene als auch bestätigte Alarme nach dem Zeitraum filtern, in dem sie aufgetreten sind.

  1. Klicken Sie auf eine Alarmgruppe, um die einzelnen Alarme dieser Gruppe anzuzeigen.
  2. Klicken Sie auf die Dropdown-Schaltfläche Filter.
  3. Klicken Sie auf Startdatum, um den Kalender zu öffnen.
  4. Wählen Sie ein Start- und ein Enddatum aus. Klicken Sie auf Anwenden. Sie sehen jetzt alle Alarme, die im angegebenen Filterzeitraum aufgetreten sind.
  5. Um den Filter zu entfernen, klicken Sie erneut auf die Dropdown-Schaltfläche Filter und anschließend auf die Schaltfläche Alle Filter löschen.
Info
titleInfo

Eine Anleitung zum Erstellen von Alarmquellen und Alarmplänen, sowie weiterführende Informationen zu Alarmen finden Sie im Bereich Alarm-Management.


Sv translation
languageen

Anker
oben
oben
Valid for

GridVis Editions

Software platform

Image Modified

Image Modified

Scroll Ignore
scroll-viewporttrue
scroll-pdftrue
scroll-officetrue
scroll-chmtrue
scroll-docbooktrue
scroll-eclipsehelptrue
scroll-epubtrue
scroll-htmltrue
Layout-Box
floatingleft
Linchpin Teaser
iconlinchpin-teaser-icon-play-circle
varianticon
width150px
aligncenter
titleTUTORIAL
type6
newTabtrue
urlhttps://youtu.be/EAOeJdpr-ec
height150px

Scroll Only
scroll-viewporttrue
scroll-pdftrue
scroll-officetrue
scroll-chmtrue
scroll-docbooktrue
scroll-eclipsehelptrue
scroll-epubtrue
scroll-htmltrue

Image Added


This tutorial explains the functions of the alarm system on the web. The following content includes accessing the alarm list, viewing and acknowledging alarms, and filtering for specific alarms.

  1. Click the Alarms hyperlink. This is located in the header of the GridVis application.
  2. In the Pending Alarms window, click on an alarm group to display the individual alarms of this group.
  3. To acknowledge an alarm, click the Acknowledge Alarm button. You can use the checkboxes to confirm the alarms of several groups at the same time.
  4. The Acknowledge Alarms window opens. Enter a comment and then click the button Acknowledge alarms now. Note that a comment must be entered to acknowledge an alarm.
  5. Click Back to return to the alarm overview.


You can filter both pending and acknowledged alarms by the time period in which they occurred.

  1. Click on an alarm group to display the individual alarms of this group.
  2. Click the Filter drop-down button.
  3. Click on Start Date to open the calendar.
  4. Select a start date and an end date. Click Apply. You will now see all alarms that occurred in the specified filter period.
  5. To remove the filter, click the Filter drop-down button once again and then click the Reset all filters button.


Info
titleInfo

Instructions for creating alarm sources and alarm plans, as well as further information about alarms can be found in the section Alarm-Management.


Sv translation
languagees

Anker
oben
oben
Válido para

Ediciones de GridVis

Plataforma de software

Image Modified

Image Modified

Scroll Ignore
scroll-viewporttrue
scroll-pdftrue
scroll-officetrue
scroll-chmtrue
scroll-docbooktrue
scroll-eclipsehelptrue
scroll-epubtrue
scroll-htmltrue
Layout-Box
floatingleft
Linchpin Teaser
iconlinchpin-teaser-icon-play-circle
varianticon
width150px
aligncenter
titleTUTORIAL
type6
newTabtrue
urlhttps://youtu.be/EAOeJdpr-ec
height150px

Scroll Only
scroll-viewporttrue
scroll-pdftrue
scroll-officetrue
scroll-chmtrue
scroll-docbooktrue
scroll-eclipsehelptrue
scroll-epubtrue
scroll-htmltrue

Image Added


En las presentes instrucciones se explican las funciones del sistema de alarmas en la versión web. Los siguientes contenidos comprenden el acceso a la lista de alarmas, la visualización y la confirmación de las alarmas, así como el filtrado por determinadas alarmas.

  1. Haga clic en el hipervínculo Alarmas. Este se encuentra en el encabezado de la aplicación GridVis.
  2. En la ventana Alarmas pendientes, haga clic en un grupo de alarmas para mostrar las alarmas individuales de este grupo.
  3. Para confirmar una alarma, haga clic en el botón Confirmar alarma. A través de las casillas de verificación podrá confirmar simultáneamente las alarmas de varios grupos.
  4. Se abre la ventana Confirmar alarmas. Introduzca un comentario y, a continuación, haga clic en el botón Confirmar alarmas ahora. Tenga en cuenta que es necesario introducir un comentario para confirmar una alarma.
  5. Haga clic en Atrás para acceder a la vista general de alarmas.


Usted puede filtrar tanto alarmas pendientes como alarmas confirmadas por el periodo de tiempo en el que se han producido.

  1. Haga clic en un grupo de alarmas para mostrar las alarmas individuales de este grupo.
  2. Haga clic en el botón desplegable Filtro.
  3. Haga clic en la Fecha de inicio para abrir el calendario.
  4. Seleccione una fecha de inicio y una fecha final. Haga clic en Aplicar. Ahora usted ve todas las alarmas que se han producido en el periodo de filtrado indicado.
  5. Para eliminar el filtro, haga nuevamente clic en el botón desplegable Filtro y, a continuación, en el botón Eliminar todos los filtros.


Info
titleInformación

En la sección Gestión de alarmas Alarm-Management encontrará unas instrucciones para la creación de fuentes de alarma y planes de alarma, así como información adicional acerca de las alarmas.


Sv translation
languageit

Anker
oben
oben
Valido per

Edizioni GridVis

Piattaforma software

Image Modified

Image Modified

Scroll Ignore
scroll-viewporttrue
scroll-pdftrue
scroll-officetrue
scroll-chmtrue
scroll-docbooktrue
scroll-eclipsehelptrue
scroll-epubtrue
scroll-htmltrue
Layout-Box
floatingleft
Linchpin Teaser
iconlinchpin-teaser-icon-play-circle
varianticon
width150px
aligncenter
titleTUTORIAL
type6
newTabtrue
urlhttps://youtu.be/EAOeJdpr-ec
height150px

Scroll Only
scroll-viewporttrue
scroll-pdftrue
scroll-officetrue
scroll-chmtrue
scroll-docbooktrue
scroll-eclipsehelptrue
scroll-epubtrue
scroll-htmltrue

Image Added


Questa guida spiega le funzioni del sistema di allarme sul web. I seguenti contenuti trattano la consultazione dell'elenco degli allarmi, la visualizzazione, la tacitazione degli allarmi e il filtraggio di allarmi specifici.

  1. Fare clic sul collegamento ipertestuale Allarmi. Quest’ultimo si trova nell'intestazione dell'applicazione GridVis.
  2. Fare clic su un gruppo di allarmi nella finestra Allarmi aperti per visualizzare i singoli allarmi di questo gruppo.
  3. Per confermare un allarme, fare clic sul pulsante Conferma allarme. È possibile confermare gli allarmi di più gruppi contemporaneamente tramite le caselle di selezione.
  4. Si apre la finestra Conferma allarme. Inserire un commento e fare clic sul pulsante Conferma allarmi ora. Si noti che per confermare un allarme è necessario inserire un commento.
  5. Fare clic su Indietro per tornare al riepilogo degli allarmi.

È possibile filtrare gli allarmi aperti e riconosciuti in base al periodo in cui si sono verificati.

  1. Fare clic su un gruppo di allarmi per visualizzare i singoli allarmi del gruppo.
  2. Fare clic sul pulsante a discesa Filtro.
  3. Fare clic su Data di inizio per aprire il calendario.
  4. Selezionare una data di inizio e una di fine. Fare clic su Applica. A questo punto vengono visualizzati tutti gli allarmi che si sono verificati nel periodo specificato nel filtro.
  5. Per rimuovere il filtro, fare nuovamente clic sul pulsante a tendina Filtro quindi sul pulsante Cancella tutti i filtri.


Info
titleInfo

Le istruzioni su come creare fonti di allarme e piani di allarme, nonché ulteriori informazioni sugli allarmi, sono disponibili nella sezione Gestione allarmi.