Versionen im Vergleich

Schlüssel

  • Diese Zeile wurde hinzugefügt.
  • Diese Zeile wurde entfernt.
  • Formatierung wurde geändert.
Kommentar: Mittels Scroll Versions veröffentlicht aus dem Bereich GVH und Version 1.0.
Sv translation
languagede


Gültig für

GridVis®-EditionenSoftware-Plattform


Anker
Zertifikat
Zertifikat
Absichern der Datenübertragung zwischen GridVis®-Dienst und Webbrowser

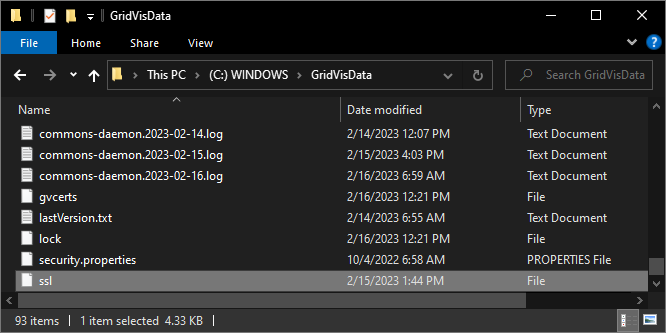
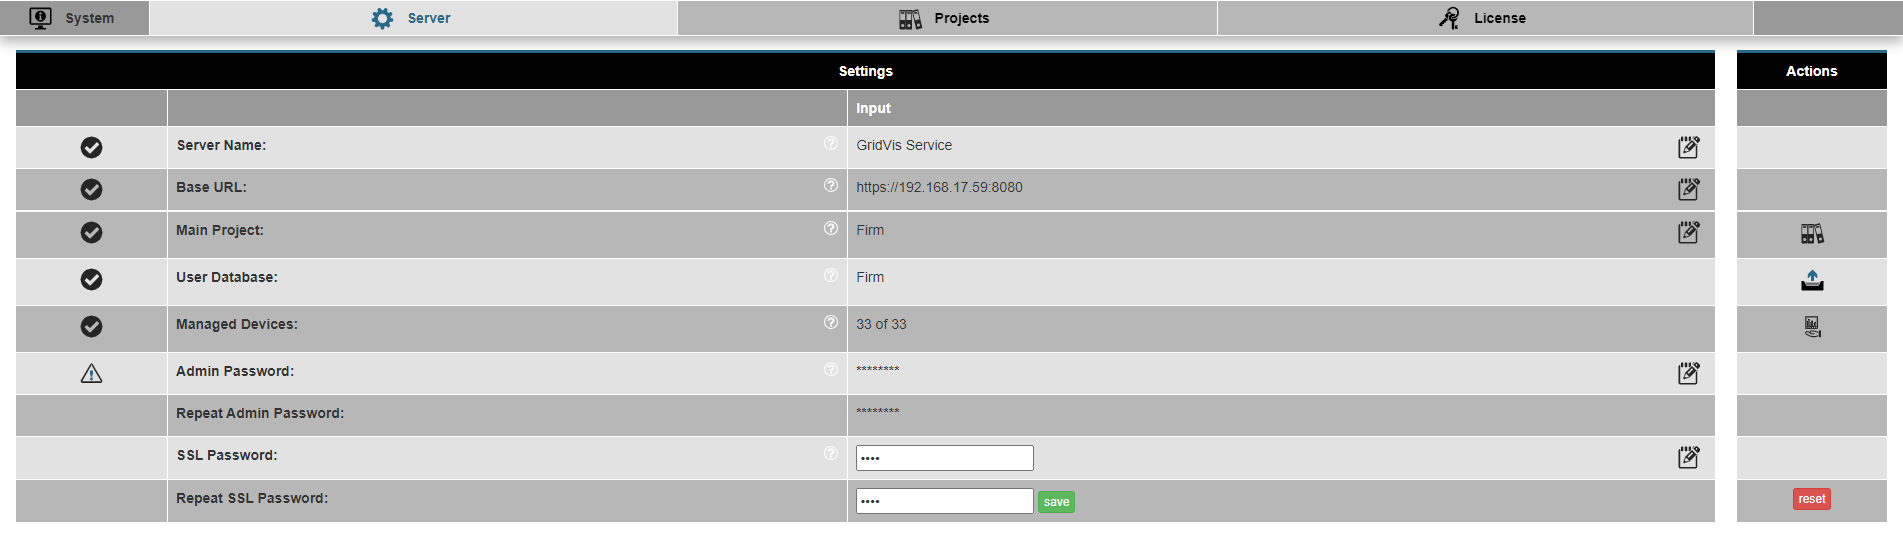
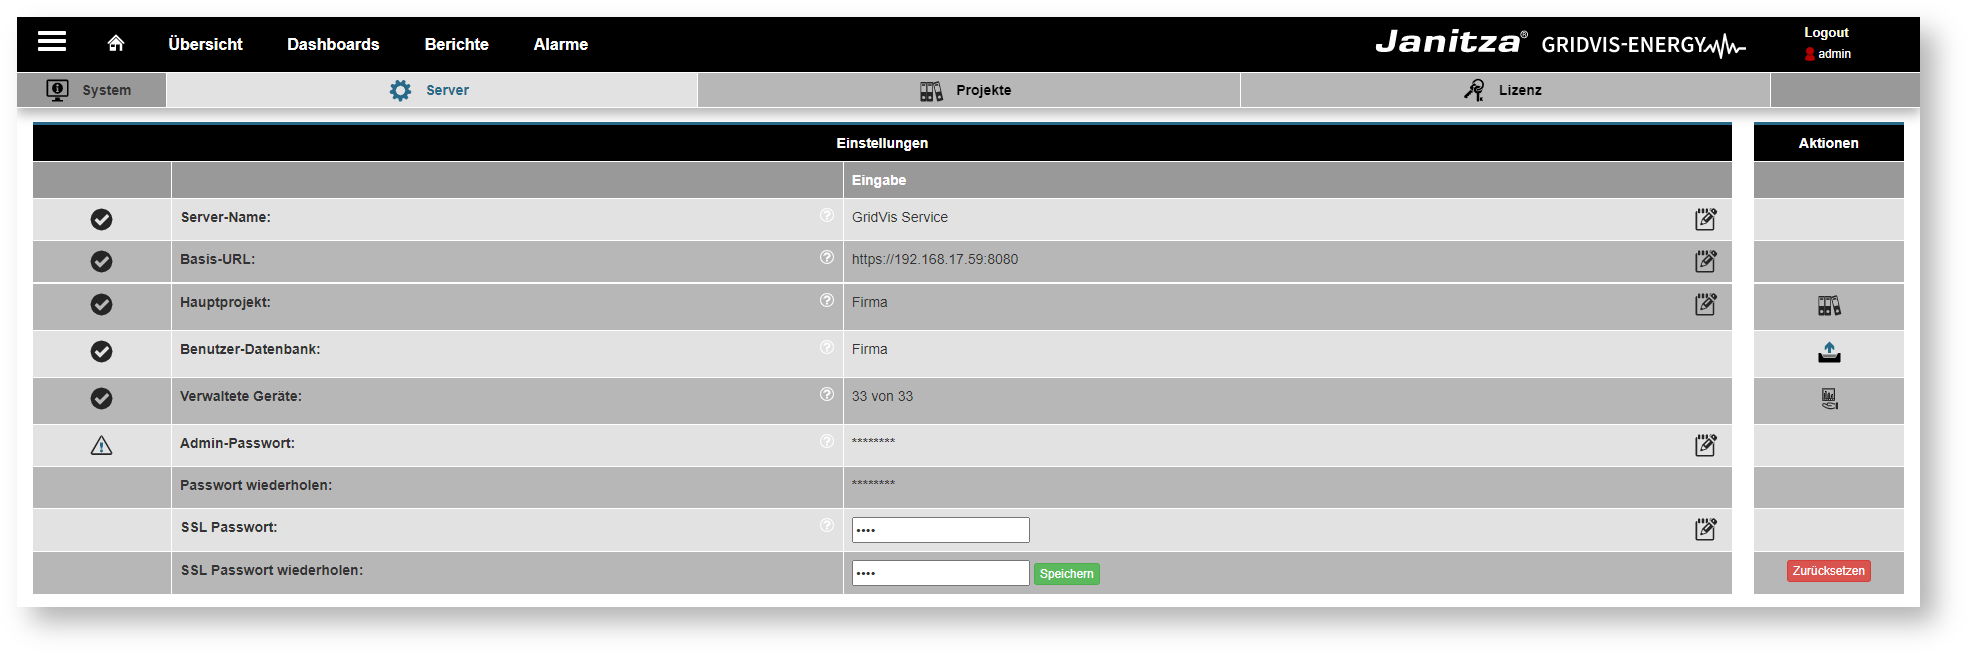
Die Datenübertragung zwischen dem GridVis®-Dienst und dem Webbrowser kann über ein SSL-Zertifikat verschlüsselt werden. Das Zertifikat muss im p12- oder pfx-Format vorliegen. Wenden Sie sich ggf. an Ihre IT-Abteilung.


Aktivieren der Verschlüsselung

  1. Kopieren Sie die Zertifikatsdatei in das Konfigurationsverzeichnis des GridVis®-Diensts. Standardmäßig ist dieses Verzeichnis C:\GridVisData.

  2. Benennen Sie die Datei in ssl um. Beachten Sie, dass die Datei keine Dateiendung haben darf.

  3. Starten Sie den GridVis®-Dienst neu.
  4. Falls das Zertifikat nicht passwortgeschützt ist, ist der GridVis®-Dienst jetzt nur über eine HTTPS-Verbindung im Webbrowser erreichbar. Beispiel:
    http://[Webadresse]:8080 ist nicht mehr erreichbar.
    https://[Webadresse]:8080 ist erreichbar und zeigt die gewohnte Startseite des GridVis®-Diensts.
    [Webadresse] entspricht der Webadresse Ihres GridVis®-Diensts.

Info
titleHinweis

Nach Aktivierung der Verschlüsselung ist der GridVis®-Dienst im Webbrowser nur noch über die im Zertifikat spezifizierte Webadresse erreichbar. Die Verwendung von Wildcards ist zulässig.


Falls das Zertifikat passwortgeschützt ist, muss das Passwort im GridVis®-Dienst hinterlegt werden, bevor der Webbrowser eine HTTPS-Verbindung aufbauen kann. Gehen Sie dazu wie folgt vor:

  1. Öffnen Sie die Weboberfläche des GridVis®-Dienst wie gewohnt über eine HTTP-Verbindung.
  2. Wechseln Sie zur Server-Konfiguration. Diese finden Sie unter Einstellungen > System.
  3. Geben Sie das Zertifikats-Passwort unter SSL-Passwort ein und wiederholen Sie das Passwort. Stimmen beide Eingaben überein, wird die Speichern-Schaltfläche grün.
  4. Bestätigen Sie das Passwort mit der Speichern-Schaltfläche. Der GridVis®-Dienst wird neu gestartet.
  5. Stimmt das Passwort mit dem Passwort des Zertifikats überein, ist der GridVis®-Dienst nur über eine HTTPS-Verbindung im Webbrowser erreichbar. Stimmen die Passwörter nicht überein, der GridVis®-Dienst nur über eine HTTP-Verbindung erreichbar.

Deaktivieren der Verschlüsselung

  1. Entfernen Sie die Zertifikatsdatei aus dem Konfigurationsverzeichnis des GridVis®-Diensts.
  2. Entfernen Sie ggf. das SSL-Passwort in der Server-Konfiguration mit der roten Zurücksetzen-Schaltfläche.
  3. Starten Sie den GridVis®-Dienst neu.
  4. Der GridVis®-Dienst ist jetzt nur über eine HTTP-Verbindung im Webbrowser erreichbar.


Anker
Proxy
Proxy
Einrichten einer Verbindung zu einem Proxy-Server

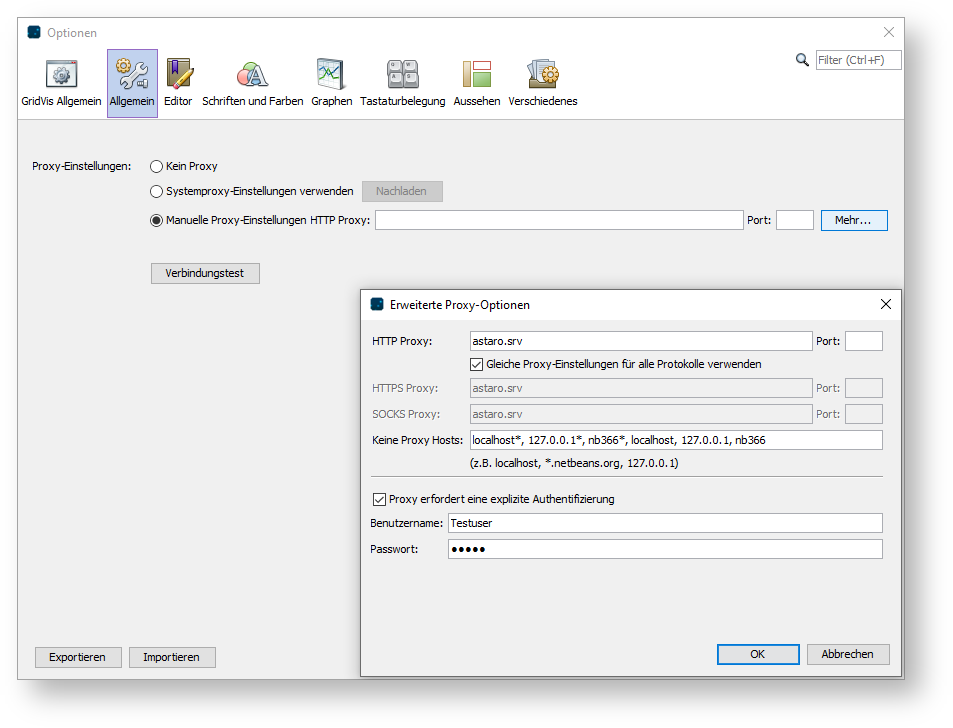
Für die Verbindung zwischen der GridVis® und einem Proxy-Server müssen die Proxy-Einstellungen sowohl in der GridVis®-Desktop als auch im GridVis®-Dienst hinterlegt werden. Wenden Sie sich ggf. an Ihre IT-Abteilung.


Proxy-Einstellungen in der GridVis®-Desktop hinterlegen

  1. Öffnen Sie die Einstellungen der GridVis®-Desktop unter Extras > Optionen.
  2. Wechseln Sie zum Reiter Allgemein.
  3. Wählen Sie die manuellen Proxy-Einstellungen aus und öffnen Sie die erweiterten Proxy-Optionen mit der Schaltfläche Mehr.
  4. Geben Sie die Proxy-Einstellungen ein und bestätigen Sie diese.
  5. Die GridVis®-Desktop kann jetzt die Verbindung zum Proxy-Server herstellen.

Proxy-Einstellungen in der GridVis®-Desktop entfernen

  1. Öffnen Sie die Einstellungen der GridVis®-Desktop unter Extras > Optionen.
  2. Wechseln Sie zum Reiter Allgemein.
  3. Entfernen Sie alle Einträge der manuellen Proxy-Einstellungen.
  4. Wählen Sie Kein Proxy oder Systemproxy-Einstellungen verwenden aus. Diese Auswahl ist abhängig von Ihrem IT-System. Wenden Sie sich ggf. an Ihre IT-Abteilung. Bestätigen Sie die Auswahl.
  5. Die GridVis®-Desktop verwendet jetzt keine eigenen Proxy-Einstellungen mehr.


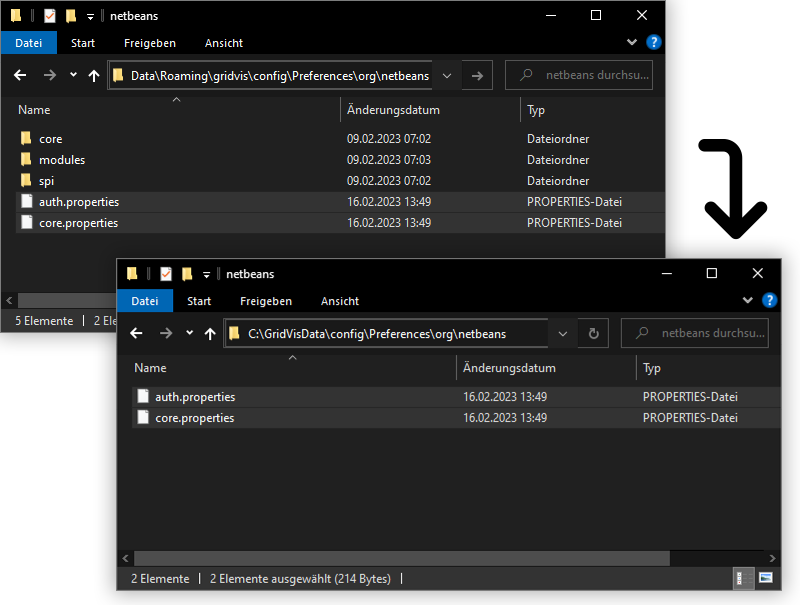
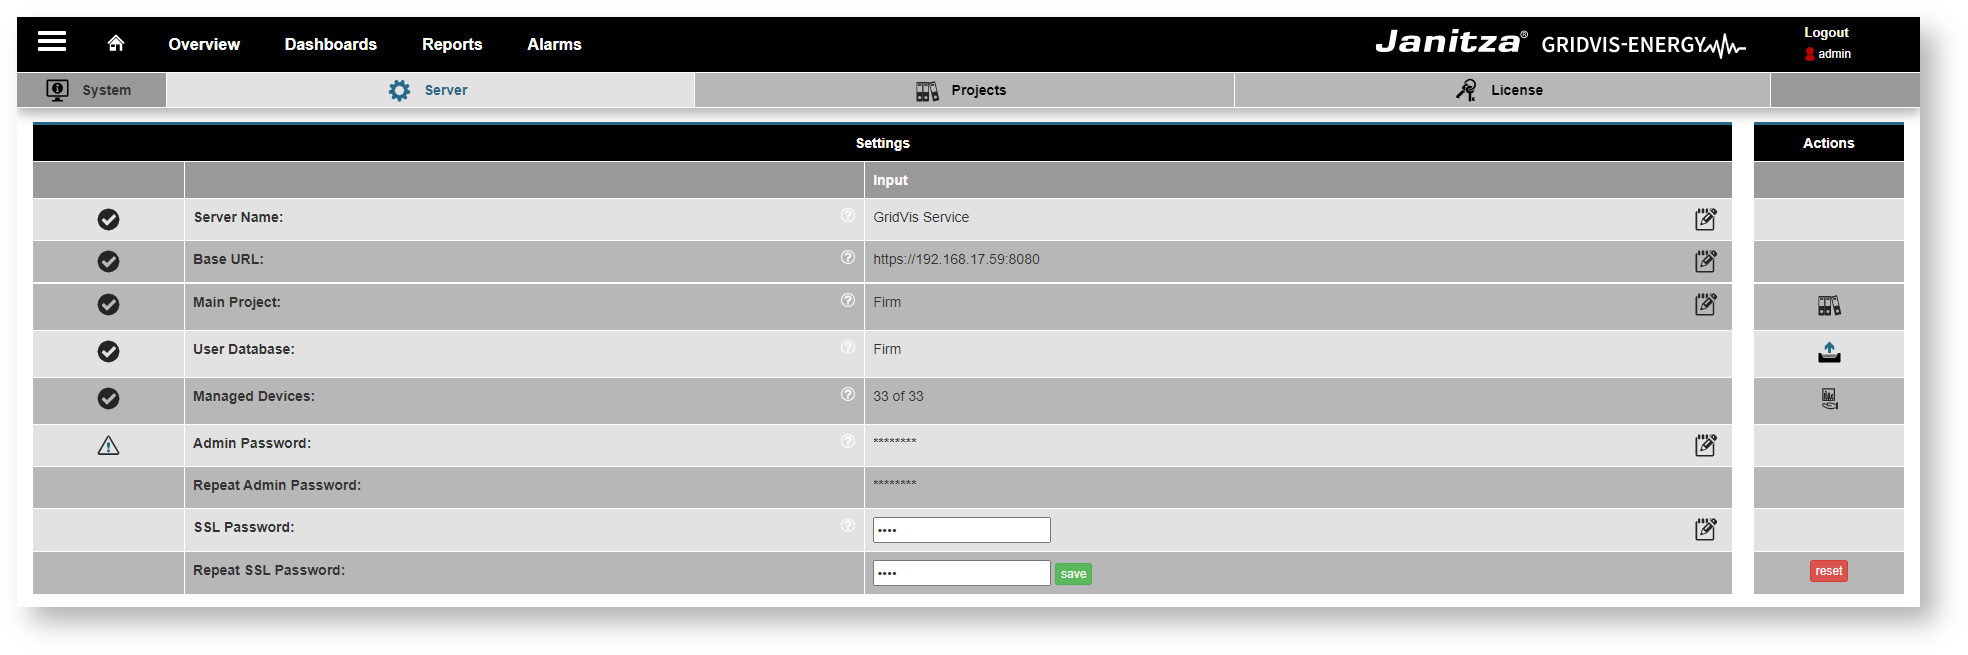
Proxy-Einstellungen im GridVis®-Dienst hinterlegen

Um Proxy-Einstellungen im GridVis®-Dienst zu hinterlegen, müssen diese Einstellungen zuerst in der GridVis®-Desktop hinterlegt werden.

  1. Öffnen Sie das Konfigurationsverzeichnis der GridVis®-Desktop. Standardmäßig ist dieses Verzeichnis %appdata%\gridvis.
  2. Navigieren Sie in der Ordnerstruktur zu config\Preferences\org\netbeans.
  3. Kopieren Sie die beiden Dateien auth.properties und core.properties. Diese enthalten die Proxy-Einstellungen.
  4. Öffnen Sie das Konfigurationsverzeichnis des GridVis®-Diensts. Standardmäßig ist dieses Verzeichnis C:\GridVisData.
  5. Navigieren Sie in der Ordnerstruktur zu config\Preferences\org\netbeans. Ggf. müssen Sie die Ordner org und netbeans manuell anlegen.
  6. Fügen Sie die Dateien auth.properties und core.properties ein.
  7. Starten Sie den GridVis®-Dienst neu.
  8. Der GridVis®-Dienst kann jetzt die Verbindung zum Proxy-Server herstellen.

Proxy-Einstellungen im GridVis®-Dienst entfernen

  1. Öffnen Sie das Konfigurationsverzeichnis des GridVis®-Diensts und navigieren Sie zu den Konfigurationsdateien mit den Proxy-Einstellungen. Standardmäßig befinden sich diese Dateien unter C:\GridVisData\config\Preferences\org\netbeans.
  2. Entfernen Sie die Dateien auth.properties und core.properties.
  3. Starten Sie den GridVis®-Dienst neu.
  4. Der GridVis®-Dienst verwendet jetzt keine eigenen Proxy-Einstellungen mehr.


Sv translation
languageen


Valid for

GridVis® editionsSoftware platform


Anker
Zertifikat
Zertifikat
Securing data transmission between GridVis® Service and web browser

The data transfer between the GridVis® Service and the web browser can be encrypted using an SSL certificate. The certificate must be in p12 or pfx format. If necessary, contact your IT department.


Enabling encryption

  1. Copy the certificate file to the configuration directory of the GridVis® Service. By default, this directory is C:\GridVisData.

  2. Rename the file as ssl. Note that the file must not have a file extension.

  3. Restart the GridVis® Service.
  4. If the certificate is not password protected, the GridVis® Service is now accessible only via an HTTPS connection in the web browser. Example:
    http://[Web address]:8080 is no longer accessible.
    https://[Web address]:8080 is accessible and shows the usual start page of the GridVis® Service.
    [Web address] corresponds to the web address of your GridVis® Service.

Info
titleNote

Once encryption has been activated, the GridVis® Service can only be accessed in the web browser via the web address specified in the certificate. The use of wildcards is permitted.


If the certificate is password protected, the password must be saved in the GridVis® Service before the web browser can establish an HTTPS connection. To do so, proceed as follows:

  1. Open the web interface of the GridVis® Service as usual via an HTTP connection.
  2. Go to the server configuration. This can be found under Settings > System.
  3. Enter the certificate password under SSL password and repeat the password. If both entries match, the Save button turns green.
  4. Confirm the password with the Save button. The GridVis® Service restarts.
  5. If the password matches the password of the certificate, the GridVis® Service can only be accessed in the web browser via an HTTPS connection. If the passwords do not match, the GridVis® Service can only be accessed via an HTTP connection.

Disabling encryption

  1. Remove the certificate file from the configuration directory of the GridVis® Service.
  2. If necessary, remove the SSL password in the server configuration using the red Reset button.
  3. Restart GridVis® Service.
  4. The GridVis® Service is now accessible in the web browser only via an HTTP connection.


Anker
Proxy
Proxy
Setting up a connection to a proxy server

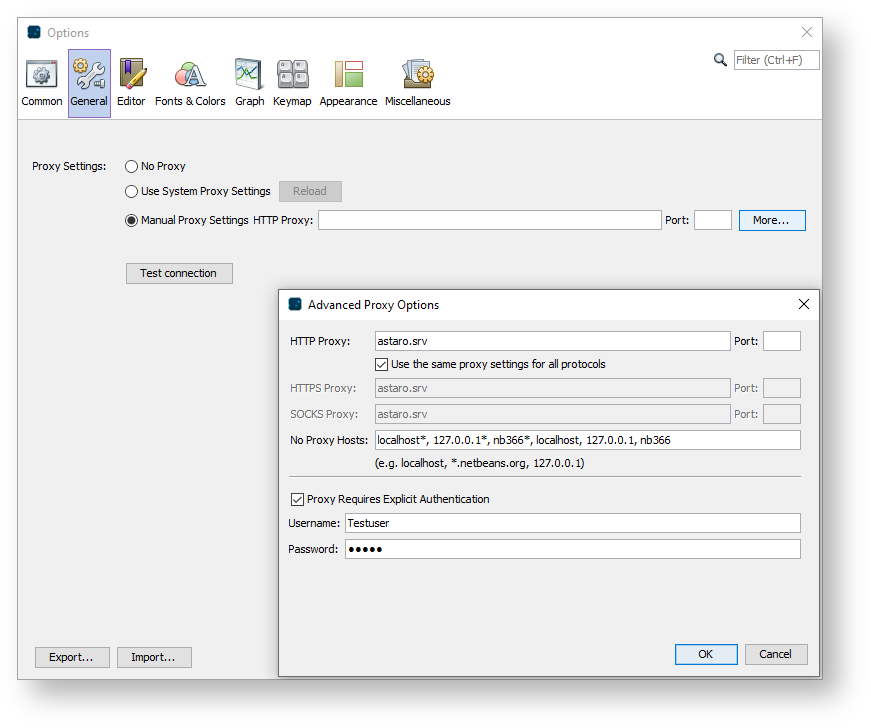
To establish a connection between the GridVis® and a proxy server, the proxy settings must be saved in both the GridVis® desktop and the GridVis® Service. If necessary, contact your IT department.


Saving proxy settings in the GridVis® desktop

  1. Open the settings of the GridVis® desktop under Tools > Options.
  2. Switch to the General tab.
  3. Select the manual proxy settings and open the advanced proxy options with the More button.
  4. Enter and confirm the proxy settings.
  5. The GridVis® desktop can now establish the connection to the proxy server.

Removing the proxy settings in the GridVis® desktop

  1. Open the settings of the GridVis® desktop under Tools > Options.
  2. Switch to the General tab.
  3. Remove all entries in the manual proxy settings.
  4. Select No Proxy or Use System Proxy Settings. This selection depends on your IT system. If necessary, contact your IT department. Confirm the selection.
  5. The GridVis® desktop now no longer uses its own proxy settings.


Saving proxy settings in the GridVis® Service

Saving proxy settings in the GridVis® Service requires that these settings must first be saved in the GridVis® desktop.

  1. Open the configuration directory of the GridVis® desktop. By default, this directory is %appdata%\gridvis.
  2. Navigate thorough the folder structure to config\Preferences\org\netbeans.
  3. Copy the two files auth.properties and core.properties. These contain the proxy settings.
  4. Open the configuration directory of the GridVis® Service. By default, this directory is C:\GridVisData.
  5. Navigate thorough the folder structure to config\Preferences\org\netbeans. It may be necessary to create the folders org and netbeans manually.
  6. Paste the files auth.properties and core.properties.
  7. Restart the GridVis® Service.
  8. The GridVis® Service can now establish the connection to the proxy server.

Removing proxy settings in the GridVis® Service

  1. Open the configuration directory of the GridVis® Service and navigate to the configuration files with the proxy settings. By default, these files are located under C:\GridVisData\config\Preferences\org\netbeans.
  2. Remove the files auth.properties and core.properties.
  3. Restart GridVis® Service.
  4. The GridVis® Service now no longer uses its own proxy settings.


Sv translation
languagees


Válido para

Ediciones GridVis®Plataforma de software


Anker
Zertifikat
Zertifikat
Protección de la transmisión de datos entre el servicio GridVis® y el navegador web

La transmisión de datos entre el servicio GridVis® y el navegador web puede cifrarse a través de un certificado SSL. El certificado tiene que estar disponible en el formato p12 o pfx. Dado el caso, póngase en contacto con su departamento informático.


Activación del cifrado

  1. Copie el archivo del certificado al directorio de configuración del servicio GridVis®. El directorio predeterminado es C:\GridVisData.

  2. Cambie el nombre del archivo a ssl. Tenga en cuenta que el archivo no debe tener ninguna extensión.

  3. Reinicie el servicio GridVis®.
  4. Si el certificado no está protegido por contraseña, ahora solo podrá accederse al servicio GridVis® a través de una conexión HTTPS en el navegador web. Ejemplo:
    http://[dirección web]:8080 ya no está accesible.
    https://[dirección web]:8080 está accesible y muestra la página de inicio habitual del servicio GridVis®.
    [dirección web] equivale a la dirección web de su servicio GridVis®.

Info
titleAviso

Después de activar el cifrado, solo podrá accederse al servicio GridVis® en el navegador web a través de la dirección web especificada en el certificado. La utilización de comodines es admisible.


Si el certificado está protegido por contraseña, la contraseña tiene que guardarse en el servicio GridVis® antes de que el navegador web pueda establecer una conexión HTTPS. A tal efecto, proceda de la siguiente manera:

  1. Abra la interfaz web del servicio GridVis® de la manera habitual a través de una conexión HTTP.
  2. Pase a la configuración del servidor. Esta se encuentra bajo Ajustes > Sistema.
  3. Introduzca la contraseña del certificado bajo Contraseña SSL y repita la contraseña. Si ambas entradas coinciden, el botón Guardar se vuelve de color verde.
  4. Confirme la contraseña con el botón Guardar. El servicio GridVis® se reinicia.
  5. Si la contraseña coincide con la contraseña del certificado, solo podrá accederse al servicio GridVis® a través de una conexión HTTPS en el navegador web. Si las contraseñas no coinciden, solo podrá accederse al servicio GridVis® a través de una conexión HTTP.

Desactivación del cifrado

  1. Elimine el archivo del certificado del directorio de configuración del servicio GridVis®.
  2. Dado el caso, elimine la contraseña SSL de la configuración del servidor con el botón rojo Restablecer.
  3. Reinicie el servicio GridVis®.
  4. Ahora solo puede accederse al servicio GridVis® a través de una conexión HTTP en el navegador web.


Anker
Proxy
Proxy
Configuración de una conexión con un servidor proxy

Para la conexión entre GridVis® y un servidor proxy, los ajustes proxy tienen que guardarse tanto en GridVis®-Desktop como en el servicio GridVis®. Dado el caso, póngase en contacto con su departamento informático.


Guardar los ajustes proxy en GridVis®-Desktop

  1. Abra los ajustes de GridVis®-Desktop bajo Herramientas > Opciones.
  2. Pase a la pestaña General.
  3. Seleccione los ajustes proxy manuales y abra las opciones proxy avanzadas con el botón Más.
  4. Introduzca y confirme los ajustes proxy.
  5. Ahora GridVis®-Desktop puede establecer la conexión con el servidor proxy.

Eliminar los ajustes proxy de GridVis®-Desktop

  1. Abra los ajustes de GridVis®-Desktop bajo Herramientas > Opciones.
  2. Pase a la pestaña General.
  3. Elimine todas las entradas de los ajustes proxy manuales.
  4. Seleccione Sin proxyUtilizar ajustes proxy sistema. Esta selección depende de su sistema informático. Dado el caso, póngase en contacto con su departamento informático. Confirme la selección.
  5. Ahora GridVis®-Desktop ya no utiliza sus propios ajustes proxy.


Guardar los ajustes proxy en el servicio GridVis®

Para guardar los ajustes proxy en el servicio GridVis®, estos ajustes primero deberán guardarse en GridVis®-Desktop.

  1. Abra el directorio de configuración de GridVis®-Desktop. El directorio predeterminado es %appdata%\gridvis.
  2. Navegue en la estructura de carpetas a config\Preferences\org\netbeans.
  3. Copie los dos archivos auth.properties y core.properties. Estos contienen los ajustes proxy.
  4. Abra el directorio de configuración del servicio GridVis®. El directorio predeterminado es C:\GridVisData.
  5. Navegue en la estructura de carpetas a config\Preferences\org\netbeans. Dado el caso tendrá que crear manualmente las carpetas org y netbeans.
  6. Pegue los dos archivos auth.properties y core.properties.
  7. Reinicie el servicio GridVis®.
  8. Ahora el servicio GridVis® puede establecer la conexión con el servidor proxy.

Eliminar los ajustes proxy del servicio GridVis®

  1. Abra el directorio de configuración del servicio GridVis® y navegue a los archivos de configuración que contienen los ajustes proxy. De manera predeterminada, estos archivos se encuentran bajo C:\GridVisData\config\Preferences\org\netbeans.
  2. Elimine los archivos auth.properties y core.properties.
  3. Reinicie el servicio GridVis®.
  4. Ahora el servicio GridVis® ya no utiliza sus propios ajustes proxy.


Sv translation
languageit


Valido per

Edizioni GridVisPiattaforma software


Anker
Certificato
Certificato
Protezione della trasmissione dei dati tra il servizio GridVis® e il browser web

La trasmissione dei dati tra il servizio GridVis® e il browser web può essere criptata tramite un certificato SSL. Il certificato deve essere in formato p12 o pfx. Se necessario, contattare il reparto IT.


Attivazione della crittografia

  1. Copiare il file del certificato nella directory di configurazione del servizio GridVis®. Come impostazione predefinita, la directory è C:\GridVisData.

  2. Rinominare il file in ssl. Si noti che il file non deve avere un'estensione.

  3. Riavviare il servizio GridVis®.
  4. Se il certificato non è protetto da password, il servizio GridVis® sarà accessibile solo tramite una connessione HTTPS nel browser web. Esempio:
    http://[Indirizzo web]:8080 non è più raggiungibile.
    https://[Indirizzo web]:8080 è accessibile e mostra la solita pagina iniziale del servizio GridVis®.
    [Indirizzo web] corrisponde all'indirizzo web del servizio GridVis® in uso.

Info
titleNota

Dopo aver attivato la crittografia, il servizio GridVis® è accessibile nel browser web solo tramite l'indirizzo web specificato nel certificato. È consentito l'uso di caratteri jolly.


Se il certificato è protetto da password, la password deve essere memorizzata nel servizio GridVis® prima che il browser web possa stabilire una connessione HTTPS. Procedere come indicato di seguito:

  1. Aprire l'interfaccia web del servizio GridVis® come di consueto tramite una connessione HTTP.
  2. Passare alla configurazione del server. È possibile trovarla in Impostazioni > Sistema.
  3. Inserire la password del certificato in Password SSL e ripeterla. Se entrambe le voci corrispondono, il pulsante Salva diventa verde.
  4. Confermare la password con il tasto Salva. Il servizio GridVis® viene riavviato.
  5. Se la password corrisponde a quella del certificato, è possibile accedere al servizio GridVis® solo tramite una connessione HTTPS nel browser web. Se le password non corrispondono, è possibile accedere al servizio GridVis® solo tramite una connessione HTTP.

Disattivazione della crittografia

  1. Tagliareil file del certificato dalla directory di configurazione del servizio GridVis®.
  2. Se necessario, rimuovere la password SSL nella configurazione del server con il pulsante rosso Ripristina.
  3. Riavviare il servizio GridVis®.
  4. Il servizio GridVis® è ora accessibile solo tramite una connessione HTTP nel browser web.


Anker
Proxy
Proxy
Configurazione della connessione a un server proxy

Per la connessione tra GridVis® e un server proxy, le impostazioni del proxy devono essere memorizzate sia nel desktop GridVis® che nel servizio GridVis®. Se necessario, contattare il reparto IT.


Memorizzare le impostazioni del proxy nel desktop di GridVis®.

  1. Aprire le impostazioni del desktop GridVis® in Extra > Opzioni.
  2. Passare alla scheda Generale.
  3. Selezionare le impostazioni manuali del proxy e aprire le opzioni avanzate del proxy con il pulsante Altro.
  4. Inserire e confermare le impostazioni del proxy.
  5. Il desktop GridVis® può ora stabilire la connessione al server proxy.

Eliminare le impostazioni del proxy nel desktop di GridVis®.

  1. Aprire le impostazioni del desktop GridVis® in Extra > Opzioni.
  2. Passare alla scheda Generale.
  3. Rimuovere tutte le voci delle impostazioni manuali del proxy.
  4. Selezionare Nessun Proxy o Usa impostazioni proxy di sistema. Questa selezione dipende dal sistema informatico in uso. Se necessario, contattare il reparto IT. Confermare la selezione.
  5. Il desktop GridVis® non utilizza più le proprie impostazioni proxy.


Memorizzare le impostazioni del proxy nel servizio GridVis®.

Per memorizzare le impostazioni del proxy nel servizio GridVis®, queste devono essere prima memorizzate nel desktop GridVis®.

  1. Aprire la directory di configurazione del desktop di GridVis®. Come impostazione predefinita, la directory è %appdata%\gridvis.
  2. Navigare nella struttura delle cartelle fino a config\Preferences\org\netbeans.
  3. Copiare i due file auth.properties e core.properties. Contengono le impostazioni del proxy.
  4. Aprire la directory di configurazione del servizio GridVis®. Come impostazione predefinita, la directory è C:\GridVisData.
  5. Navigare nella struttura delle cartelle fino a config\Preferences\org\netbeans. Se necessario, creare manualmente le cartelle org e netbeans.
  6. Incollare i due file auth.properties e core.properties.
  7. Riavviare il servizio GridVis®.
  8. Il servizio GridVis® può ora stabilire la connessione al server proxy.

Rimuovere le impostazioni del proxy nel servizio GridVis®.

  1. Aprire la directory di configurazione del servizio GridVis® e navigare nei file di configurazione con le impostazioni del proxy. Come impostazione predefinita, questi file si trovano in C:\GridVisData\config\Preferences\org\netbeans.
  2. Rimuovere i due file auth.properties e core.properties.
  3. Riavviare il servizio GridVis®.
  4. Il servizio GridVis® non utilizza più le proprie impostazioni proxy.