
| Sv translation | |||||||||||||||||||||||||||||||||||||||||||||||||||||||||||||||||||||||||||||||||||||||||||||||
|---|---|---|---|---|---|---|---|---|---|---|---|---|---|---|---|---|---|---|---|---|---|---|---|---|---|---|---|---|---|---|---|---|---|---|---|---|---|---|---|---|---|---|---|---|---|---|---|---|---|---|---|---|---|---|---|---|---|---|---|---|---|---|---|---|---|---|---|---|---|---|---|---|---|---|---|---|---|---|---|---|---|---|---|---|---|---|---|---|---|---|---|---|---|---|---|
| |||||||||||||||||||||||||||||||||||||||||||||||||||||||||||||||||||||||||||||||||||||||||||||||
|

| Icon | Kurztext | Beschreibung | Details | |
|---|---|---|---|---|
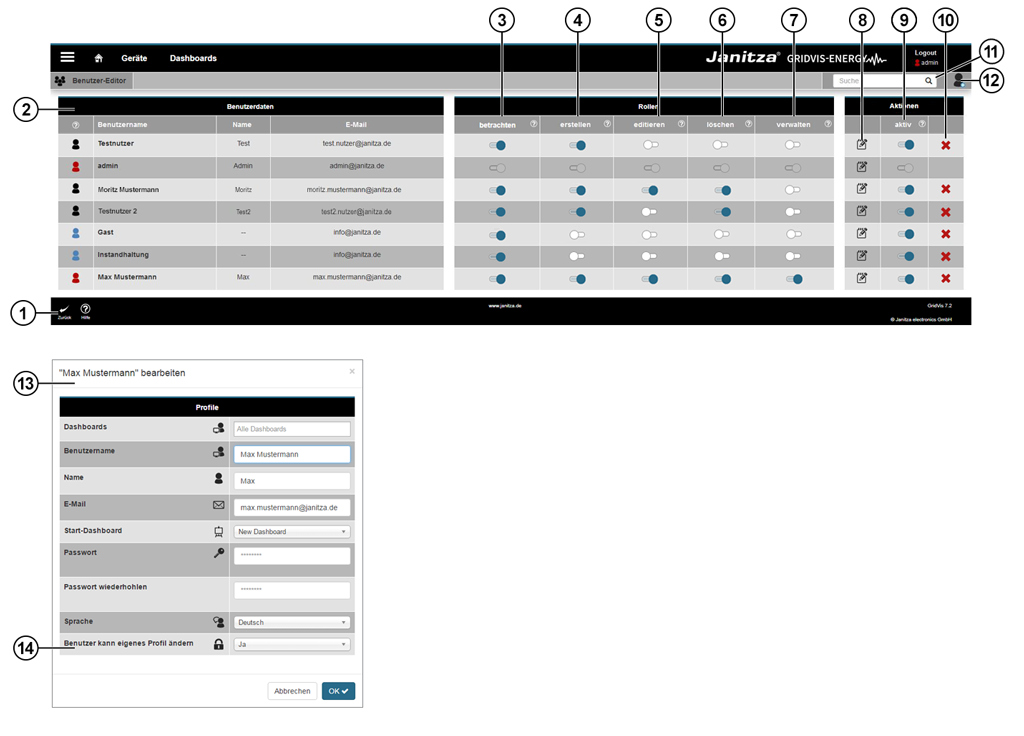
| 1 |   | Zurück und Hilfe | Schaltflächen |
|
| 2 | Benutzerdaten | Benutzer-Icons | ||
| ||||
| Benutzer | Der Benutzername ist der Login- und System-Name.
| |||
| Name | Vor- und Nachname des Benutzers. | |||
| E-Mail-Adresse | E-Mail-Adresse des Benutzers. | |||
| Sprache | Einstellung der Sprache des Benutzers. | |||
| 3 | Rolle | betrachten | Mit aktivierter Check-Box kann der Benutzer:
Ein Benutzer, der nur die Rolle betrachten besitzt, bekommt vom System ein blaues Icon | |
| 4 | Rolle | erstellen | Mit aktivierter Check-Box darf der Benutzer in den Projekten
| |
| 5 | Rolle | editieren | Mit aktivierter Check-Box darf der Benutzer in den Projekten
| |
| 6 | Rolle | löschen | Mit aktivierter Check-Box darf der Benutzer in den Projekten
| |
| 7 | Rolle | verwalten | Mit aktivierter Check-Box hat der Benutzer
| |
| 8 | Aktion | bearbeiten | Über die Schaltfläche konfigurieren Sie die Benutzerdaten des ausgewählten Benutzers. | |
| 9 | Aktion | aktiv | Mit diesen Kontrollkästchen aktivieren oder deaktivieren Sie Benutzer. Deaktivierte Benutzer
Aktivierte Benutzer
| |
| 10 | Aktion | löschen | Mit dieser Schaltfläche löschen Sie Benutzer aus dem System.
| |
| 11 | Suchfeld und Filter | Im Such- und Filter-Feld suchen und filtern Sie Benutzer. | ||
| 12 | Schaltfläche | Benutzer hinzufügen | Erstellen eines neuen Benutzer-Profils. | |
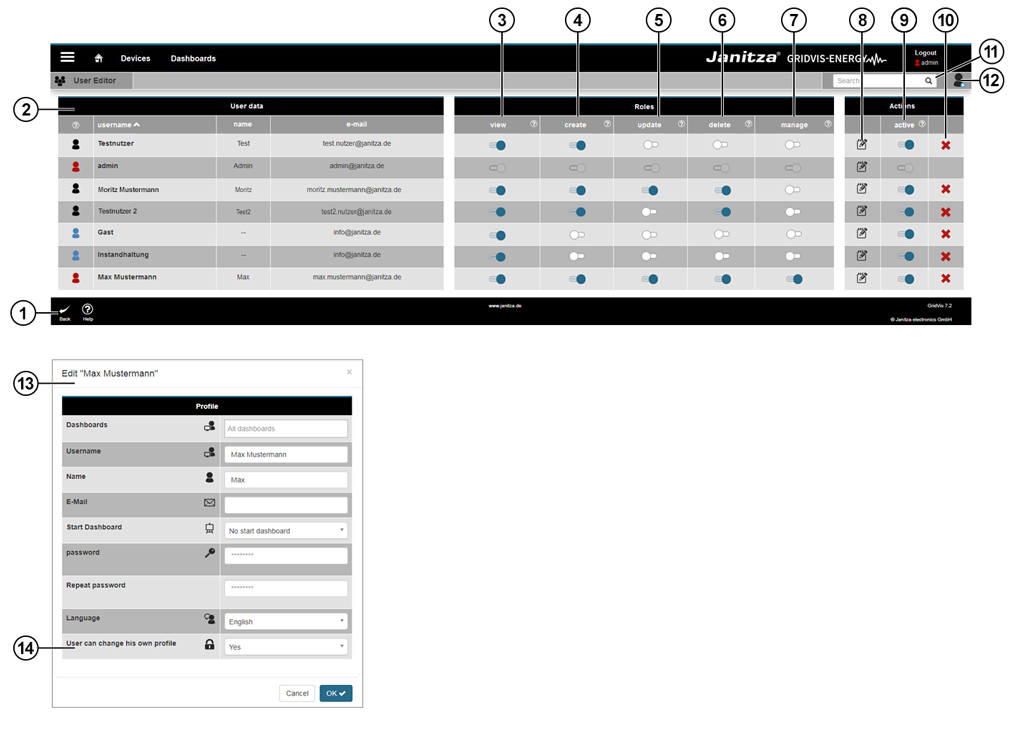
| 13 | Benutzerdaten (Bild2) | Weitere Informationen zu den Benutzerdaten finden Sie unter Profil. | ||
| 14 | Eigenes Profil ändern (Bild2) | Ist dieser Dialogeintrag aktiviert (ja), kann der Benutzer das eigene Profil ändern (Grundeinstellung). |
| Sv translation | |||||||||||||||||||||||||||||||||||||||||||||||||||||||||||||||||||||||||||||||||||||||||
|---|---|---|---|---|---|---|---|---|---|---|---|---|---|---|---|---|---|---|---|---|---|---|---|---|---|---|---|---|---|---|---|---|---|---|---|---|---|---|---|---|---|---|---|---|---|---|---|---|---|---|---|---|---|---|---|---|---|---|---|---|---|---|---|---|---|---|---|---|---|---|---|---|---|---|---|---|---|---|---|---|---|---|---|---|---|---|---|---|---|
| |||||||||||||||||||||||||||||||||||||||||||||||||||||||||||||||||||||||||||||||||||||||||
Valid for
|
| Icon | Short text | Description | Details | |
|---|---|---|---|---|
| 1 | | "Back" and "Help" | Buttons |
|
| 2 | User data | User icons | ||
| User | The user name is the login and system name.
| |||
| Name | Forename and surname of the user. | |||
| Email address | Email address of the user. | |||
| Language | User language setting. | |||
| 3 | Role | "view" | If the check-box is activated, the user
A user who only possesses the "observe" role is identified by the system with a blue icon | |
| 4 | Role | "create" | If the check-box is activated, the user's available project activities are
| |
| 5 | Role | "update" | If the check-box is activated, the user's available project activities are
| |
| 6 | Role | "delete" | If the check-box is activated, the user's available project activities are
| |
| 7 | Role | "manage" | If the check-box is activated, the user has
| |
| 8 | Action | "Edit" | Via the button you configure the user data for the selected user. | |
| 9 | Action | "active" | With this control box, you activate or deactivate users. Deactivated users
Activated users
| |
| 10 | Action | "Delete" | Using this button you delete users from the system.
| |
| 11 | Search field and filter | You search and filter users in the search and filter field. | ||
| 12 | Button | "Add user" | Create a new user profile. | |
| 13 | User data (image2) | You can find further information on user data under "Profile (User settings)". | ||
| 14 | Change own profile (image2) | If this dialogue item is active ("yes"), the user is able to change their own profile (basic setting). |
| Sv translation | |||||||||||||||||||||||||||||||||||||||||||||||||||||||||||||||||||||||||||||||||||||||||||||||
|---|---|---|---|---|---|---|---|---|---|---|---|---|---|---|---|---|---|---|---|---|---|---|---|---|---|---|---|---|---|---|---|---|---|---|---|---|---|---|---|---|---|---|---|---|---|---|---|---|---|---|---|---|---|---|---|---|---|---|---|---|---|---|---|---|---|---|---|---|---|---|---|---|---|---|---|---|---|---|---|---|---|---|---|---|---|---|---|---|---|---|---|---|---|---|---|
| |||||||||||||||||||||||||||||||||||||||||||||||||||||||||||||||||||||||||||||||||||||||||||||||
|
| Icono | Texto breve | Descripción | Detalles | |
|---|---|---|---|---|
| 1 | | «Atrás» y «Ayuda» | Botones: |
|
| 2 | Datos del usuario | Iconos de usuario | ||
| Usuario | El nombre de usuario es el nombre del sistema y de inicio de sesión.
| |||
| Nombre | Nombre y apellidos del usuario. | |||
| Dirección de correo electrónico | Dirección de correo electrónico del usuario. | |||
| Idioma | Ajuste del idioma del usuario. | |||
| 3 | Rol | «observar» | Con la casilla de verificación habilitada, el usuario puede llevar a cabo una serie de acciones:
El sistema asigna un icono de color azul ( | |
| 4 | Rol | «crear» | Con la casilla de verificación habilitada, el usuario puede hacer lo siguiente:
| |
| 5 | Rol | «editar» | Con la casilla de verificación habilitada, el usuario puede hacer lo siguiente:
| |
| 6 | Rol | «eliminar» | Con la casilla de verificación habilitada, el usuario puede hacer lo siguiente:
| |
| 7 | Rol | «administrar» | Con la casilla de verificación habilitada, el usuario puede llevar a cabo las siguientes acciones:
| |
| 8 | Acción | «editar» | Con este botón puede configurar los datos del usuario seleccionado. | |
| 9 | Acción | «activo» | Con esta casilla de verificación puede activar y desactivar usuarios. Los usuarios desactivados se caracterizan por los siguientes aspectos:
Los usuarios activados se caracterizan por los siguientes aspectos:
| |
| 10 | Acción | «eliminar» | Con este botón puede eliminar usuarios del sistema.
| |
| 11 | Campo de búsqueda y filtro | En el campo de búsqueda y filtro puede buscar y filtrar usuarios. | ||
| 12 | Botón | «Añadir usuario» | Creación de un nuevo perfil de usuario. | |
| 13 | Datos de usuario (segunda imagen de arriba) | Encontrará más información sobre los datos de usuario en «Perfil». | ||
| 14 | Modificar el propio perfil (segunda imagen de arriba) | Si esta entrada del cuadro de diálogo está activada («sí»), el usuario puede modificar su propio perfil (ajuste básico). |
| Sv translation | |||||||||||||||||||||||||||||||||||||||||||||||||||||||||||||||||||||||||||||||||||||||||||||||
|---|---|---|---|---|---|---|---|---|---|---|---|---|---|---|---|---|---|---|---|---|---|---|---|---|---|---|---|---|---|---|---|---|---|---|---|---|---|---|---|---|---|---|---|---|---|---|---|---|---|---|---|---|---|---|---|---|---|---|---|---|---|---|---|---|---|---|---|---|---|---|---|---|---|---|---|---|---|---|---|---|---|---|---|---|---|---|---|---|---|---|---|---|---|---|---|
| |||||||||||||||||||||||||||||||||||||||||||||||||||||||||||||||||||||||||||||||||||||||||||||||
|
| Icona | Testo breve | Descrizione | Dettagli | |
|---|---|---|---|---|
| 1 | | “Indietro“ e “Guida“ | Pulsanti |
|
| 2 | Dati utente | Icone utenti | ||
| Utenti | Il nome utente è il nome di login e di sistema.
| |||
| Nome | Nome e cognome dell’utente. | |||
| Indirizzo e-mail | Indirizzo e-mail dell’utente. | |||
| Lingua | Impostazione della lingua dell’utente. | |||
| 3 | Ruolo | “osservatore“ | Con la casella di controllo attivata, l’utente può:
Un utente che ha solo il ruolo “osservatore“ riceve un’icona blu dal sistema. | |
| 4 | Ruolo | “creare“ | Se la casella di controllo è attivata, l’utente è autorizzato a
| |
| 5 | Ruolo | “modificare“ | Se la casella di controllo è attivata, l’utente è autorizzato a
| |
| 6 | Ruolo | “Cancella“ | Se la casella di controllo è attivata, l’utente è autorizzato a
| |
| 7 | Ruolo | “gestire“ | Con la casella di controllo attivata, l’utente ha:
| |
| 8 | Azione | “modificare“ | Utilizzare il pulsante per configurare i dati dell’utente selezionato. | |
| 9 | Azione | “attivo“ | Utilizzare queste caselle di controllo per attivare o disattivare gli utenti. Gli utenti disattivati
Gli utenti attivati
| |
| 10 | Azione | “Cancella“ | Utilizzare questo pulsante per eliminare gli utenti dal sistema.
| |
| 11 | Campo di ricerca e filtro | Nel campo di ricerca e filtro è possibile cercare e filtrare gli utenti. | ||
| 12 | Pulsante di comando | “Aggiungi utente“ | Creare un nuovo profilo utente. | |
| 13 | Dati utente (figura 2) | Per ulteriori informazioni sui dati utente, vedere “Profilo“. | ||
| 14 | Modificare il proprio profilo (figura 2) | Se questa voce della finestra di dialogo è attivata (“sì“), l’utente può modificare il proprio profilo (impostazione di base). |