
| Sv translation | |||||||||||||||||||||||||||||||||||||||||||||||||||||||||||||||||||||||||||||||||||||||||||||||||||||||||||||||||||||||||||||||||||||||||||||||||||||||||||||
|---|---|---|---|---|---|---|---|---|---|---|---|---|---|---|---|---|---|---|---|---|---|---|---|---|---|---|---|---|---|---|---|---|---|---|---|---|---|---|---|---|---|---|---|---|---|---|---|---|---|---|---|---|---|---|---|---|---|---|---|---|---|---|---|---|---|---|---|---|---|---|---|---|---|---|---|---|---|---|---|---|---|---|---|---|---|---|---|---|---|---|---|---|---|---|---|---|---|---|---|---|---|---|---|---|---|---|---|---|---|---|---|---|---|---|---|---|---|---|---|---|---|---|---|---|---|---|---|---|---|---|---|---|---|---|---|---|---|---|---|---|---|---|---|---|---|---|---|---|---|---|---|---|---|---|---|---|---|
| |||||||||||||||||||||||||||||||||||||||||||||||||||||||||||||||||||||||||||||||||||||||||||||||||||||||||||||||||||||||||||||||||||||||||||||||||||||||||||||
Gültig für
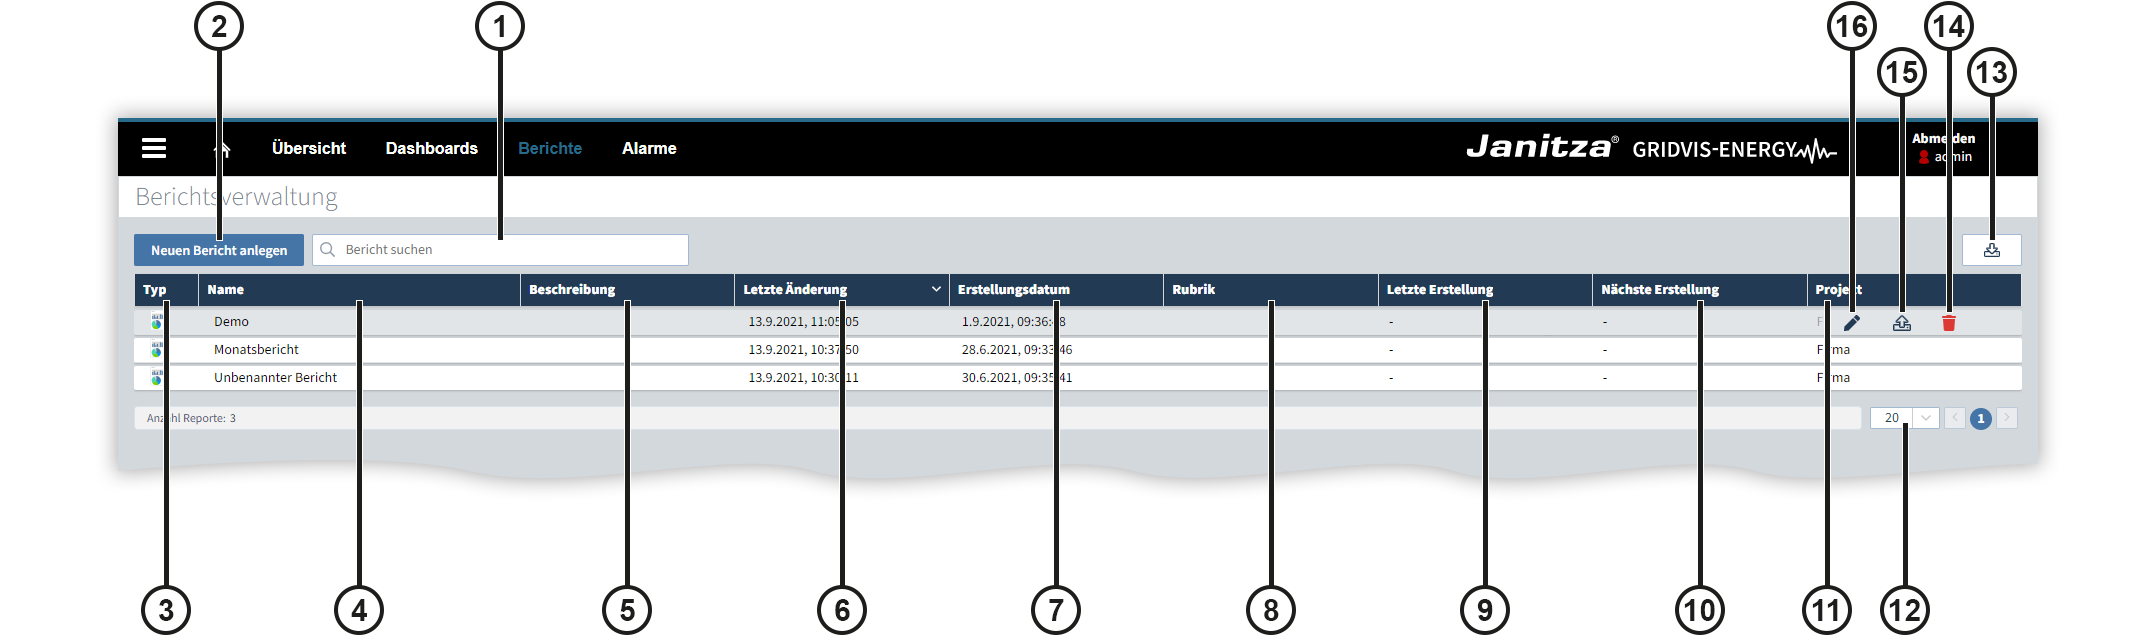
Klicken Sie in der Navigationsleiste der GridVis®-Web auf Berichte. Es öffnet sich die Berichtsverwaltung. Starten Sie den Berichtseditor, indem Sie entweder einen neuen Bericht anlegen oder einen bestehenden Bericht bearbeiten. Sie können die Berichtsliste sortieren, indem Sie den entsprechenden Spaltenkopf anklicken. Klicken Sie auf einen Eintrag in der Berichtsliste, um in einem neuen Fenster die bisher in der Datenbank abgelegten Dokumente dieses Eintrags anzusehen, herunterzuladen oder zu löschen.
| |||||||||||||||||||||||||||||||||||||||||||||||||||||||||||||||||||||||||||||||||||||||||||||||||||||||||||||||||||||||||||||||||||||||||||||||||||||||||||||
| language
| en
Die verschiedenen Aktionen im Berichtseditor erfordern unterschiedliche Rechte. Sie verleihen diese Rechte über die jeweiligen Rollen eines Benutzers in der Benutzerverwaltung.
|
| Sv translation | |||||||||||||||||||||||||||||||||||||||||||||||||||||||||||||||||||||||||||||||||||||||||||||||||||||||||||||||||||||||||||||||||||||||||||||||||||||||||||||||||||||||||||||||||||||||||||||||||||
|---|---|---|---|---|---|---|---|---|---|---|---|---|---|---|---|---|---|---|---|---|---|---|---|---|---|---|---|---|---|---|---|---|---|---|---|---|---|---|---|---|---|---|---|---|---|---|---|---|---|---|---|---|---|---|---|---|---|---|---|---|---|---|---|---|---|---|---|---|---|---|---|---|---|---|---|---|---|---|---|---|---|---|---|---|---|---|---|---|---|---|---|---|---|---|---|---|---|---|---|---|---|---|---|---|---|---|---|---|---|---|---|---|---|---|---|---|---|---|---|---|---|---|---|---|---|---|---|---|---|---|---|---|---|---|---|---|---|---|---|---|---|---|---|---|---|---|---|---|---|---|---|---|---|---|---|---|---|---|---|---|---|---|---|---|---|---|---|---|---|---|---|---|---|---|---|---|---|---|---|---|---|---|---|---|---|---|---|---|---|---|---|---|---|---|---|
| |||||||||||||||||||||||||||||||||||||||||||||||||||||||||||||||||||||||||||||||||||||||||||||||||||||||||||||||||||||||||||||||||||||||||||||||||||||||||||||||||||||||||||||||||||||||||||||||||||
Valid for GridVis® Editions | Software platform |
Starting the report editorIn the navigation bar of the GridVis® Web, click Reports. The report management opens. Start the report editor by either creating a new report or editing an existing report. You can sort the report list by clicking the corresponding column header. Click on an entry in the report list to view, download or delete the documents of this entry stored so far in the database in a new window that opens.
Position | Icon | Designation | Description | 1 |
Report search | Searches for the entered term in the report list. | 2 | Create new report | Creates a new report and starts the report editor. | 3 |
Type | Report (only available in GridVis® Expert) Data export (created with the GridVis® Desktop, see Exporte & Reporte). 4 | Name | The names of the reports or data exports. | 5 | Description | The descriptions of the reports or data exports.
6 | Last change | The date when the reports or data exports were last modified. | 7 | Creation date | The date when the reports or data exports were created. | 8 | Category | The category of the data exports.
9 | Last creation | The date when the reports or data exports were last stored in the database as a document. | 10 | Next creation | The date of the next time when the reports or data exports will be stored in the database as a document. For this purpose, a schedule for automatic execution must be selected. | 11 | Project | The name of the project to which the reports or data exports belong. | 12 |
Quantity per page | Drop-down field to select how many reports or data exports are displayed per page.
13 |
Import report | Opens the window for selecting the report to be imported.
14 |
Delete | Deletes the selected report or data export including all related documents. | 15 |
Export | Exports the selected report in the JSON format. | 16 |
Edit | Opens the selected report in the report editor. Data exports are processed in the GridVis® desktop (see Exporte & Reporte). | | ||||||||||||||||||||||||||||||||||||||||||||||||||||||||||||||||||||||||||||||||||||||||||||||||||||||||||||||||||||||||||||||||||||||||||||||||||
| Sv translation | |||||||||||||||||||||||||||||||||||||||||||||||||||||||||||||||||||||||||||||||||||||||||||||||||||||||||||||||||||||||||||||||||||||||||||||||||||||||||||||||||||||||||||||||||||||||||||||||||||
| |||||||||||||||||||||||||||||||||||||||||||||||||||||||||||||||||||||||||||||||||||||||||||||||||||||||||||||||||||||||||||||||||||||||||||||||||||||||||||||||||||||||||||||||||||||||||||||||||||
| Scroll Ignore | |||||||||||||||||||||||||||||||||||||||||||||||||||||||||||||||||||||||||||||||||||||||||||||||||||||||||||||||||||||||||||||||||||||||||||||||||||||||||||||||||||||||||||||||||||||||||||||||||||
| |||||||||||||||||||||||||||||||||||||||||||||||||||||||||||||||||||||||||||||||||||||||||||||||||||||||||||||||||||||||||||||||||||||||||||||||||||||||||||||||||||||||||||||||||||||||||||||||||||
| Layout-Box | |||||||||||||||||||||||||||||||||||||||||||||||||||||||||||||||||||||||||||||||||||||||||||||||||||||||||||||||||||||||||||||||||||||||||||||||||||||||||||||||||||||||||||||||||||||||||||||||||||
| |||||||||||||||||||||||||||||||||||||||||||||||||||||||||||||||||||||||||||||||||||||||||||||||||||||||||||||||||||||||||||||||||||||||||||||||||||||||||||||||||||||||||||||||||||||||||||||||||||
| Linchpin Teaser | |||||||||||||||||||||||||||||||||||||||||||||||||||||||||||||||||||||||||||||||||||||||||||||||||||||||||||||||||||||||||||||||||||||||||||||||||||||||||||||||||||||||||||||||||||||||||||||||||||
|
| Scroll Only | ||||||||||||||||
|---|---|---|---|---|---|---|---|---|---|---|---|---|---|---|---|---|
| ||||||||||||||||
Válido para
![]()

Iniciar el editor de informes
En la barra de navegación de GridVis®-Web, haga clic en Informes. Se abre la administración de informes. Inicie el editor de informes creando un nuevo informe o editando un informe existente. Usted puede ordenar la lista de informes haciendo clic en el encabezado de la columna correspondiente. Haga clic en una entrada de la lista de informes para ver, descargar o eliminar en una nueva ventana los documentos hasta ahora guardados de esta entrada.
![]()
![]()
![]()
Informe (solo disponible en GridVis® Expert)
Exportación de datos (creada con GridVis®-Desktop, véase Exporte & Reporte).
Descripciones de los informes o exportaciones de datos.
| Info | ||
|---|---|---|
| ||
|
Sección de las exportaciones de datos.
| Info | ||
|---|---|---|
| ||
|
|
| Scroll Only | ||||||||||||||||
|---|---|---|---|---|---|---|---|---|---|---|---|---|---|---|---|---|
| ||||||||||||||||
Valid for
| GridVis® Editions | Software platform |
|---|---|
|
|
| Anker | ||||
|---|---|---|---|---|
|
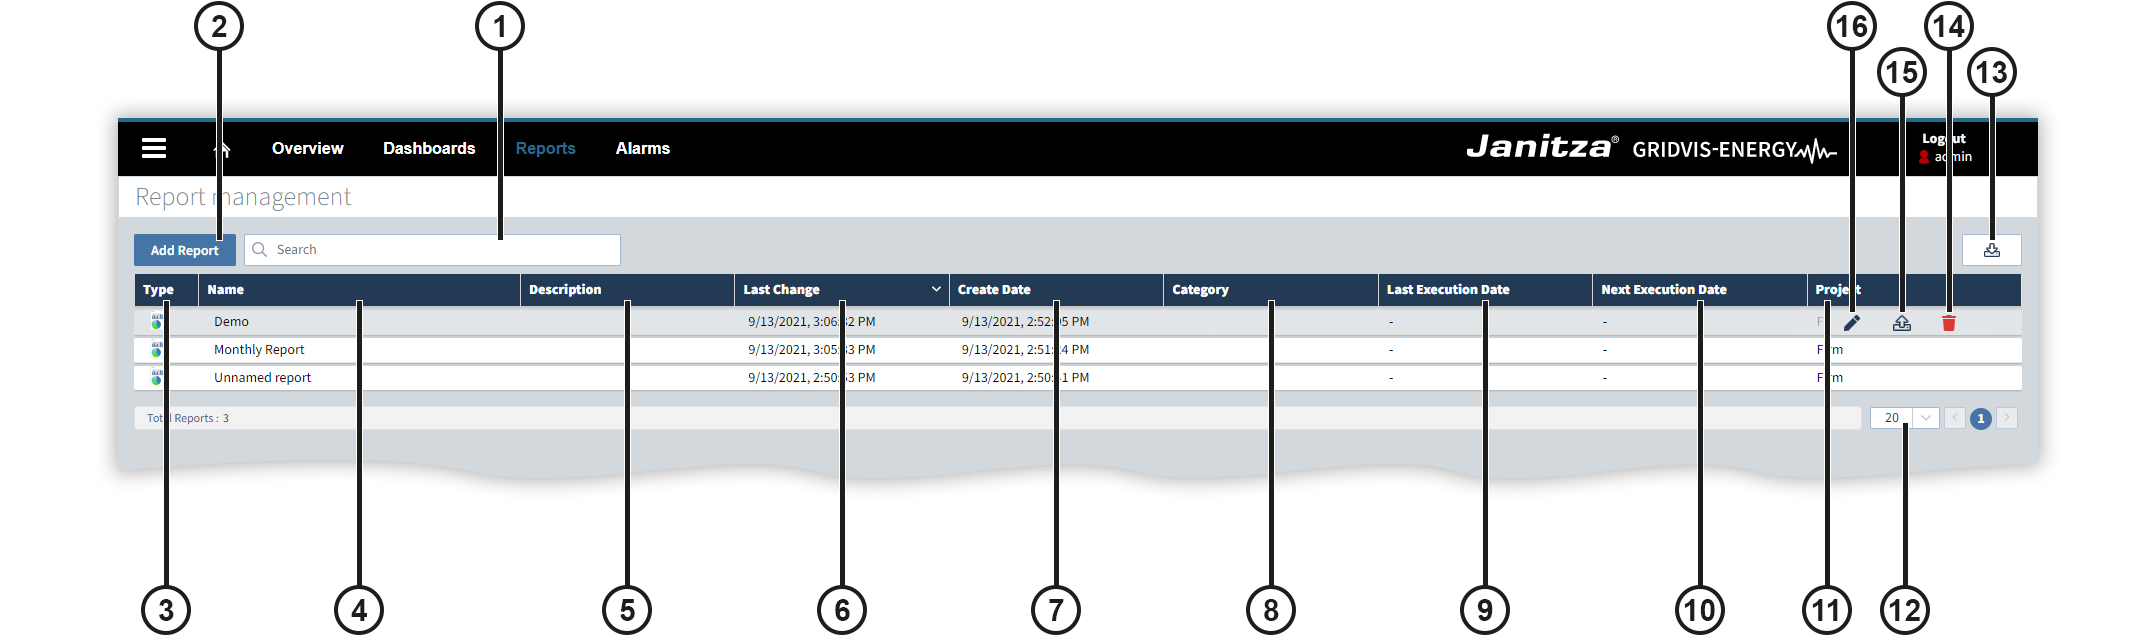
In the navigation bar of the GridVis® Web, click Reports. The report management opens. Start the report editor by either creating a new report or editing an existing report. You can sort the report list by clicking the corresponding column header. Click on an entry in the report list to view, download or delete the documents of this entry stored so far in the database in a new window that opens.
| Position | Icon | Designation | Description | |||||
|---|---|---|---|---|---|---|---|---|
| 1 |
| Report search | Searches for the entered term in the report list. | |||||
| 2 | Create new report | Creates a new report and starts the report editor. | ||||||
| 3 |
| Type | Report (only available in GridVis® Expert) Data export (created with the GridVis® Desktop, see Exporte & Reporte). | |||||
| 4 | Name | The names of the reports or data exports. | ||||||
| 5 | Description | The descriptions of the reports or data exports.
| ||||||
| 6 | Last change | The date when the reports or data exports were last modified. | ||||||
| 7 | Creation date | The date when the reports or data exports were created. | ||||||
| 8 | Category | The category of the data exports.
| ||||||
| 9 | Last creation | The date when the reports or data exports were last stored in the database as a document. | ||||||
| 10 | Next creation | The date of the next time when the reports or data exports will be stored in the database as a document. For this purpose, a schedule for automatic execution must be selected. | ||||||
| 11 | Project | The name of the project to which the reports or data exports belong. | ||||||
| 12 |
| Quantity per page | Drop-down field to select how many reports or data exports are displayed per page.
| |||||
| 13 |
| Import report | Opens the window for selecting the report to be imported.
| |||||
| 14 |
| Delete | Deletes the selected report or data export including all related documents. | |||||
| 15 |
| Export | Exports the selected report in the JSON format. | |||||
| 16 |
| Edit | Opens the selected report in the report editor. Data exports are processed in the GridVis® desktop (see Exporte & Reporte). |
| Anker | ||||
|---|---|---|---|---|
|
The different actions in the report editor require different rights. You grant these rights via the respective roles of a user in the user management.
| Action / Role | View | Create | Update | Delete |
|---|---|---|---|---|
| View report | ||||
| Delete report | ||||
| Create report | ||||
| Edit report | ||||
| Export report | ||||
| Import report | ||||
| Create PDF | ||||
| View PDF | ||||
| Delete PDF |
| Sv translation | |||||||||||||||||||||||||||||||||||||||||||||||||||||||||||||||||||||||||||||||||||||||||||||||||||||||||||||||||||||||||||||||||||||||||||||||||||||||||||||||||||||||||||||||||||||||||||||||||||||||||||||||||||||
|---|---|---|---|---|---|---|---|---|---|---|---|---|---|---|---|---|---|---|---|---|---|---|---|---|---|---|---|---|---|---|---|---|---|---|---|---|---|---|---|---|---|---|---|---|---|---|---|---|---|---|---|---|---|---|---|---|---|---|---|---|---|---|---|---|---|---|---|---|---|---|---|---|---|---|---|---|---|---|---|---|---|---|---|---|---|---|---|---|---|---|---|---|---|---|---|---|---|---|---|---|---|---|---|---|---|---|---|---|---|---|---|---|---|---|---|---|---|---|---|---|---|---|---|---|---|---|---|---|---|---|---|---|---|---|---|---|---|---|---|---|---|---|---|---|---|---|---|---|---|---|---|---|---|---|---|---|---|---|---|---|---|---|---|---|---|---|---|---|---|---|---|---|---|---|---|---|---|---|---|---|---|---|---|---|---|---|---|---|---|---|---|---|---|---|---|---|---|---|---|---|---|---|---|---|---|---|---|---|---|---|---|---|---|
| |||||||||||||||||||||||||||||||||||||||||||||||||||||||||||||||||||||||||||||||||||||||||||||||||||||||||||||||||||||||||||||||||||||||||||||||||||||||||||||||||||||||||||||||||||||||||||||||||||||||||||||||||||||
Válido para
En la barra de navegación de GridVis®-Web, haga clic en Informes. Se abre la administración de informes. Inicie el editor de informes creando un nuevo informe o editando un informe existente. Usted puede ordenar la lista de informes haciendo clic en el encabezado de la columna correspondiente. Haga clic en una entrada de la lista de informes para ver, descargar o eliminar en una nueva ventana los documentos hasta ahora guardados de esta entrada.
Las distintas acciones del editor de informes requieren diferentes derechos. Estos derechos se conceden a través de los roles respectivos de un usuario en la administración de usuarios.
|
| Sv translation | |||||||||||||||||||||||||||||||||||||||||||||||||||||||||||||||||||||||||||||||||||||||||||||||||||||||||||||||||||||||||||||||||||||||||||||||||||||||||||||||||||||||||||||||||||||||||||||||||||||||||||||||||||||
|---|---|---|---|---|---|---|---|---|---|---|---|---|---|---|---|---|---|---|---|---|---|---|---|---|---|---|---|---|---|---|---|---|---|---|---|---|---|---|---|---|---|---|---|---|---|---|---|---|---|---|---|---|---|---|---|---|---|---|---|---|---|---|---|---|---|---|---|---|---|---|---|---|---|---|---|---|---|---|---|---|---|---|---|---|---|---|---|---|---|---|---|---|---|---|---|---|---|---|---|---|---|---|---|---|---|---|---|---|---|---|---|---|---|---|---|---|---|---|---|---|---|---|---|---|---|---|---|---|---|---|---|---|---|---|---|---|---|---|---|---|---|---|---|---|---|---|---|---|---|---|---|---|---|---|---|---|---|---|---|---|---|---|---|---|---|---|---|---|---|---|---|---|---|---|---|---|---|---|---|---|---|---|---|---|---|---|---|---|---|---|---|---|---|---|---|---|---|---|---|---|---|---|---|---|---|---|---|---|---|---|---|---|---|
| |||||||||||||||||||||||||||||||||||||||||||||||||||||||||||||||||||||||||||||||||||||||||||||||||||||||||||||||||||||||||||||||||||||||||||||||||||||||||||||||||||||||||||||||||||||||||||||||||||||||||||||||||||||
Valido per
Fare clic su Report nella barra di navigazione di GridVis®-Web. Si apre la gestione dei report. Avviare l’editor di report creando un nuovo report o modificandone uno esistente. È possibile ordinare l’elenco dei report facendo clic sull’intestazione della colonna corrispondente. Fare clic su una voce nell’elenco dei report per visualizzare, scaricare o cancellare in una nuova finestra i documenti di questa voce finora memorizzati nel database.
Le varie azioni dell'editor di report richiedono diversi diritti. Questi diritti vengono assegnati tramite i rispettivi ruoli di un utente nella gestione utenti.
| 10 | Próxima creación | Fecha en la que los informes o las exportaciones de datos se guardarán la próxima vez como documento en la base de datos. A tal efecto hay que seleccionar una programación para la ejecución automática. | 11 | Proyecto | Nombre del proyecto al que pertenecen los informes o las exportaciones de datos. | |||||||||||||||||||||||||||||||||||||||||||||||||||||||||||||||||||||||||||||||||||||||||||||||||||||||||||||||||||||||||||||||||||||||||||||||||||||||||||||||||||||||||||||||||||||||||||||||||||||||||||||||
| 12 |
| Cantidad por página | Cuadro desplegable para seleccionar cuántos informes o exportaciones de datos se muestran por página.
| ||||||||||||||||||||||||||||||||||||||||||||||||||||||||||||||||||||||||||||||||||||||||||||||||||||||||||||||||||||||||||||||||||||||||||||||||||||||||||||||||||||||||||||||||||||||||||||||||||||||||||||||||||
| 13 |
| Importar informe | Abre la ventana para seleccionar el informe que debe importarse.
| ||||||||||||||||||||||||||||||||||||||||||||||||||||||||||||||||||||||||||||||||||||||||||||||||||||||||||||||||||||||||||||||||||||||||||||||||||||||||||||||||||||||||||||||||||||||||||||||||||||||||||||||||||
| 14 |
| Eliminar | Elimina el informe o la exportación de datos seleccionados, todos los documentos pertinentes inclusive. | ||||||||||||||||||||||||||||||||||||||||||||||||||||||||||||||||||||||||||||||||||||||||||||||||||||||||||||||||||||||||||||||||||||||||||||||||||||||||||||||||||||||||||||||||||||||||||||||||||||||||||||||||||
| 15 |
| Exportar | Exporta el informe seleccionado en el formato JSON. | ||||||||||||||||||||||||||||||||||||||||||||||||||||||||||||||||||||||||||||||||||||||||||||||||||||||||||||||||||||||||||||||||||||||||||||||||||||||||||||||||||||||||||||||||||||||||||||||||||||||||||||||||||
| 16 |
| Editar | Abre el informe seleccionado en el editor de informes. Las exportaciones de datos se editan en GridVis®-Desktop (véase Exporte & Reporte). | ||||||||||||||||||||||||||||||||||||||||||||||||||||||||||||||||||||||||||||||||||||||||||||||||||||||||||||||||||||||||||||||||||||||||||||||||||||||||||||||||||||||||||||||||||||||||||||||||||||||||||||||||||
| Sv translation | |||||||||||||||||||||||||||||||||||||||||||||||||||||||||||||||||||||||||||||||||||||||||||||||||||||||||||||||||||||||||||||||||||||||||||||||||||||||||||||||||||||||||||||||||||||||||||||||||||||||||||||||||||||
| |||||||||||||||||||||||||||||||||||||||||||||||||||||||||||||||||||||||||||||||||||||||||||||||||||||||||||||||||||||||||||||||||||||||||||||||||||||||||||||||||||||||||||||||||||||||||||||||||||||||||||||||||||||
| Scroll Ignore |
Layout-Box |
Linchpin Teaser |
Valido per Edizioni GridVis® | Piattaforma software |
Avvio dell’editor di reportFare clic su Report nella barra di navigazione di GridVis®-Web. Si apre la gestione dei report. Avviare l’editor di report creando un nuovo report o modificandone uno esistente. È possibile ordinare l’elenco dei report facendo clic sull’intestazione della colonna corrispondente. Fare clic su una voce nell’elenco dei report per visualizzare, scaricare o cancellare in una nuova finestra i documenti di questa voce finora memorizzati nel database.
Posizione | Icona | Denominazione | Descrizione | 1 |
Cerca report | Cerca il termine inserito nell’elenco dei report. | 2 | Creare nuovo report | Crea un nuovo report e avvia l’editor di report. | 3 |
Tipo | Report (disponibile solo in GridVis® Expert) Esportazione di dati (creata con GridVis®-Desktop, vedere Exporte & Reporte). 4 | Nome | I nomi dei report o delle esportazioni di dati. | 5 | Descrizione | Le descrizioni dei report o delle esportazioni di dati.
6 | Ultima modifica | La data dell’ultima modifica dei report o delle esportazioni di dati. | 7 | Data di creazione | La data di creazione dei report o delle esportazioni di dati. | 8 | Rubrica | La rubrica di esportazione dei dati.
9 | Ultima creazione | La data in cui i report o le esportazioni di dati sono stati memorizzati per l’ultima volta come documento nel database. | 10 | Prossima creazione | La data in cui i report o le esportazioni di dati verranno successivamente archiviati come documento nel database. A tal fine è necessario selezionare un programma per l’esecuzione automatica. | 11 | Progetto | Il nome del progetto a cui appartengono i report o le esportazioni di dati. | 12 |
Numero per pagina | Campo a discesa per selezionare il numero di report o esportazioni di dati visualizzati per pagina.
13 |
Importa report | Apre la finestra per la selezione del report da importare.
14 |
Cancella | Elimina il report o l’esportazione di dati selezionati, compresi tutti i documenti associati. | 15 |
Esporta | Esporta il report selezionato in formato JSON. | 16 |
Modifica | Apre il report selezionato nell’editor di report. Le esportazioni di dati vengono elaborate in GridVis®-Desktop (vedere Exporte & Reporte). |