Versionen im Vergleich

Schlüssel

  • Diese Zeile wurde hinzugefügt.
  • Diese Zeile wurde entfernt.
  • Formatierung wurde geändert.
Kommentar: Mittels Scroll Versions veröffentlicht aus dem Bereich GVH und Version 1.0.
Sv translation
languagede

Anker
oben
oben
Gültig für

GridVis-EditionSoftware-Plattform

Scroll Ignore
scroll-viewporttrue
scroll-pdftrue
scroll-officetrue
scroll-chmtrue
scroll-docbooktrue
scroll-eclipsehelptrue
scroll-epubtrue
scroll-htmltrue
Layout-Box
floatingleft
Linchpin Teaser
iconlinchpin-teaser-icon-play-circle
varianticon
width150px
aligncenter
titleTUTORIAL
type6
newTabtrue
urlhttps://youtu.be/45vPG6B16Xw?t=513
height150px

Scroll Only
scroll-viewporttrue
scroll-pdftrue
scroll-officetrue
scroll-chmtrue
scroll-docbooktrue
scroll-eclipsehelptrue
scroll-epubtrue
scroll-htmltrue


Einbinden eines Projektes in die GridVis-Web


Nachdem Sie ein Projekt in der GridVis-Desktop angelegt haben, können Sie dieses in die GridVis-Web einbinden. Gehen Sie dafür wie folgt vor:

  1. Öffnen Sie die Menüleiste und klicken Sie auf den Menüeintrag Einstellungen und anschließend auf den Menüeintrag System.
  2. Es öffnet sich das Fenster Server. Klicken Sie hier auf die Registerkarte Projekte.
  3. Klicken Sie auf die Schaltfläche Upload
  4. Es öffnet sich das Fenster Projekt Laden. Kopieren Sie den Projektpfad in das Eingabefeld und klicken Sie auf die Schaltfläche Laden. Den Projektpfad finden Sie im Übersichtsfenster des Projekts in der GridVis-Desktop.
  5. Klicken Sie auf die Schaltfläche Server neu starten, um die Einbindung des Projektes abzuschließen.

Ihr Projekt wurde erfolgreich als Hauptprojekt gesetzt und kann nun verwendet werden.
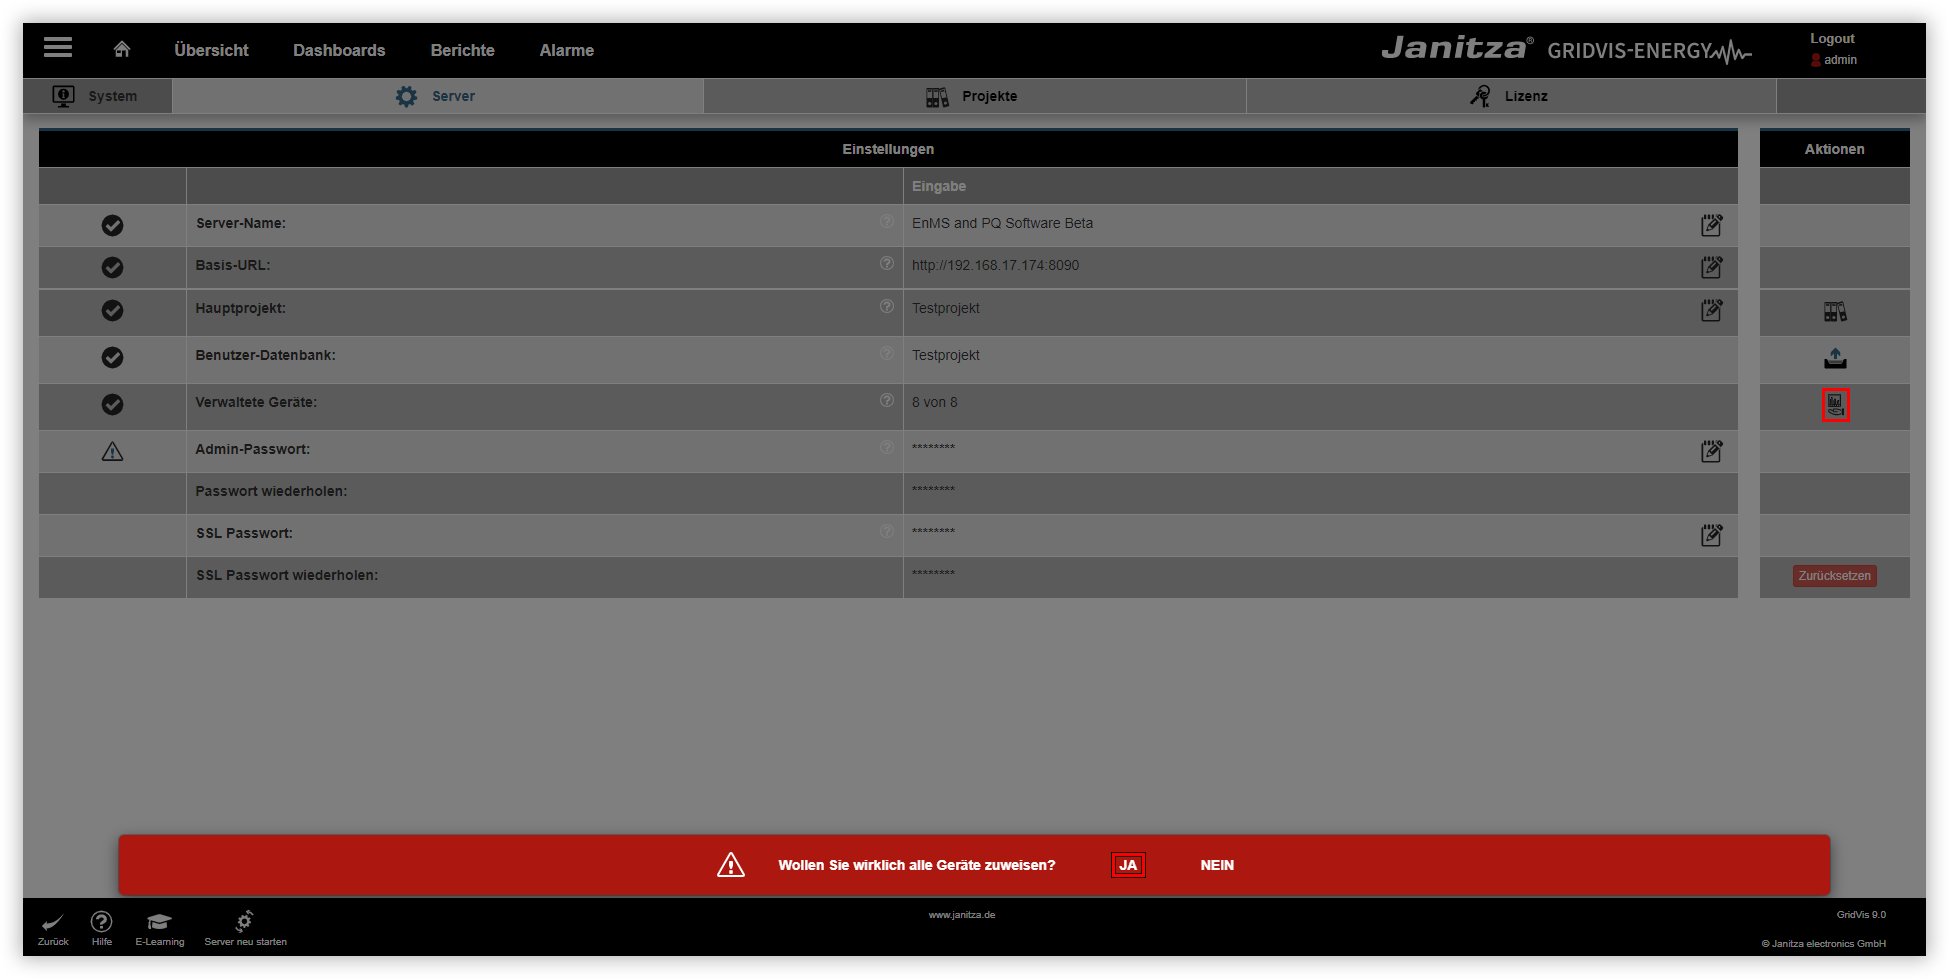


Zuweisen der Geräte

Sie können Ihre Geräte von GridVis-Web verwalten lassen. Der Dienst übernimmt dann automatische Aktionen wie z. B. das Auslesen der Geräte. Um Ihre Geräte von der GridVis-Web verwalten zu lassen, gehen Sie wie folgt vor:

  1. Öffnen Sie die Menüleiste und klicken Sie auf den Menüeintrag Einstellungen und anschließend auf den Menüeintrag System.
  2. Es öffnet sich das Fenster Server. Klicken Sie hier auf die Schaltfläche Verwaltete Messgeräte.
  3. Es wird eine Warnmeldung am unteren Rand der GridVis-Web angezeigt. Klicken Sie hier auf die Schaltfläche Ja.

Die Geräte wurden erfolgreich der GridVis-Desktop zugewiesen. Sie können jetzt Geräte-Aktionen durchführen, ohne dass die GridVis-Desktop gestartet wird.


Wechsel des Hauptprojektes


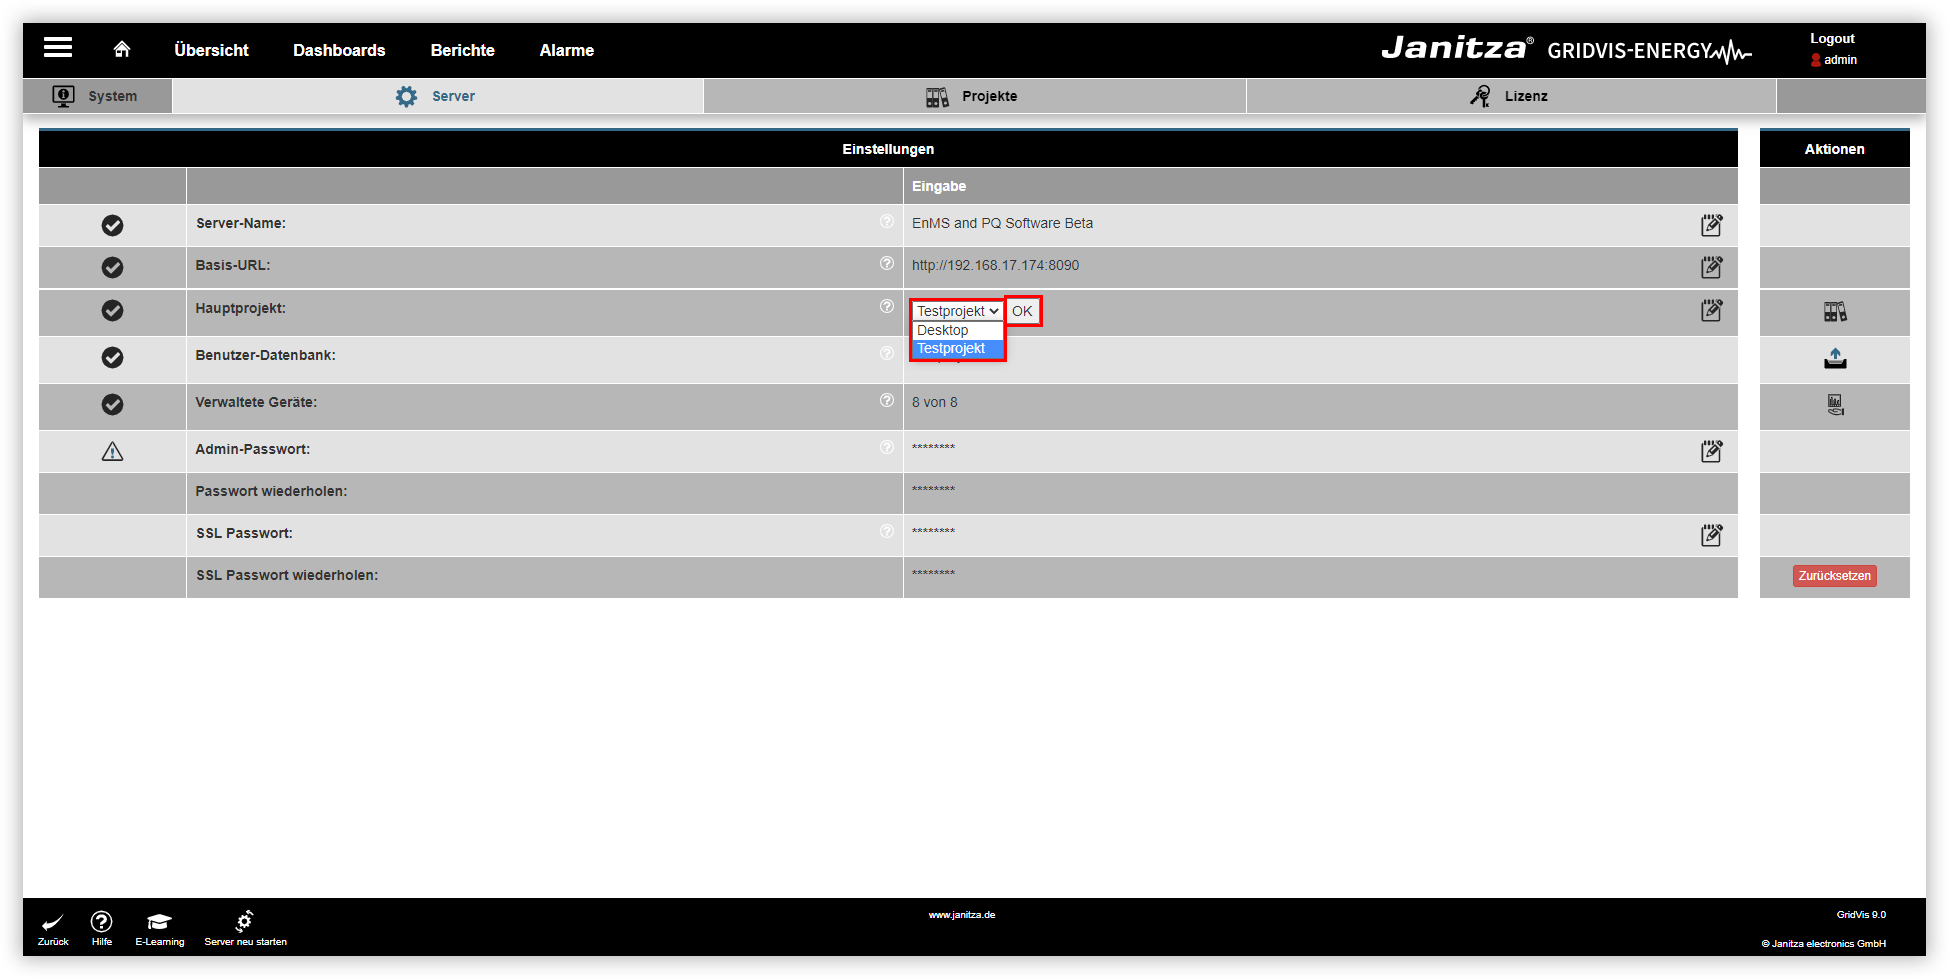
In der GridVis-Web kann immer nur ein Hauptprojekt verwendet werden. Für den Fall, dass Sie ein anderes Projekt als Hauptprojekt verwenden wollen, gehen Sie wie folgt vor:

  1. Öffnen Sie die Menüleiste und klicken Sie auf den Menüeintrag Einstellungen und anschließend auf den Menüeintrag System.
  2. Es öffnet sich das Fenster Server. Klicken Sie auf die Schaltfläche Hauptprojekt ändern
  3. Wählen Sie aus der Dropdown-Liste das gewünschte Projekt aus und klicken Sie auf die Schaltfläche OK.
  4. Es wird eine Warnmeldung am unteren Rand der GridVis-Web angezeigt. Klicken Sie hier auf die Schaltfläche Ja. Die GridVis-Web wird anschließend neu gestartet. 

Ihr Hauptprojekt wurde erfolgreich geändert und kann nun verwendet werden. Beachten Sie, dass die Geräte erneut zugewiesen werden müssen, damit die GridVis-Web die Geräte auslesen kann.

Sv translation
languageen

Anker
oben
oben
Valid for

GridVis editionSoftware platform

Scroll Ignore
scroll-viewporttrue
scroll-pdftrue
scroll-officetrue
scroll-chmtrue
scroll-docbooktrue
scroll-eclipsehelptrue
scroll-epubtrue
scroll-htmltrue
Layout-Box
floatingleft
Linchpin Teaser
iconlinchpin-teaser-icon-play-circle
varianticon
width150px
aligncenter
titleTUTORIAL
type6
newTabtrue
urlhttps://youtu.be/ucH1ZlhnjCY?t=448
height150px

Scroll Only
scroll-viewporttrue
scroll-pdftrue
scroll-officetrue
scroll-chmtrue
scroll-docbooktrue
scroll-eclipsehelptrue
scroll-epubtrue
scroll-htmltrue


Integrating a project into GridVis Web


After you have created a project in GridVis® Desktop, you can integrate it into GridVis® Web. Proceed as follows to do so:

  1. Open the Menu bar and click the menu item Settings and then the menu item System.
  2. The Server window opens. Here, click the Projects tab.
  3. Click the Upload button. 
  4. The Load project window opens. Copy the project path into the input field and click the Load button. You can find the project path in the Overview window of the project in GridVis Desktop.
  5. Click the Restart server button to complete the integration of the project.

Your project has been successfully set as the main project and can now be used.


Assigning the devices

You can let GridVis Web manage your devices. The service then takes over automatic actions such as reading out the devices. Proceed as follows to have GridVis Web manage your devices:

  1. Open the Menu bar and click the menu item Settings and then the menu item System.
  2. The Server window opens. Here, click the Managed measurement devices button.
  3. A warning message is displayed at the bottom of GridVis Web. Here, click the Yes button.

The devices have been successfully assigned to GridVis Desktop. You can now perform device actions without starting GridVis Desktop.


Changing the main project


Only one main project can be used in GridVis Web at a time. Proceed as follows if you want to use another project as the main project:

  1. Open the Menu bar and click the menu item Settings and then the menu item System.
  2. The Server window opens. Click the Change main project button. 
  3. Select the desired project from the drop-down list and click the OK button.
  4. A warning message is displayed at the bottom of GridVis Web. Here, click the Yes button. GridVis Web is then restarted. 

Your main project has been successfully changed and can now be used. Note that the devices must be reassigned so that GridVis Web is able to read the devices.

Sv translation
languagees

Anker
oben
oben
Válido para

Edición GridVisPlataforma de software

Scroll Ignore
scroll-viewporttrue
scroll-pdftrue
scroll-officetrue
scroll-chmtrue
scroll-docbooktrue
scroll-eclipsehelptrue
scroll-epubtrue
scroll-htmltrue
Layout-Box
floatingleft
Linchpin Teaser
iconlinchpin-teaser-icon-play-circle
varianticon
width150px
aligncenter
titleTUTORIAL
type6
newTabtrue
urlhttps://youtu.be/ucH1ZlhnjCY?t=448
height150px

Scroll Only
scroll-viewporttrue
scroll-pdftrue
scroll-officetrue
scroll-chmtrue
scroll-docbooktrue
scroll-eclipsehelptrue
scroll-epubtrue
scroll-htmltrue


Integración de un proyecto en GridVis-Web


Después de haber creado un proyecto en GridVis® Desktop, podrá integrarlo en GridVis® Web. A tal efecto, proceda de la siguiente manera:

  1. Abra la barra de menús, haga clic en la entrada de menú Ajustes y, a continuación, en la entrada de menú Sistema.
  2. Se abre la ventana Servidor. Aquí, haga clic en la pestaña Proyectos.
  3. Haga clic en el botón Carga
  4. Se abre la ventana Cargar proyecto. Copie la ruta del proyecto al campo de entrada y haga clic en el botón Cargar. Encontrará la ruta del proyecto en la ventana de resumen del proyecto en GridVis-Desktop.
  5. Haga clic en el botón Reiniciar servidor para finalizar la integración del proyecto.

Su proyecto se estableció correctamente como proyecto principal y ahora puede utilizarse.


Asignación de los dispositivos

Usted puede hacer que GridVis-Web administre sus dispositivos. En este caso, el servicio se encarga de acciones automáticas, como, p. ej., la lectura de los dispositivos. Para hacer que GridVis-Web administre sus dispositivos, proceda de la siguiente manera:

  1. Abra la barra de menús, haga clic en la entrada de menú Ajustes y, a continuación, en la entrada de menú Sistema.
  2. Se abre la ventana Servidor. Aquí, haga clic en el botón Dispositivos de medición administrados.
  3. Se muestra un mensaje de advertencia en el borde inferior de GridVis-Web. Aquí, haga clic en el botón .

Los dispositivos se asignaron correctamente a GridVis-Desktop. Ahora podrá ejecutar acciones de los dispositivos sin que se inicie GridVis-Desktop.


Cambio del proyecto principal


En GridVis-Web siempre puede utilizarse solamente un proyecto principal. En el caso de que desee utilizar un proyecto diferente como proyecto principal, proceda de la siguiente manera:

  1. Abra la barra de menús, haga clic en la entrada de menú Ajustes y, a continuación, en la entrada de menú Sistema.
  2. Se abre la ventana Servidor. Haga clic en el botón Cambiar proyecto principal
  3. Seleccione el proyecto deseado en la lista desplegable y haga clic en el botón Aceptar.
  4. Se muestra un mensaje de advertencia en el borde inferior de GridVis-Web. Aquí, haga clic en el botón . A continuación se reinicia GridVis-Web. 

Su proyecto principal se cambió correctamente y ahora puede utilizarse. Tenga en cuenta que hay que volver a asignar los dispositivos para que GridVis-Web pueda leer los dispositivos.

Sv translation
languageit

Anker
oben
oben
Valido per

Edizione GridVisPiattaforma software

Scroll Ignore
scroll-viewporttrue
scroll-pdftrue
scroll-officetrue
scroll-chmtrue
scroll-docbooktrue
scroll-eclipsehelptrue
scroll-epubtrue
scroll-htmltrue
Layout-Box
floatingleft
Linchpin Teaser
iconlinchpin-teaser-icon-play-circle
varianticon
width150px
aligncenter
titleTUTORIAL
type6
newTabtrue
urlhttps://youtu.be/ucH1ZlhnjCY?t=448
height150px

Scroll Only
scroll-viewporttrue
scroll-pdftrue
scroll-officetrue
scroll-chmtrue
scroll-docbooktrue
scroll-eclipsehelptrue
scroll-epubtrue
scroll-htmltrue


Integrazione di un progetto in GridVis-Web


Una volta creato un progetto in GridVis® Desktop, è possibile integrarlo in GridVis® Web. Per farlo, procedere come segue:

  1. Aprire la Barra del menu, fare clic su Impostazioni quindi su Sistema.
  2. Si apre la finestra Server. Fare clic qui sulla scheda Progetti.
  3. Fare clic sul pulsante Upload
  4. Si apre la finestra Carica progetto. Copiare il percorso del progetto nel campo di immissione e fare clic sul pulsante Carica. Il percorso del progetto si trova nella finestra riepilogativa del progetto nel desktop di GridVis.
  5. Fare clic sul pulsante Riavvia Server per completare l'integrazione del progetto.

Il progetto è stato impostato correttamente come progetto principale e ora può essere utilizzato


Assegnazione dei dispositivi

È possibile fare in modo che GridVis-Web gestisca i dispositivi. Il servizio esegue azioni automatiche, come la lettura dei dispositivi. Per fare in modo che GridVis-Web gestisca i dispositivi, procedere come segue:

  1. Aprire la Barra del menu, fare clic su Impostazioni quindi su Sistema.
  2. Si apre la finestra Server. Cliccare qui sul pulsante Strumenti di misura gestiti.
  3. Nella parte inferiore di GridVis-Web viene visualizzato un messaggio di avvertimento. Cliccare qui sul pulsante .

I dispositivi sono stati assegnati correttamente al desktop di GridVis. A questo punto è possibile eseguire azioni sul dispositivo senza avviare il desktop di GridVis.


Modifica del progetto principale


In GridVis-Web è possibile utilizzare un solo progetto principale alla volta. Se si desidera utilizzare un altro progetto come progetto principale, procedere come segue:

  1. Aprire la Barra del menu, fare clic su Impostazioni quindi su Sistema.
  2. Si apre la finestra Server. Fare clic sul pulsante Modifica progetto
  3. Selezionare il progetto desiderato dall'elenco a discesa e fare clic sul pulsante OK.
  4. Nella parte inferiore di GridVis-Web viene visualizzato un messaggio di avvertimento. Cliccare qui sul pulsante . GridVis-Web viene quindi riavviato. 

Il progetto principale è stato modificato correttamente e ora può essere utilizzato. Si noti che i dispositivi devono essere riassegnati in modo che GridVis-Web possa leggerli.