Versionen im Vergleich

Schlüssel

  • Diese Zeile wurde hinzugefügt.
  • Diese Zeile wurde entfernt.
  • Formatierung wurde geändert.
Kommentar: Mittels Scroll Versions veröffentlicht aus dem Bereich GVH und Version 1.0.
Sv translation
languagede

Anker
oben
oben


  • Markieren Sie Ihr MI-Gerät im Fenster Projekte.
  • Ein Klick auf die Schaltfläche Konfiguration öffnet das Fenster Konfiguration Ihres DI-Geräts.

oder

  • Ein Klick mit der rechten Maustaste auf das DI-Gerät öffnet das Kontextmenü.
  • Klicken Sie im Kontextmenü auf den Eintrag Konfiguration.

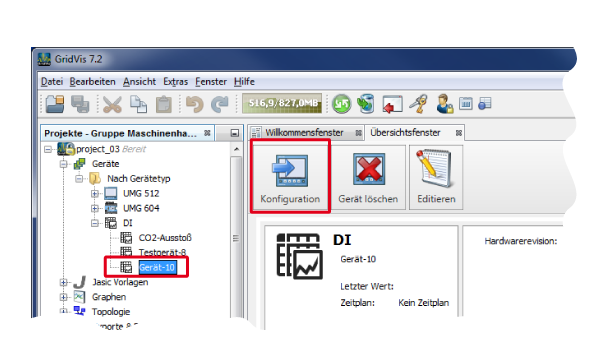
Abb.: Übersichtsfenster des MI-Geräts - MI-Gerät markieren und konfigurieren.


  • Vergeben Sie in den Eingabefeldern im Konfigurationsfenster Ihres DI-Geräts einen Namen und eine Beschreibung.
  • Klicken Sie anschließend die Schaltfläche Übertragen in der Symbolleiste des Konfigurationsfensters.
  • Es erscheint das Fenster Information mit der Meldung Änderungen wurden gespeichert.
  • Bestätigen Sie mit Klick der Schaltfläche OK.
  • Das System überträgt den Namen und die Beschreibung an das MI-Gerät in Ihrem Projekt.


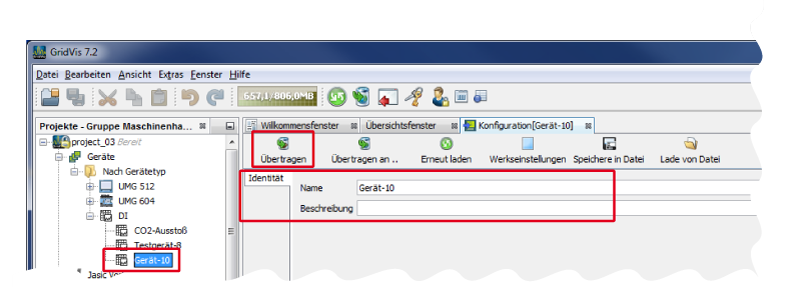
Abb.: Fenster Konfiguration des MI-Geräts - Name/Beschreibung


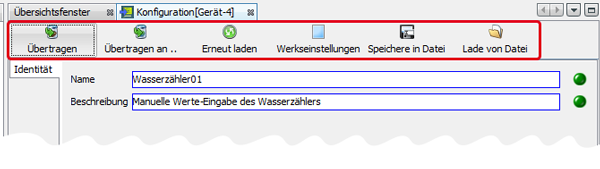
Abb.: Fenster Konfiguration des DI-Geräts - Symbolleiste (Beispiel)

Funktion der Schaltflächen in der Symbolleiste des DI-Geräte-Konfigurationsfensters:


Schaltfläche/SymbolFunktionBeschreibung
1Übertragen
  • Überträgt Datenänderungen an das Gerät.
2Übertragen an
  • Überträgt Datenänderungen über ein Dialogfenster an das Gerät.
3Erneut laden
  • Lädt Daten erneut, z.B. nach Änderungen, die widerrufen werden sollen.
4Werkseinstellungen
  • Setzt Geräte-Einstellungen zurück auf Werkseinstellung. Beachten Sie: Hierbei kann die Verbindung zum Gerät abbrechen!
5Speichere in Datei
  • Speichert alle Geräte-Einstellungen in eine txt-Datei (Text-Datei).
6Lade von Datei
  • Lädt alle Geräte-Einstellungen aus einer txt-Datei.


Sv translation
languageen

Anker
oben
oben


  • Mark your MI device in the window "Projects."
  • Single-click on the window "Configuration" to open the "Configuration" window of your DI device.

or

  • Right-click on the DI device to open the context menu.
  • In the context menu, click on the entry "Configuration."

Fig.: Overview window of the MI device - Mark and configure the MI device.


  • In the entry fields in the configuration window of your DI device, enter a "Name" and a "Description."
  • Then click on the button "Transfer" in the symbol bar of the configuration window.
  • the window "Information" will open with the message "Changes were Saved."
  • Confirm by clicking on the button "OK."
  • The system transfers the "Name" and the "Description" to the MI device in your project.


Fig.: "Configuration" window of the MI device - Name/Description


Fig.: "Configuration" window of the DI device - Symbol bar (example)

Function of the buttons in the symbol bar of the DI device configuration window.

 Button/SymbolFunctionDescription
1"Transfer"
  • Transfers data changes to the device.
2"Transfer to"
  • Transfers data changes to the device via a dialog box.
3"Reload"
  • Reloads data, e.g. after changes that should be undone.
4"Factory Presets"
  • Sets the device settings back to the factory presets. Please note: This may interrupt the connection to the device!
5"Save in File"
  • Saves all device settings in a txt file (text file).
6"Load File"
  • Loads all device settings from a txt file.


Sv translation
languagees

Anker
oben
oben


  • Marque su dispositivo DI en la ventana «Proyectos».
  • Haciendo clic en el botón «Configuración» se abre la ventana «Configuración» de su dispositivo DI.

o

  • Haga clic con el botón derecho del ratón en el dispositivo DI para abrir el menú contextual.
  • En el menú contextual, haga clic en el elemento «Configuración».

Fig.: ventana de vista general del dispositivo DI; marcado y configuración del dispositivo DI.


  • Especifique un «nombre» y una «descripción»en los campos de entrada de la ventana de configuración de su dispositivo DI.
  • A continuación, haga clic en el botón «Transferir» de la barra de herramientas de la ventana de configuración.
  • Aparecerá la ventana «Información» con el mensaje «Se han guardado los cambios».
  • Confirme la acción haciendo clic en el botón «Aceptar».
  • El sistema transfiere el «nombre» y la «descripción» al dispositivo DI de su proyecto.


Fig.: ventana «Configuración» del dispositivo DI; nombre y descripción


Fig.: ventana «Configuración» del dispositivo DI; barra de herramientas (ejemplo)

Función de los botones de la barra de herramientas de la ventana de configuración de los dispositivos DI:

 Botón o símboloFunciónDescripción
1«Transferir»
  • Se transfieren los cambios de los datos al dispositivo.
2«Transferir a»
  • Se transfieren al dispositivo los cambios de los datos a través de una ventana de diálogo.
3«Volver a cargar»
  • Se vuelven a cargar los datos; por ejemplo, tras realizar cambios que desee deshacer.
4«Ajustes de fábrica»
  • Se restablecen los ajustes de fábrica del dispositivo. Tenga en cuenta lo siguiente: ¡puede perderse la conexión con el dispositivo!
5«Guardar en el archivo»
  • Se guardan todos los ajustes del dispositivo en un archivo txt (archivo de texto).
6«Cargar desde el archivo»
  • Se cargan todos los ajustes del dispositivo desde un archivo txt.


Sv translation
languageit

Anker
oben
oben


  • Contrassegnare il dispositivo IM nella finestra “Progetti“.
  • Facendo clic sul pulsante “Configurazione“ apre la finestra “Configurazione“ del dispositivo ID.

o

  • Facendo clic con il tasto destro sul dispositivo ID, si apre il menu contestuale.
  • Nel menu contestuale, fare clic sulla voce “Configurazione“.

Fig.: Finestra riepilogativa del dispositivo IM - Contrassegnare e configurare il dispositivo IM.

  • Inserire un “Nome“ e una “Descrizione“ nei campi della finestra di configurazione del dispositivo ID.
  • Fare quindi clic sul pulsante “Trasferisci“ nella barra degli strumenti della finestra di configurazione.
  • Viene visualizzata la finestra “Informazioni“ con il messaggio “Le modifiche sono state salvate“.
  • Confermare facendo clic sul pulsante “OK“.
  • Il sistema trasmette il “Nome“ e la “Descrizione“ al dispositivo IM del progetto.


Fig.: Finestra “Configurazione“ del dispositivo IM - Nome/Descrizione

Fig.: Finestra “Configurazione“ del dispositivo ID - Barra degli strumenti (esempio)


Funzione dei pulsanti della barra degli strumenti della finestra di configurazione del dispositivo ID:


Pulsante/simboloFunzioneDescrizione
1“Trasferisci“
  • Trasferisce le modifiche dei dati al dispositivo.
2“Trasferisci a“
  • Trasferisce le modifiche dei dati al dispositivo tramite una finestra di dialogo.
3“Ricaricare“
  • Ricarica i dati, ad esempio dopo le modifiche che devono essere revocate.
4“Factory settings (impostazioni di fabbrica)”
  • Ripristina le impostazioni di fabbrica del dispositivo. Assicurarsi che: Questo può interrompere il collegamento con il dispositivo!
5“Salva su file“
  • Salva tutte le impostazioni dei dispositivi in un file txt (file di testo).
6“Caricamento da file“
  • Carica tutte le impostazioni dei dispositivi da un file txt.