
| Sv translation | ||||||||||
|---|---|---|---|---|---|---|---|---|---|---|
| ||||||||||
Ist ein Benutzerverzeichnis mit der Software-GridVis verbunden, kann ein angemeldeter GridVis-Administrator (oder Benutzer mit Administrator-Rechten) ein Projekt schützen. Konfigurieren Sie den Zugriffschutz für Ihr Projekt wie folgt:
Abb.: Fenster Projekte und Fenster Eigenschaften
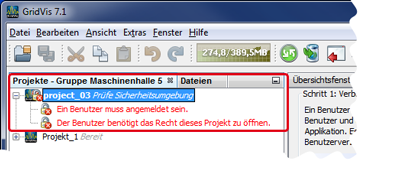
Besitzt ein Benutzer für dieses geschützte Projekt untergeordnete oder keine Berechtigungen oder ist der Benutzer nicht angemeldet, erscheint im Fenster Projekte unterhalb des Projektnames eine weiterführende Erklärung (siehe Abb. rechts):
Abb.: Fenster Projekte - Beschreibungen unterhalb des Projektnamens
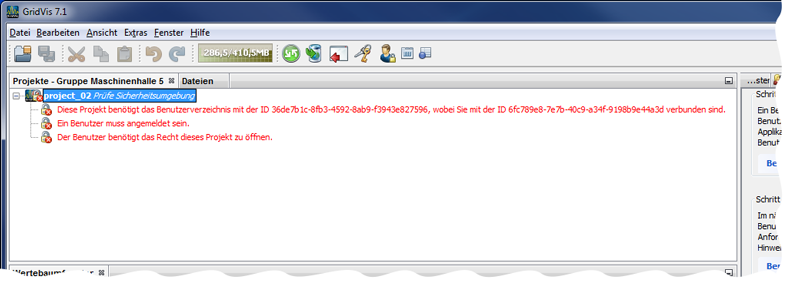
Existiert für das geschützte Projekt innerhalb der GridVis eine Verbindung zu einem anderen Benutzerverzeichnis (Datenbank zur Benutzerverwaltung) erscheint eine zusätzliche Erklärung im Fenster Projekte unterhalb des Projektnames (siehe Abb. rechts):
Lösen Sie in diesem Fall die aktuelle Verbindung zum Benutzerverzeichnis (vgl. Benutzerverzeichnis trennen) und verbinden Sie die Software-GridVis mit dem richtigen Benutzerverzeichnis (vgl. Mit einem Benutzerverzeichnis verbinden). Abb.: Fenster Projekte - Beschreibungen unterhalb des Projektnamens
Software: GridVis 7 V 1.0 Themenverwandte Links |

| Sv translation | ||||||||||
|---|---|---|---|---|---|---|---|---|---|---|
| ||||||||||
If a user directory is connected with the GridVis software, a logged-in GridVis administrator (or user with administrator rights) can protect a project. Configure the "Access Protection" for your project as follows:
Fig.: "Projects" window and "Properties" window
If a user does not have sufficient rights or is not logged in, the window "Projects" below the project name will display further explanation (see fig. on the right):
Fig.: "Projects" window - Descriptions below the project name
If there is a connection to another user directory (database for user management) inside of GridVis for the protected project, an additional explanation will appear in the "Projects" window below the project name (see fig. on the right):
In this case, disconnect the current connection to the user directory (cf. "Disconnect User Directory") and connect the GridVis software with the correct user directory (cf. "Connect with a User Directory"). Fig.: "Projects" window - Descriptions below the project name
Software: GridVis 7 V 1.0 Related links |
| Sv translation | ||||||||||
|---|---|---|---|---|---|---|---|---|---|---|
| ||||||||||
Si un directorio de usuarios está conectado con el software GridVis, un administrador de GridVis (o un usuario con privilegios de administrador) que haya iniciado sesión puede proteger un proyecto. Configure la «protección de acceso» para su proyecto de la siguiente manera:
Fig.: ventana «Proyectos» y ventana «Propiedades»
Si el usuario no posee ningún permiso o solo posee permisos secundarios para este proyecto protegido, o si el usuario no ha iniciado sesión, aparecerá una explicación posterior en la ventana «Proyectos», debajo del nombre del proyecto (véase la figura de la derecha):
Fig.: ventana «Proyectos» (descripciones debajo del nombre del proyecto)
Si existe una conexión con otro directorio de usuarios (base de datos para la administración de usuarios) para el proyecto protegido en GridVis, aparecerá una explicación adicional en la ventana «Proyectos», debajo del nombre del proyecto (véase la figura de la derecha):
En ese caso, desancle la conexión actual con el directorio de usuarios (véase «Desvinculación del directorio de usuarios») y conecte el software GridVis con el directorio de usuarios correcto (véase «Conexión con un directorio de usuarios»). Fig.: ventana «Proyectos» (descripciones debajo del nombre del proyecto)
Software: GridVis 7 V 1.0 Vínculos relacionados |
| Sv translation | ||||||||||
|---|---|---|---|---|---|---|---|---|---|---|
| ||||||||||
Se una directory utenti è collegata al software GridVis, un amministratore di GridVis connesso (o un utente con i diritti di amministratore) può proteggere un progetto. Configurare la “Protezione dell'accesso“ per il progetto come segue:
Fig.: Finestra “Progetti“ e finestra “Proprietà”
Se un utente ha permessi subordinati o non ha permessi per questo progetto protetto o se non è connesso, nella finestra “Progetti“ sotto il nome del progetto appare un'ulteriore spiegazione (vedere fig. a destra):
Fig.: Finestra “Progetti“ - Descrizioni sotto il nome del progetto
Se per il progetto protetto esiste una connessione a un'altra directory utenti (database gestione utenti) all'interno di GridVis, nella finestra “Progetti“ appare un'ulteriore spiegazione sotto il nome del progetto (vedere fig. a destra):
In questo caso, occorre disconnettere la connessione corrente alla directory utenti (cfr. Disconnettere una directory utenti) e connettere il software GridVis alla directory utenti corretta (cfr. Collegarsi a una directory di utenti). Fig.: Finestra “Progetti“ - Descrizioni sotto il nome del progetto
Software: GridVis 7 V1.0 Link correlati |