Versionen im Vergleich

Schlüssel

  • Diese Zeile wurde hinzugefügt.
  • Diese Zeile wurde entfernt.
  • Formatierung wurde geändert.
Kommentar: Mittels Scroll Versions veröffentlicht aus dem Bereich GVH und Version 1.0.
Sv translation
languagede

Anker
oben
oben
Gültig für

GridVis-EditionenSoftware-Plattform


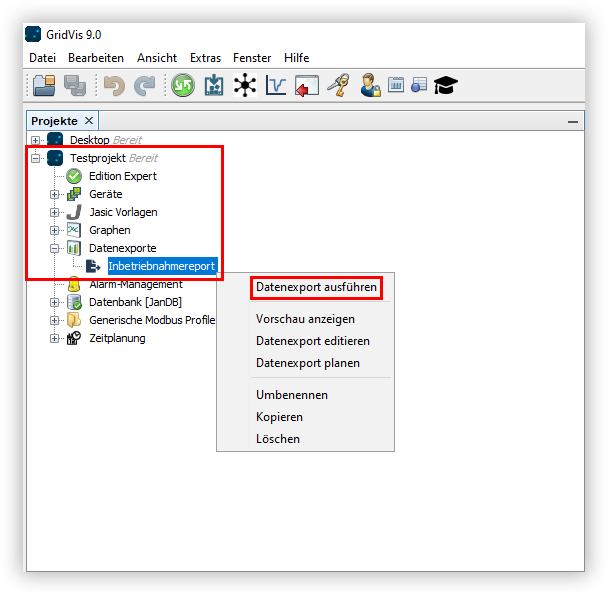
Nachdem Sie ein Projekt erstellt und Geräte zu diesem hinzugefügt haben, können Sie einen Inbetriebnahmereport erstellen. Der Report dient als Abschlussreport nach einer Inbetriebnahme und beinhaltet eine Übersicht über das Projekt (Kunden- und Prüferdaten, Details zur im Projekt verwendeten GridVis-Version), sowie die vier optionalen Elemente: Abnahmeprotokoll, Gerätedetails, Wandlereinstellungen und Anschlusskontrolle. Um einen Inbetriebnahmereport zu erstellen, gehen Sie wie folgt vor:

  1. Öffnen Sie den Baumeintrag Ihres Projektes und klicken Sie mit der rechten Maustaste auf den Eintrag Datenexporte.
  2. Wählen Sie im Kontextmenü die Option Datenexport erstellen aus.
  3. Das Fenster Auswahl der Export-Gruppe öffnet sich. Wählen Sie die Rubrik Andere aus und klicken Sie auf die Schaltfläche Weiter.
  4. Wählen Sie im Bereich Empfohlene Exporte den Eintrag Inbetriebnahme-Report aus und klicken Sie auf die Schaltfläche Konfigurieren.
  5. Wählen Sie die Geräte aus, die in den Export einbezogen werden sollen, und klicken Sie auf die Schaltfläche Weiter.
  6. Geben Sie einen Titel für den Report ein und wählen Sie die gewünschten Layouteinstellungen, sowie Report-Funktionen aus. Klicken Sie auf die Schaltfläche Weiter.
  7. Geben Sie die Unternehmens- und Prüferinformationen ein und klicken Sie erneut auf die Schaltfläche Weiter.
  8. Fügen Sie bis zu zehn Einträge in das Abnahmeformular ein und protokollieren Sie, ob diese erfüllt wurden. Klicken Sie anschließend auf die Schaltfläche Weiter.
  9. Konfigurieren Sie die Grenzwerte für die Anschlussüberwachung und klicken Sie auf die Schaltfläche Weiter.
  10. Wählen Sie das gewünschte Dateiformat aus. Es stehen die Formate PDF, XLS und XLSX zur Verfügung.
  11. Wählen Sie aus, ob der Datenexport im Web verfügbar seien soll oder nicht. Geben Sie einen Dateinamen für den Datenexport an und wählen Sie einen Speicherort aus.
  12. Wählen Sie die Dateiaktion für den Export aus. Sollte die Datei bereits existieren, können Sie diese überschreiben oder das Erstellungsdatum und die Zeit anhängen, um eine neue Datei zu erstellen. 
  13. Wählen Sie im Bereich Datenexport erstellen aus, ob der Datenexport direkt erstellt werden soll. Klicken abschließend Sie auf die Schaltfläche Fertig.


Info
titleInfo

Sie können den Export jederzeit ausführen. Öffnen Sie dazu den Baumeintrag Datenexporte und klicken Sie mit der rechten Maustaste auf den zuvor konfigurierten Report. Wählen Sie im Kontextmenü die Option Datenexport ausführen. Über die Option Datenexport editieren können Sie die Konfiguration des zuvor erstellten Datenexports ändern.


Sv translation
languageen

Anker
oben
oben
Valid for

GridVis EditionsSoftware platform


After you have created a project and added devices to it, you can create a commissioning report. The report serves as a final report after commissioning and contains an overview of the project (customer and inspector data, details on the GridVis version used in the project), as well as the four optional elements: Acceptance protocol, device details, CT settings and connection check. Proceed as follows to create a commissioning report:

  1. Open the tree item of your project and right-click on the item Data exports.
  2. In the context menu, select the option Create data export.
  3. The Choose export groups window opens. Choose the category Other and click the Next button.
  4. In the section Recommended exports, select the item Commissioning report and click the Configure button.
  5. Choose the devices to be included in the export and click the Next button.
  6. Enter a title for the report and select the desired layout settings and report functions. Click the Next button.
  7. Enter the company and auditor information and once again click the Next button.
  8. Add up to ten items to the acceptance form and record whether they have been met. Then click the Next button.
  9. Configure the limit values for connection monitoring and click the Next button.
  10. Select the desired File format. The PDF, XLS and XLSX formats are available.
  11. Choose whether or not the data export should be available on the web. Specify a file name for the data export and select a storage location.
  12. Choose the File action for the export. If the file already exists, you can overwrite it or append the creation date and time to create a new file. 
  13. In the section Create data export, choose whether the data export should be created immediately. Finally, click the Finish button.


Info
titleInfo

You can run the export at any time. To do so, open the tree item Data exports and right-click on the previously configured report. In the context menu, select the option Execute data export. Use the option Edit data export to change the configuration of the previously created data export.


Sv translation
languagees

Anker
oben
oben
Válido para

Ediciones de GridVisPlataforma de software


Después de haber creado un proyecto y de haber agregado dispositivos al mismo, usted puede crear un informe de puesta en servicio. El informe se utiliza como informe final después de una puesta en servicio y comprende una vista general del proyecto (datos del cliente y del inspector, detalles acerca de la versión GridVis utilizada en el proyecto), así como los siguientes cuatro elementos opcionales: acta de aceptación, detalles del dispositivo, ajustes de transformador y control de conexión. Para crear un informe de puesta en servicio, proceda de la siguiente manera:

  1. Abra la entrada de árbol de su proyecto y haga clic con el botón derecho del ratón en la entrada Exportaciones de datos.
  2. En el menú contextual, seleccione la opción Crear exportación de datos.
  3. Se abre la ventana Selección del grupo de exportación. Seleccione la sección Otrosy haga clic en el botón Siguiente.
  4. En la sección Exportaciones recomendadas, seleccione la entrada Informe de puesta en servicio y haga clic en el botón Configurar.
  5. Seleccione los dispositivos que deben incluirse en la exportación y haga clic en el botón Siguiente.
  6. Introduzca un título para el informe y seleccione los ajustes de diseño deseados, así como las funciones del informe. Haga clic en el botón Siguiente.
  7. Introduzca las informaciones acerca de la compañía y del inspector y vuelva a hacer clic en el botón Siguiente.
  8. Introduzca hasta diez entradas en el formulario de aceptación y registre si estas se han cumplido. A continuación, haga clic en el botón Siguiente.
  9. Configure los valores límite para la monitorización de conexión y haga clic en el botón Siguiente.
  10. Seleccione el Formato de archivo deseado. Están disponibles los formatos PDF, XLS y XLSX.
  11. Seleccione si la exportación de datos debe estar disponible o no en la versión web. Introduzca un nombre de archivo para la exportación de datos y seleccione una ubicación.
  12. Seleccione la acción de archivo para la exportación. En el caso de que el archivo ya exista, podrá sobrescribirlo o añadir la fecha y la hora de creación para crear un nuevo archivo. 
  13. Seleccione en la sección Crear exportación de datos si la exportación de datos debe crearse directamente. Para finalizar, haga clic en el botón Finalizar.


Info
titleInformación

Usted puede ejecutar la exportación en cualquier momento. A tal efecto, abra la entrada de árbol Exportaciones de datos y con el botón derecho del ratón haga clic en el informe anteriormente configurado. En el menú contextual, seleccione la opción Ejecutar exportación de datos. A través de la opción Editar exportación de datos podrá modificar la configuración de la exportación de datos anteriormente creada.


Sv translation
languageit

Anker
oben
oben
Valido per

Edizioni GridVisPiattaforma software


Dopo aver creato un progetto e avervi aggiunto dei dispositivi, è possibile creare un report di messa in funzione. Il report funge da relazione finale dopo la messa in funzione e contiene una panoramica del progetto (dati del cliente e dell'ispettore, dettagli sulla versione di GridVis utilizzata nel progetto) e i quattro elementi opzionali: Verbale di accettazione, dettagli del dispositivo, impostazioni del trasformatore e controllo dei collegamenti. Per creare un report di messa in funzione, procedere come segue:

  1. Aprire la voce della struttura del progetto e fare clic con il tasto destro su Esportazioni dati.
  2. Nel menu contestuale, selezionare l'opzione Crea esportazione dati.
  3. Si apre la finestra Seleziona gruppo di esportazione. Selezionare la rubrica Altroe fare clic sul pulsante Avanti.
  4. Nell'area Esportazioni consigliate, selezionare Report di messa in funzione e fare clic sul pulsante Configura.
  5. Selezionare i dispositivi da includere nell'esportazione e fare clic sul pulsante Avanti.
  6. Inserire un titolo per il report e selezionare le impostazioni di layout e le funzioni del report desiderate. Fare clic sul pulsante Avanti.
  7. Immettere le informazioni sull’azienda e sull’ispettore e fare nuovamente clic sul pulsante Avanti.
  8. Aggiungere fino a dieci voci al modulo di accettazione e registrare se sono state soddisfatte. Cliccare, quindi fare clic sul pulsante Avanti.
  9. Configurare le soglie per il monitoraggio delle connessioni e fare clic sul pulsante Avanti.
  10. Selezionare il Formato file desiderato. Sono disponibili i formati PDF, XLS e XLSX.
  11. Scegliere se l'esportazione dei dati deve essere disponibile o meno sul web. Specificare un nome file per l'esportazione dei dati e selezionare una posizione di archiviazione.
  12. Selezionare l’azione file per l’esportazione. Se il file esiste già, è possibile sovrascriverlo o aggiungere la data e l'ora di creazione per crearne uno nuovo. 
  13. Nell’area Crea esportazione dati, scegliere se l'esportazione dei dati deve essere creata direttamente. Infine, fare clic sul pulsante Fatto.


Info
titleInfo

È possibile effettuare l'esportazione in qualsiasi momento. Per farlo, aprire la voce della struttura Esportazione dati e fare clic con il tasto destro sul report precedentemente configurato. Nel menu contestuale, selezionare l'opzione Esegui esportazione dati. Tramite l'opzione Modifica esportazione dati è possibile modificare la configurazione dell'esportazione di dati creata precedentemente.