Versionen im Vergleich

Schlüssel

  • Diese Zeile wurde hinzugefügt.
  • Diese Zeile wurde entfernt.
  • Formatierung wurde geändert.
Kommentar: Mittels Scroll Versions veröffentlicht aus dem Bereich GVH und Version 1.0.
Sv translation
languagede

Anker
oben
oben
Gültig für

GridVis®-EditionSoftware-Plattform

Scroll Ignore
scroll-viewporttrue
scroll-pdftrue
scroll-officetrue
scroll-chmtrue
scroll-docbooktrue
scroll-eclipsehelptrue
scroll-epubtrue
scroll-htmltrue
Layout-Box
floatingleft
Linchpin Teaser
iconlinchpin-teaser-icon-play-circle
varianticon
width150px
aligncenter
titleTUTORIAL
type6
newTabtrue
urlhttps://youtu.be/6CmoRpLCC-8
height150px

Scroll Only
scroll-viewporttrue
scroll-pdftrue
scroll-officetrue
scroll-chmtrue
scroll-docbooktrue
scroll-eclipsehelptrue
scroll-epubtrue
scroll-htmltrue


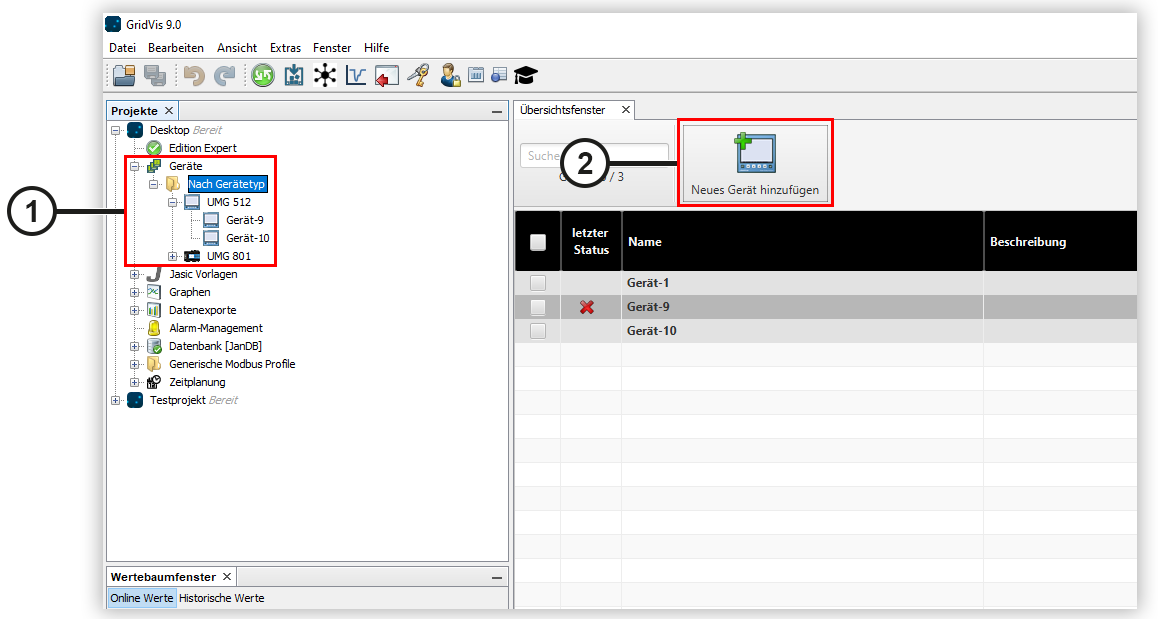
Mithilfe der GridVis®-Desktop ist es dem Anwender möglich, neue Geräte hinzuzufügen und diese anschließend in der Gridvis®-Desktop und der GridVis®-Web zu nutzen.


Das Hinzufügen von neuen Geräten ist nur mit der GridVis®-Desktop möglich. 

  • Öffnen Sie im Projektbaum den Eintrag Geräte. Dieser befindet sich in der linken Menüleiste der GridVis®-Anwendung.

  • Öffnen Sie mit einem Doppelklick auf den Eintrag Nach Gerätetyp das Übersichtsfenster. (1)
  • Klicken Sie auf die Schaltfläche Neues Gerät hinzufügen (2). Es öffnet sich das Fenster Neue Datei (siehe Abb. 2).

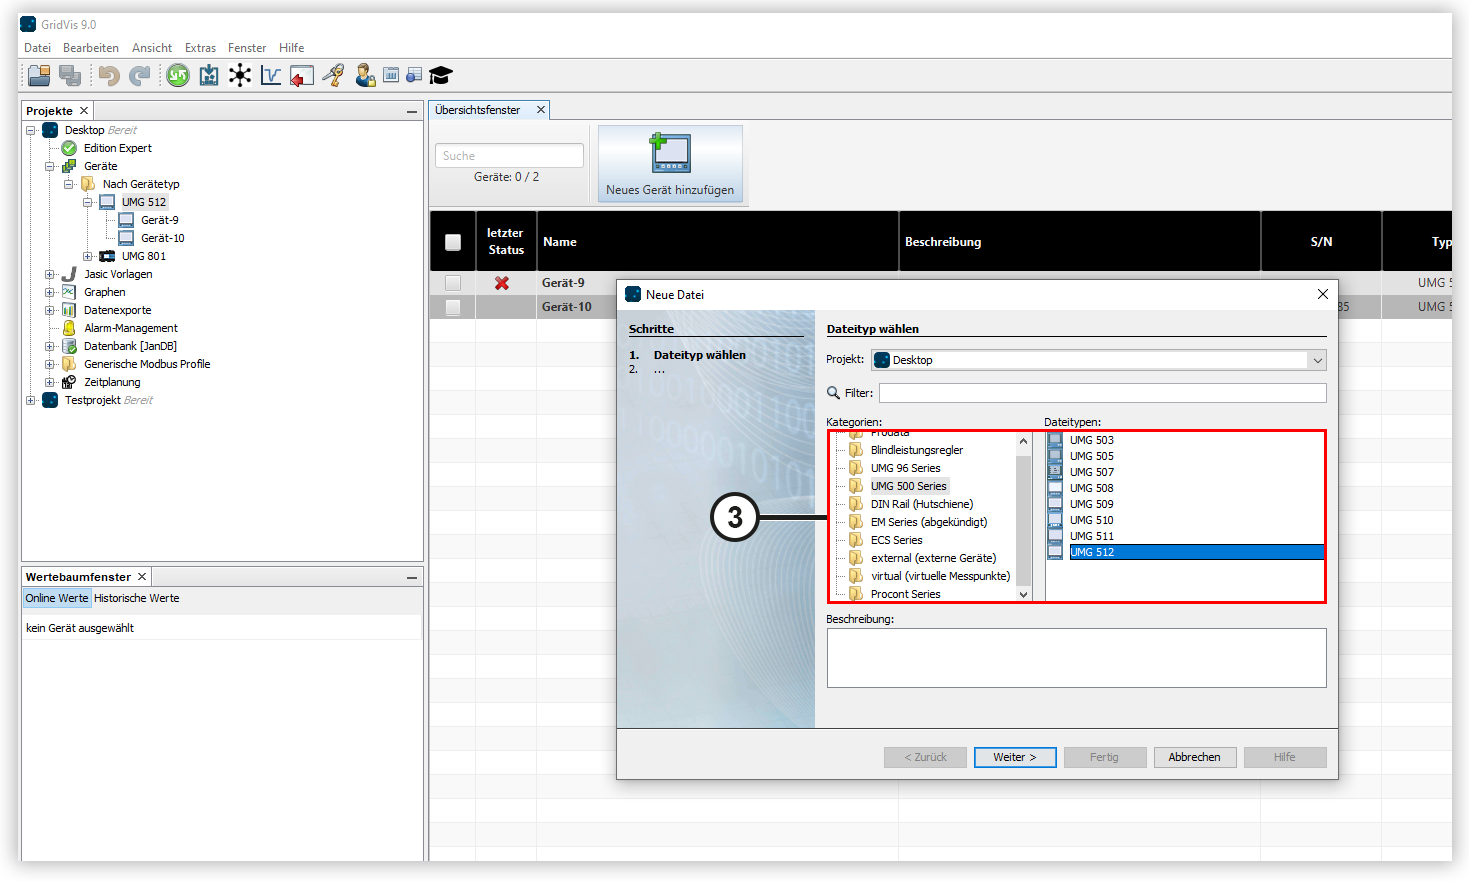
Abb. 1: Geräteliste


Im Fenster Neue Datei können Sie das gewünschte Gerät auswählen und hinzufügen.

  • Wählen Sie unter Kategorie die richtige Baureihe Ihres Gerätes aus.
  • Wählen Sie unter Dateityp anschließend den richtigen Gerätetyp aus und klicken Sie auf Weiter.


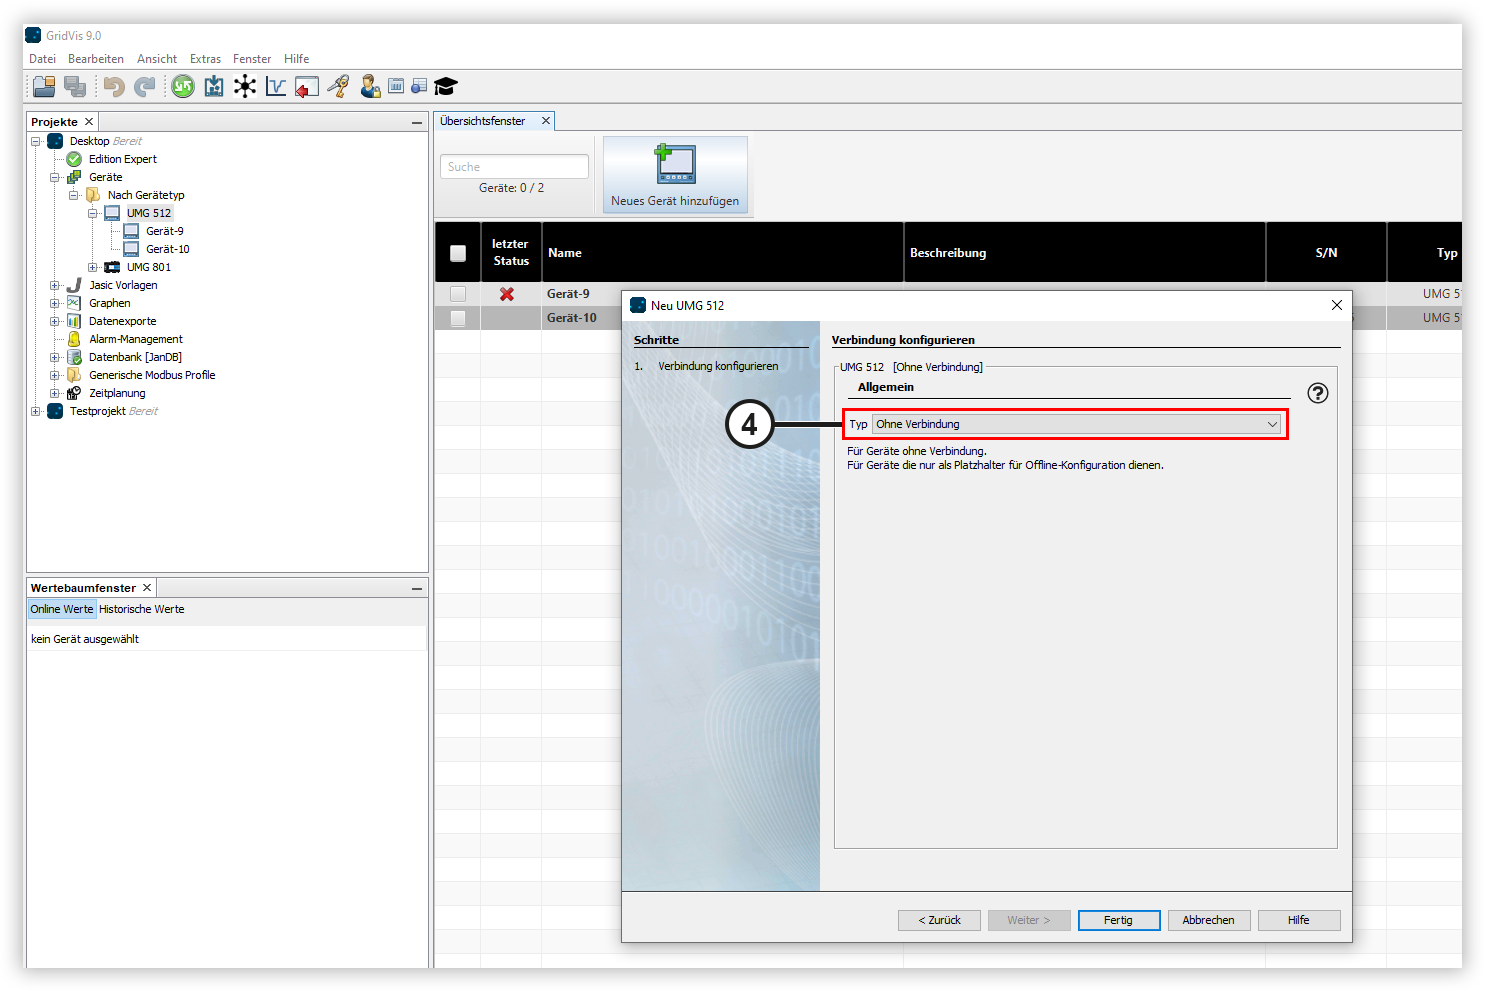
Abb. 2: Neues Gerät hinzufügen


Nach der Auswahl des Gerätes folgen die Verbindungseinstellungen.

  • Wählen Sie den Verbindungstyp Ihres Gerätes aus. Diese ist abhängig vom Gerät und dessen Einbauweise. Den Verbindungstypen Ihres Gerätes finden Sie im Benutzerhandbuch des Gerätes.
  • Sie können ein Gerät auch ohne Verbindung anlegen. Damit dient es als Platzhalter, um z. B. Items Ihrer Lizenz zu reservieren.
  • Geben Sie die die Verbindungseinstellungen ein, die für den ausgewählten Verbindungstyp benötigt werden.
  • Testen Sie die Verbindung, indem Sie auf die Schaltfläche Verbindungstest klicken.
  • Klicken Sie auf die Schaltfläche Fertig. Das Gerät wurde erfolgreich hinzugefügt und kann in der GridVis® verwendet werden.

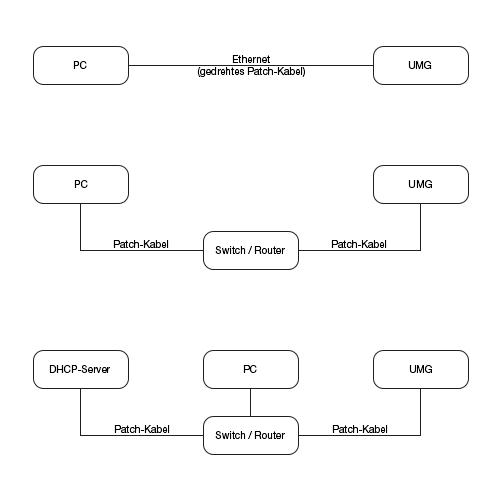
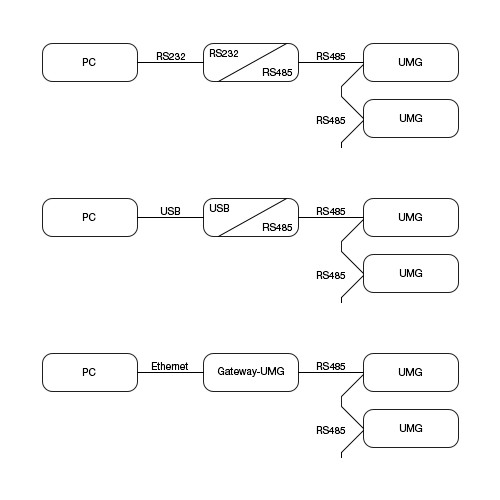
Abb. 3: Neues Gerät verbinden

Die gängigen Verbindungstypen sind:

Verbindungstypen über Ethernet


Verbindungstypen über Schnittstellenwandler bzw. Gateway-Gerät

TypVerwendung für 
Ohne VerbindungVorab-Konfiguration eines Gerätes, zu dem noch keine Verbindung möglich ist.
Modbus RTU / M-BusVerbindung zu einem Gerät über einen Schnittstellenkonverter RS232/RS485 oder USB/RS485 oder einen Pegelwandler für M-Bus.
Ethernet-Gateway / EasyGatewayVerbindung zu einem Gerät, das über RS485/Modbus RTU mit einem Basisgerät verbunden ist. Das Basisgerät funktioniert als Gateway zum Ethernet. Geben Sie unter Host / IP-Adresse die IP-Adresse des Basisgeräts/Gateways und unter Geräteadresse die Modbus-Adresse des Geräts an, das Sie verbinden möchten.
Das anzusprechende Gerät und das Basisgerät müssen dieselben RS485-Einstellungen aufweisen.
Ethernet / TCP/IP / HTTP

Verbindung zu einem Gerät über Netzwerkkabel. Eine Verbindung über Netzwerkkabel ist bei einigen Geräten über ein Zusatzmodul möglich (z. B. UMG PA/PQ-Serie über das Modul 96-PA-RCM-EL).

Informationen zur Verbindung über eine sichere TCP/IP-Verbindung finden Sie hier.
Weitere Informationen zu den möglichen Netzwerkeinstellungen finden Sie im Benutzerhandbuch Ihres Geräts.

Stellen Sie sicher, dass sich Ihr PC und Ihr Gerät im gleichen Netzwerksegment befinden. Wenden Sie sich ggf. an Ihren Netzwerkadministrator.

USB (nur UMG 96RM-P/-CBM)

Verbindung zu einem Gerät über USB. Ggf. ist ein Treiberupdate nötig. Wenden Sie sich an Ihren Administrator.

OPC UA

Informationen zum OPC UA Client finden Sie hier.

Sv translation
languageen

Anker
oben
oben
Valid for

GridVis® editionSoftware platform

Scroll Ignore
scroll-viewporttrue
scroll-pdftrue
scroll-officetrue
scroll-chmtrue
scroll-docbooktrue
scroll-eclipsehelptrue
scroll-epubtrue
scroll-htmltrue
Layout-Box
floatingleft
Linchpin Teaser
iconlinchpin-teaser-icon-play-circle
varianticon
width150px
aligncenter
titleTUTORIAL
type6
newTabtrue
urlhttps://youtu.be/HDLUDDSBom8
height150px

Scroll Only
scroll-viewporttrue
scroll-pdftrue
scroll-officetrue
scroll-chmtrue
scroll-docbooktrue
scroll-eclipsehelptrue
scroll-epubtrue
scroll-htmltrue


The GridVis® Desktop enables users to add new devices and then use them in the GridVis® Desktop and the GridVis® Web.


Adding new devices is only possible with the GridVis® Desktop. 

  • In the project tree, open the entry Devices. This is located in the left menu bar of the GridVis® application.
  • Double-click on the entry By type to open the Overview window. (1)
  • Click the Add new device button (2). This opens the New file window (see Fig. 2).

Fig. 1: Device list


You can select and add the desired device in the New file window.

  • Under Categories, select the correct series of your device.
  • Then, under File types, select the correct device type and click Next.


Fig. 2: Add new device


After selecting the device, the connection settings must be made.

  • Select the connection type for your device. This depends on the device and its installation method. You can find the connection type of your device in the user manual of the device.
  • You can also create a device without a connection. This means it then serves as a placeholder, for example, to reserve items of your license.
  • Enter the connection settings needed for the selected connection type.
  • Test the connection by clicking on the Connection test button.
  • Click Finish. The device has been added successfully and can be used in the GridVis®.

Fig. 3: Connecting a new device

The common connection types are:

Connection types via Ethernet


Connection types via interface converter or gateway device

TypeUsed for
With no connectionPre-configuration of a device to which a connection is not yet possible.
Modbus RTU / M-BusConnection to a device via an interface converter RS-232/RS-485 or USB/RS-485 or a level converter for M-Bus.
Ethernet gateway / EasyGatewayConnection to a device connected to a basic device via RS-485/Modbus RTU. The basic device functions as a gateway to the Ethernet. For the Host / IP address, enter the IP address of the basic device/gateway, and for the Device address, enter the Modbus address of the device you want to connect.
The device to be addressed and the basic device must have the same RS-485 settings.
Ethernet / TCP/IP / HTTP

Connection to a device via network cable. A connection via network cable is possible for some devices using an additional module (e.g. UMG PA/PQ series via the 96-PA-RCM-EL module).

You can find information about connection via a secure TCP/IP connection here.
More information on the possible network settings can be found in the user manual of your device.

Make sure that your PC and your device are in the same network segment. If necessary, contact your network administrator.

USB (only UMG 96RM-P/-CBM)

Connection to a device via USB. A driver update may be necessary. Contact your administrator.

OPC UA

Information about the OPC UA Client can be found here.

Sv translation
languagees

Anker
oben
oben
Válido para

Edición GridVis®Plataforma de software

Scroll Ignore
scroll-viewporttrue
scroll-pdftrue
scroll-officetrue
scroll-chmtrue
scroll-docbooktrue
scroll-eclipsehelptrue
scroll-epubtrue
scroll-htmltrue
Layout-Box
floatingleft
Linchpin Teaser
iconlinchpin-teaser-icon-play-circle
varianticon
width150px
aligncenter
titleTUTORIAL
type6
newTabtrue
urlhttps://youtu.be/HDLUDDSBom8
height150px

Scroll Only
scroll-viewporttrue
scroll-pdftrue
scroll-officetrue
scroll-chmtrue
scroll-docbooktrue
scroll-eclipsehelptrue
scroll-epubtrue
scroll-htmltrue


Con ayuda de GridVis®-Desktop, el usuario puede agregar nuevos dispositivos y, a continuación, utilizarlos en Gridvis®-Desktop y en GridVis®-Web.


Solo es posible agregar nuevos dispositivos con GridVis®-Desktop. 

  • Abra la entrada Dispositivos en el árbol de proyectos. Este se encuentra en la barra de menús izquierda de la aplicación GridVis®.
  • Haciendo doble clic en la entrada Por tipo de dispositivo, abra la Ventana de resumen. (1)
  • Haga clic en el botón Agregar nuevo dispositivo (2). Se abre la ventana Nuevo archivo (véase Fig. 2).

Fig. 1: Lista de dispositivos


En la ventana Nuevo archivo podrá seleccionar y agregar el dispositivo deseado.

  • Seleccione la serie correcta de su dispositivo bajo Categoría.
  • A continuación, seleccione bajo Tipo de archivo el tipo de dispositivo correcto y haga clic en Siguiente.


Fig. 2: Agregar nuevo dispositivo


Después de seleccionar el dispositivo se realizan los ajustes de conexión.

  • Seleccione el tipo de conexión de su dispositivo. Este depende del dispositivo y de su tipo de instalación. Encontrará el tipo de conexión de su dispositivo en el manual del usuario del dispositivo.
  • Usted también puede crear un dispositivo sin conexión. De esta forma se utiliza como comodín, p. ej., para reservar elementos de su licencia.
  • Introduzca los ajustes de conexión requeridos para el tipo de conexión seleccionado.
  • Pruebe la conexión haciendo clic en el botón Prueba de conexión.
  • Haga clic en el botón Finalizar. El dispositivo se ha agregado correctamente y puede utilizarse en GridVis®.

Abb. 3: Conectar un nuevo dispositivo

Los tipos de conexión habituales son:

Tipos de conexión a través de Ethernet


Tipos de conexión a través de convertidor de interfaz o dispositivo pasarela

Type (Tipo)Utilización para
Sin conexiónConfiguración previa de un dispositivo con el cual aún no es posible ninguna conexión.
Modbus RTU /M-BusConexión con un dispositivo a través de un convertidor de interfaz RS232/RS485 o USB/RS485 o un convertidor de nivel para M-Bus.
Ethernet gateway (Pasarela Ethernet) / EasyGatewayConexión con un dispositivo que está conectado con el dispositivo básico a través de RS485/Modbus RTU. El dispositivo básico funciona como pasarela hacia Ethernet. Introduzca bajo Host/Dirección IP la dirección IP del dispositivo básico/de la pasarela y bajo Dirección del dispositivo, la dirección Modbus del dispositivo que desee conectar.
El dispositivo que deba activarse y el dispositivo básico deben presentar los mismos ajustes RS485.
Ethernet / TCP/IP / HTTP

Conexión con un dispositivo a través de un cable de red. Una conexión a través de un cable de red puede realizarse en algunos dispositivos a través de un módulo adicional (p. ej., en la serie UMG PA/PQ, a través del módulo 96-PA-RCM-EL).

Para más información acerca de la conexión a través de una conexión TCP/IP segura, consulte aquí.
Para más información acerca de los posibles ajustes de red, consulte el manual del usuario de su dispositivo.

Cerciórese de que su PC y su dispositivo se encuentran en el mismo segmento de red. Dado el caso, póngase en contacto con su administrador de red.

USB (solo UMG 96RM-P/-CBM)

Conexión con un dispositivo a través de USB. Posiblemente sea necesario actualizar el controlador. Póngase en contacto con su administrador.

OPC UA

Para más información acerca del cliente OPC UA, consulte aquí.

Sv translation
languageit

Anker
oben
oben
Valido per

Edizione GridVis®Piattaforma software

Scroll Ignore
scroll-viewporttrue
scroll-pdftrue
scroll-officetrue
scroll-chmtrue
scroll-docbooktrue
scroll-eclipsehelptrue
scroll-epubtrue
scroll-htmltrue
Layout-Box
floatingleft
Linchpin Teaser
iconlinchpin-teaser-icon-play-circle
varianticon
width150px
aligncenter
titleTUTORIAL
type6
newTabtrue
urlhttps://youtu.be/HDLUDDSBom8
height150px

Scroll Only
scroll-viewporttrue
scroll-pdftrue
scroll-officetrue
scroll-chmtrue
scroll-docbooktrue
scroll-eclipsehelptrue
scroll-epubtrue
scroll-htmltrue


Con l'aiuto di GridVis®-Desktop, l'utente può aggiungere nuovi dispositivi e utilizzarli in Gridvis®-Desktop e GridVis®-Web.


L'aggiunta di nuovi dispositivi è possibile solo con il desktop GridVis®. 

  • Nella struttura del progetto, aprire la voce Dispositivi. Si trova nella barra dei menu a sinistra dell'applicazione GridVis®.

  • Aprire facendo doppio clic sulla voce Per tipo di dispositivo la finestra riepilogativa. (1)
  • Fare clic sul pulsante Aggiungi nuovo dispositivo (2). Si apre la finestra Nuovo file (vedere Fig. 2).

Fig. 1: Elenco dispositivi


Nella finestra Nuovo file è possibile selezionare e aggiungere il dispositivo desiderato.

  • Selezionare la serie corretta del dispositivo in Categoria.
  • Quindi selezionare il tipo di dispositivo corretto in Tipo di file e fare clic su Avanti.


Fig. 2: Aggiungere un nuovo dispositivo


Dopo aver selezionato il dispositivo, segue la configurazione della connessione.

  • Selezionare il tipo di connessione del dispositivo. Quest’ultimo dipende dal dispositivo e dal metodo di installazione. Il tipo di connessione del dispositivo è riportato nel manuale del dispositivo.
  • È possibile creare un dispositivo anche senza connessione. Serve quindi come segnaposto, ad esempio per prenotare gli item della licenza.
  • Inserire le impostazioni di connessione necessarie per il tipo di connessione selezionato.
  • Verificare la connessione facendo clic sul pulsante Prova di connessione.
  • Fare clic sul pulsante Fatto. Il dispositivo è stato aggiunto correttamente e può essere utilizzato in GridVis®.

Fig. 3: Collegare un nuovo dispositivo

I tipi di connessione più comuni sono:

Tipi di connessione via Ethernet


Tipi di connessione tramite convertitore di interfaccia o dispositivo gateway

TipoUtilizzo per
Senza connessionePreconfigurazione di un dispositivo al quale non è ancora possibile connettersi.
Modbus RTU / M-BusConnessione a un dispositivo tramite un convertitore di interfaccia RS232/RS485 o USB/RS485 o un convertitore di livello per M-Bus.
Gateway Ethernet / EasyGatewayCollegamento a un dispositivo connesso a un dispositivo di base tramite RS485/Modbus RTU. Il dispositivo di base funge da gateway per la rete Ethernet. Inserire l'indirizzo IP del dispositivo di base/gateway in Host / indirizzo IP e l'indirizzo Modbus del dispositivo da collegare in Indirizzo dispositivo.
Il dispositivo da indirizzare e il dispositivo di base devono avere le stesse impostazioni RS485.
Ethernet / TCP/IP / HTTP

Connessione a un dispositivo tramite cavo di rete. Con alcuni dispositivi è possibile una connessione via cavo di rete tramite un modulo aggiuntivo (ad esempio, la serie UMG PA/PQ tramite il modulo 96-PA-RCM-EL).

Per informazioni sul collegamento tramite una connessione TCP/IP sicura, vedere qui.
Per ulteriori informazioni sulle possibili impostazioni di rete, consultare il manuale del dispositivo.

Assicurarsi che il PC e il dispositivo si trovino nello stesso segmento di rete. Se necessario, rivolgersi all'amministratore di rete.

USB (solo UMG 96RM-P/-CBM)

Connessione a un dispositivo tramite USB. Potrebbe essere necessario un aggiornamento del driver. Rivolgersi all’amministratore del sistema.

OPC UA

Le informazioni sul Client OPC UA sono disponibili qui.