Versionen im Vergleich

Schlüssel

  • Diese Zeile wurde hinzugefügt.
  • Diese Zeile wurde entfernt.
  • Formatierung wurde geändert.
Kommentar: Mittels Scroll Versions veröffentlicht aus dem Bereich GVH und Version 1.0.
Sv translation
languagede

Gültig für

GridVis®-EditionenSoftware-Plattform

Scroll Ignore
scroll-viewporttrue
scroll-pdftrue
scroll-officetrue
scroll-chmtrue
scroll-docbooktrue
scroll-eclipsehelptrue
scroll-epubtrue
scroll-htmltrue
Layout-Box
floatingleft
Linchpin Teaser
iconlinchpin-teaser-icon-play-circle
varianticon
width150px
aligncenter
titleTUTORIAL
type6
newTabtrue
urlhttps://youtu.be/RuudpPecB6E
height150px

Scroll Only
scroll-viewporttrue
scroll-pdftrue
scroll-officetrue
scroll-chmtrue
scroll-docbooktrue
scroll-eclipsehelptrue
scroll-epubtrue
scroll-htmltrue


Info
titleHinweis
  • Ein Projekt kann sowohl die Janitza DB (Standard) als auch eine SQL-Datenbank verwenden.
  • Bei Verwendung der Janitza DB muss der Projektordner lokal abliegen.


  1. Öffnen Sie das Fenster Neues Projekt mit der Schaltfläche Datei > Neues Projekt.
  2. Es ist automatisch ein Projekt für die GridVis®-Desktop ausgewählt. Bestätigen Sie mit Weiter.
  3. Geben Sie einen Projektnamen und einen Projektpfad ein. Beachten Sie, dass der Name eines angelegten Projekts nicht geändert werden kann.

  4. Wenn Sie eine SQL-Datenbank verwenden möchten, wählen Sie die Option Benutze die Standarddatenbank ab. Bestätigen Sie mit Weiter.
  5. Geben Sie falls nötig den Datenbanktyp und die Zugangsdaten der SQL-Datenbank ein. Bestätigen Sie mit Weiter.
  6. Legen Sie das Projekt mit der Schaltfläche Fertig an. Bestätigen Sie falls nötig die Erstellung der Datenbank.

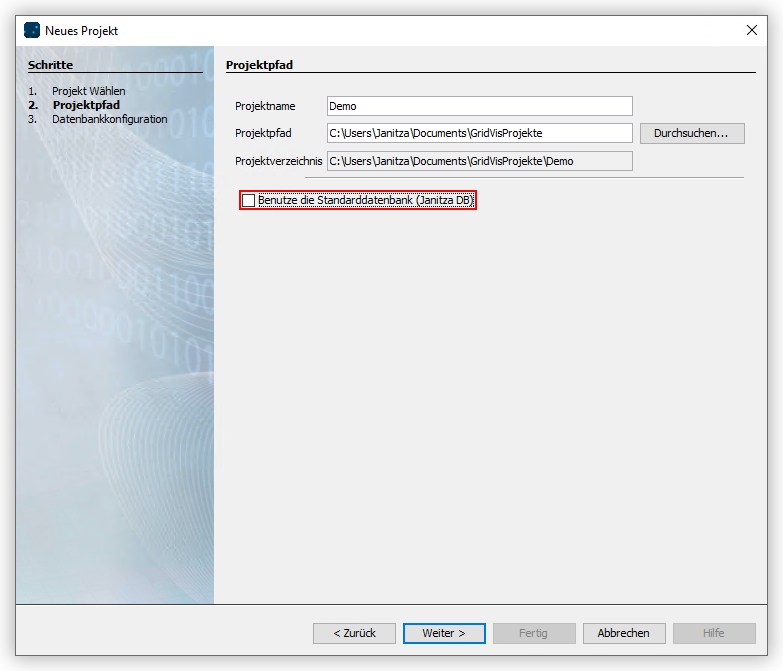
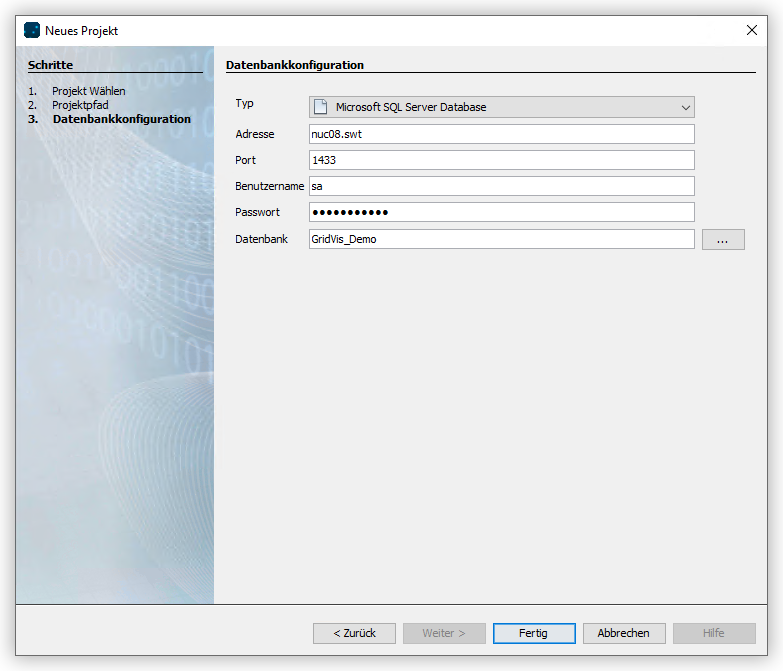
Bevor Sie das Projekt verwenden können, muss es lizenziert werden. Informationen zur Lizenzierung finden Sie hier.

Sv translation
languageen

Valid for

GridVis® editionsSoftware platform

Scroll Ignore
scroll-viewporttrue
scroll-pdftrue
scroll-officetrue
scroll-chmtrue
scroll-docbooktrue
scroll-eclipsehelptrue
scroll-epubtrue
scroll-htmltrue
Layout-Box
floatingleft
Linchpin Teaser
iconlinchpin-teaser-icon-play-circle
varianticon
width150px
aligncenter
titleTUTORIAL
type6
newTabtrue
urlhttps://youtu.be/OQNOwy9E34Q
height150px

Scroll Only
scroll-viewporttrue
scroll-pdftrue
scroll-officetrue
scroll-chmtrue
scroll-docbooktrue
scroll-eclipsehelptrue
scroll-epubtrue
scroll-htmltrue


Info
titleNote
  • A project can use either the Janitza DB (standard) or an SQL database.
  • When the Janitza DB is used, the project folder must be local.


  1. Open the New project window using the File > New project button.
  2. A project for the GridVis® desktop is selected automatically. Confirm with Next.
  3. Enter a Project name and a Project location. Note that the name of a created project cannot be changed.
  4. If you want to use an SQL database, deselect the option Use default database. Confirm with Next.
  5. If necessary, enter the database type and the access data for the SQL database. Confirm with Next.
  6. Create the project with the Done button. If required, confirm the creation of the database.

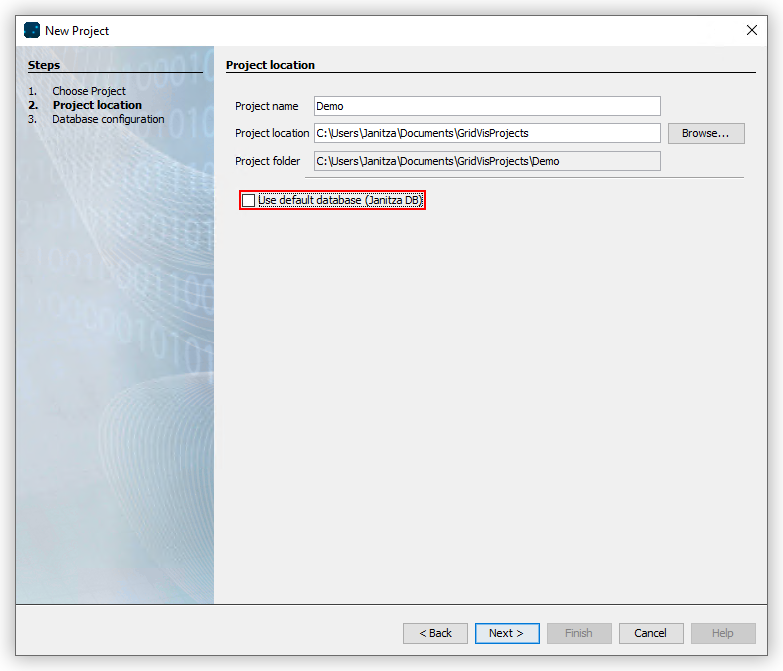
Before you can use the project, it must be licensed. Information about licensing can be found here.

Sv translation
languageit

Valido per

Edizioni GridVis®Piattaforma software

Scroll Ignore
scroll-viewporttrue
scroll-pdftrue
scroll-officetrue
scroll-chmtrue
scroll-docbooktrue
scroll-eclipsehelptrue
scroll-epubtrue
scroll-htmltrue
Layout-Box
floatingleft
Linchpin Teaser
iconlinchpin-teaser-icon-play-circle
varianticon
width150px
aligncenter
titleTUTORIAL
type6
newTabtrue
urlhttps://youtu.be/OQNOwy9E34Q
height150px

Scroll Only
scroll-viewporttrue
scroll-pdftrue
scroll-officetrue
scroll-chmtrue
scroll-docbooktrue
scroll-eclipsehelptrue
scroll-epubtrue
scroll-htmltrue


Info
titleNota
  • Un progetto può utilizzare sia il DB Janitza (standard) sia un database SQL.
  • Se si utilizza il DB Janitza, la cartella del progetto deve essere locale.


  1. Aprire la finestra Nuovo progetto con il pulsante File > Nuovo progetto.
  2. Viene automaticamente selezionato un progetto per GridVis®-Desktop Confermare con Avanti.
  3. Inserire un Nome progetto e un Percorso progetto. Si noti che il nome di un progetto creato non può essere modificato.
  4. Se si desidera utilizzare un database SQL, deselezionare l'opzione Usa database predefinito. Confermare con Avanti.
  5. Se necessario, inserire il tipo di database e i dati di accesso del database SQL. Confermare con Avanti.
  6. Creare il progetto con il pulsante Fatto. Se necessario, confermare la creazione del database.

Prima di poter utilizzare il progetto, è necessario ottenerne la licenza. Le informazioni sulle licenze sono disponibili qui.

Sv translation
languagees

Válido para

Ediciones GridVis®Plataforma de software

Scroll Ignore
scroll-viewporttrue
scroll-pdftrue
scroll-officetrue
scroll-chmtrue
scroll-docbooktrue
scroll-eclipsehelptrue
scroll-epubtrue
scroll-htmltrue
Layout-Box
floatingleft
Linchpin Teaser
iconlinchpin-teaser-icon-play-circle
varianticon
width150px
aligncenter
titleTUTORIAL
type6
newTabtrue
urlhttps://youtu.be/OQNOwy9E34Q
height150px

Scroll Only
scroll-viewporttrue
scroll-pdftrue
scroll-officetrue
scroll-chmtrue
scroll-docbooktrue
scroll-eclipsehelptrue
scroll-epubtrue
scroll-htmltrue


Info
titleAviso
  • Un proyecto puede utilizar tanto la base de datos Janitza DB (base de datos predeterminada) como una base de datos SQL.
  • En el caso de utilizar la base de datos Janitza DB, la carpeta del proyecto debe estar guardada localmente.


  1. Abra la ventana Nuevo proyecto con el botón Archivo > Nuevo proyecto.
  2. Automáticamente está seleccionado un proyecto para GridVis®-Desktop. Confirme con Siguiente.
  3. Introduzca un Nombre de proyecto y una Ruta de proyecto. Tenga en cuenta que el nombre de un proyecto creado no puede cambiarse.
  4. Si desea utilizar una base de datos SQL, deseleccione la opción Utilizar la base de datos predeterminada. Confirme con Siguiente.
  5. Si es necesario, introduzca el tipo de base de datos y los datos de acceso de la base de datos SQL. Confirme con Siguiente.
  6. Cree el proyecto con el botón Finalizar. Si es necesario, confirme la creación de la base de datos.

Antes de poder utilizar el proyecto, hay que obtener una licencia para el mismo. Para más información acerca de la obtención de la licencia, consulte aquí.