Versionen im Vergleich

Schlüssel

  • Diese Zeile wurde hinzugefügt.
  • Diese Zeile wurde entfernt.
  • Formatierung wurde geändert.
Kommentar: Mittels Scroll Versions veröffentlicht aus dem Bereich GVH und Version 1.0.
Sv translation
languagede


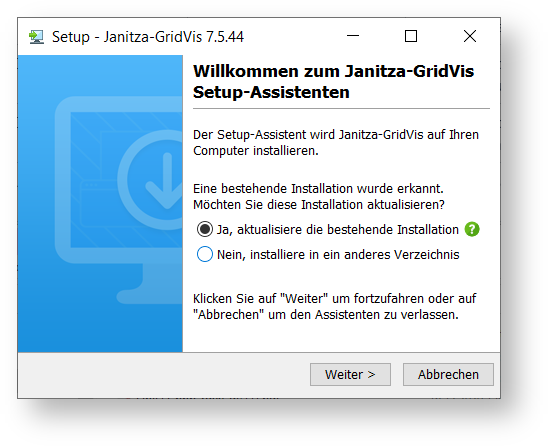
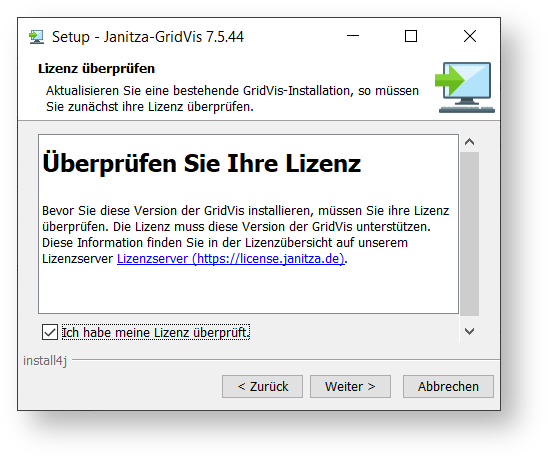
Der GridVis-Setup-Assistent führt Sie durch die unterschiedlichen Installations-Schritte bei einer Neu-Installation und einer bestehenden Installation:


Info
titleHINWEIS

Führen Sie vor der Installation einer neuen GridVis® Edition ein Backup Ihrer Projekte durch. Informationen hierzu finden Sie im Kapitel Projekt-Backup erstellen.

Info
titleHINWEIS

Je nachdem, ob Sie eine Neu-Installation durchführen oder eine bestehende Installation aktualisieren und abhängig von der installierten GridVis-Plattform, können die dargestellten Screenshots von den tatsächlichen Bildschirmanzeigen abweichen!

Scroll Ignore
scroll-viewporttrue
scroll-pdftrue
scroll-officetrue
scroll-chmtrue
scroll-docbooktrue
scroll-eclipsehelptrue
scroll-epubtrue
scroll-htmltrue
Layout-Box
floatingleft

GridVis® installieren

Linchpin Teaser
iconlinchpin-teaser-icon-play-circle
varianticon
width150px
aligncenter
titleTUTORIAL
type6
newTabtrue
urlhttps://youtu.be/EOZ495_sw7w
height150px

GridVis®-Desktop installieren

Linchpin Teaser
iconlinchpin-teaser-icon-play-circle
varianticon
width150px
aligncenter
titleTUTORIAL
type6
newTabtrue
urlhttps://youtu.be/mwQtcgSHaz4
height150px

Scroll Only
scroll-viewporttrue
scroll-pdftrue
scroll-officetrue
scroll-chmtrue
scroll-docbooktrue
scroll-eclipsehelptrue
scroll-epubtrue
scroll-htmltrue

GridVis® installieren


GridVis®-Desktop installieren

Image Added

  • Schließen Sie vor der GridVis-Installation alle geöffneten Programme.
  • Starten Sie den GridVis-Setup-Assistent mit Doppelklick auf die zuvor gespeicherte Ausführungsdatei/exe-Datei (siehe Kopie von GridVis downloaden) und folgen Sie den Anweisungen.
  • Über Radio-Buttons wählen Sie zwischen eine bestehende Installation aktualisieren oder in ein anderes Verzeichnis installieren.
  • Lesen und akzeptieren Sie im nächsten Fenster die Lizenzvereinbarungen, wenn Sie die Software GridVis nutzen möchten. Bestätigen Sie die Angaben mit der Schaltfläche Weiter.


  • Wenn Sie eine bestehende GridVis-Installation aktualisieren, überprüfen und bestätigen Sie Ihre Lizenz (Kontrollkästchen Ich habe meine Lizenz überprüft). Nähere Informationen zu Ihren Lizenzen unter Janitza ID-Server. 

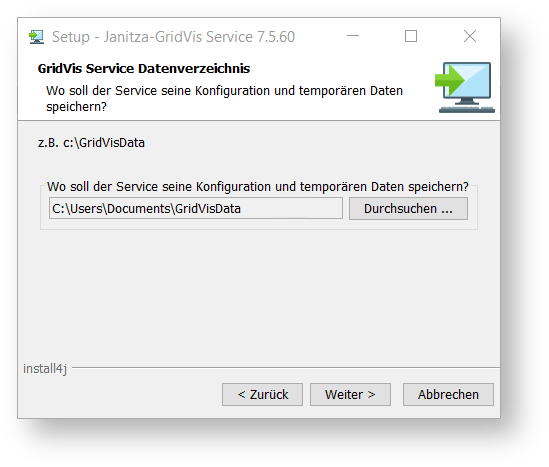
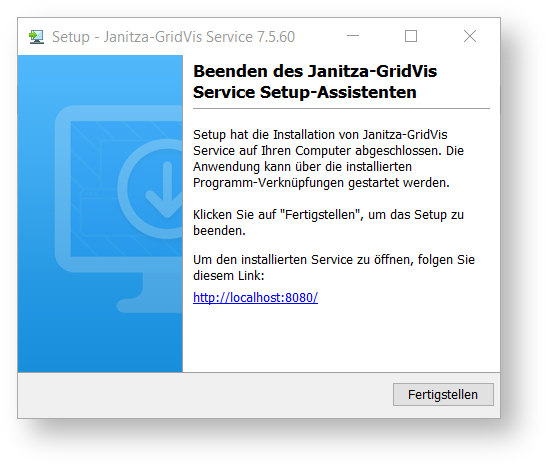
Zusätzliche Schritte bei Installation des GridVis-Service:

  • Wählen Sie für die Installations- und Konfigurationsdateien über die Schaltfläche Durchsuchen ein Ziel-Verzeichnis oder übernehmen Sie den eingestellten Pfad.
  • Wählen Sie in den weiteren Fenstern die Port-Nummer des Services (interner http-Server, nur bei den Editionen Standard und Expert) und die Arbeitsspeichernutzung. Über die Port-Nummer (Teil einer Netzwerk-Adresse) kommuniziert der Service (Dienst) zwischen der GridVis-Desktop und dem Internet.

  • Bevor Sie im abschließenden Fenster die Schaltfläche Fertigstellen klicken, notieren Sie sich bitte den Link des installierten Service (auch Dienst genannt) - Sie benötigen ihn, um später die Web-Oberfläche aufzurufen (nur GridVis-Edition Standard und Expert).
  • Klicken Sie die Schaltfläche Fertigstellen, um das Setup zu beenden oder folgen Sie dem angezeigten Link, um den Service (Dienst, http-Adresse/Netzwerk-Adresse) zu öffnen. 


Info
titleHinweis

Wir empfehlen Ihnen nach der Installation und dem Start der Software GridVis Ihre GridVis-Projekte zu lizenzieren. Näheres zur Aktivierung finden Sie unter Janitza ID-Server.


Sv translation
languageen


The GridVis setup wizard guides you through the different installation steps for a new installation or an existing installation:


Info
titleNOTE

Perform a backup of your projects before installing a new GridVis® edition. Information on this can be found in the section Create a project backup.

Info
titleNOTE

Depending on whether you are performing a new installation or updating an existing installation and depending on the GridVis platform installed, the screenshots shown may differ from the actual screen displays!

Scroll Ignore
scroll-viewporttrue
scroll-pdftrue
scroll-officetrue
scroll-chmtrue
scroll-docbooktrue
scroll-eclipsehelptrue
scroll-epubtrue
scroll-htmltrue
Layout-Box
floatingleft

GridVis® installation

Linchpin Teaser
iconlinchpin-teaser-icon-play-circle
varianticon
width150px
aligncenter
titleTUTORIAL
type6
newTabtrue
urlhttps://youtu.be/veOLwcatA5U
height150px

GridVis® Desktop installation

Linchpin Teaser
iconlinchpin-teaser-icon-play-circle
varianticon
width150px
aligncenter
titleTUTORIAL
type6
newTabtrue
urlhttps://youtu.be/r5EhdiU14EE
height150px

Scroll Only
scroll-viewporttrue
scroll-pdftrue
scroll-officetrue
scroll-chmtrue
scroll-docbooktrue
scroll-eclipsehelptrue
scroll-epubtrue
scroll-htmltrue

GridVis® installation


GridVis® Desktop installation

Image Added

  • Close all open programs before installing GridVis.
  • Start the GridVis setup wizard by double-clicking on the previously saved executable file/exe file (see "Kopie von GridVis downloaden") and follow the instructions.
  • Use "radio buttons" to choose between "Update an existing installation" or "Install to another directory".
  • In the next window, read and accept the license agreements if you want to use the GridVis software. Confirm the information with the "Continue" button.


  • If you are updating an existing GridVis installation, check and confirm your license (checkbox "I have checked my license"). For more information about your licenses, see "Janitza ID-Server". 

Additional steps when installing GridVis Service:

  • Select a target directory for the installation and configuration files via the "Browse" button or accept the set path.
  • In the following windows, select the port number of the service (internal http server, only for the "Standard" and "Expert" editions) and the memory usage. The port number (part of a network address) is used by the "Service" for communication between the GridVis desktop and the Internet.


  • Before you click the "Finish" button in the final window, please make a note of the link of the installed "Service" - you will need it to access the web interface later (GridVis "Standard" and "Expert" edition only).
  • Click the "Finish" button to exit the setup or follow the displayed link to open the "Service" (http address/network address) 


Info
titleNote

We recommend that you license your GridVis projects after installing and starting the "GridVis" software. You can find more details on activation at "Janitza ID-Server".


Sv translation
languagees


El asistente de instalación de GridVis le guiará a través de los diferentes pasos de instalación, tanto durante una nueva instalación como en el caso de una instalación ya existente:


Info
titleAVISO

Haga una copia de seguridad de sus proyectos antes de instalar una nueva edición de GridVis®. Encontrará información al respecto en el capítulo Hacer una copia de seguridad de los proyectos.

Info
titleAVISO

¡Dependiendo de si usted ejecuta una nueva instalación o actualiza una instalación existente y en función de la plataforma de GridVis instalada, las capturas de pantalla representadas pueden diferir de las informaciones realmente mostradas en pantalla!

Scroll Ignore
scroll-viewporttrue
scroll-pdftrue
scroll-officetrue
scroll-chmtrue
scroll-docbooktrue
scroll-eclipsehelptrue
scroll-epubtrue
scroll-htmltrue
Layout-Box
floatingleft

Instalación de GridVis®

Linchpin Teaser
iconlinchpin-teaser-icon-play-circle
varianticon
width150px
aligncenter
titleTUTORIAL
type6
newTabtrue
urlhttps://youtu.be/veOLwcatA5U
height150px

Instalación de GridVis® Desktop

Linchpin Teaser
iconlinchpin-teaser-icon-play-circle
varianticon
width150px
aligncenter
titleTUTORIAL
type6
newTabtrue
urlhttps://youtu.be/r5EhdiU14EE
height150px

Scroll Only
scroll-viewporttrue
scroll-pdftrue
scroll-officetrue
scroll-chmtrue
scroll-docbooktrue
scroll-eclipsehelptrue
scroll-epubtrue
scroll-htmltrue

Instalación de GridVis®


Instalación de GridVis® Desktop

Image Added

  • Cierre todos los programas abiertos antes de instalar GridVis.
  • Inicie el asistente de instalación de GridVis haciendo doble clic en el archivo ejecutable/archivo *.exe previamente guardado (véase “Kopie von GridVis downloaden”) y siga las instrucciones.
  • A través de los botones de opción podrá seleccionar entre actualizar una instalación existente (“Yes, update the existing installation”) o instalar en un directorio diferente (“No, install into a different directory”).
  • En la ventana que aparece a continuación, lea y acepte el acuerdo de licencia si desea utilizar el software GridVis. Confirme sus indicaciones con el botón “Next” (Siguiente).


  • Si actualiza una instalación existente de GridVis, compruebe y confirme su licencia (casilla de verificación “I have checked my licence” (He comprobado mi licencia)). Encontrará información más detallada acerca de sus licencias en “Servidor Janitza ID”. 

Pasos adicionales para la instalación de GridVis Service:

  • Para los archivos de instalación y configuración, seleccione a través del botón “Buscar” un directorio de destino o acepte la ruta de acceso ajustada.
  • En las siguientes ventanas, seleccione el número de puerto del servicio (servidor http interno, solo en las ediciones “Standard” y “Expert”) y el uso de la memoria de trabajo. A través del número de puerto (parte de una dirección de red) el servicio establece una comunicación entre GridVis Desktop e Internet.


  • Antes de hacer clic en el botón “Finalizar” en la última ventana, anote el enlace del servicio instalado —lo necesitará para acceder posteriormente a la interfaz Web (solo en la edición de GridVis “Standard” y “Expert”).
  • Haga clic en el botón “Finalizar” para finalizar la instalación o siga el enlace mostrado para abrir el servicio (dirección http/dirección de red). 


Info
titleAviso

Recomendamos obtener una licencia para sus proyectos GridVis después de instalar e iniciar el software “GridVis”. Encontrará más información acerca de la activación bajo “Servidor Janitza ID”.


Sv translation
languageit


La procedura guidata di installazione di GridVis guida l’utente attraverso i vari passaggi di installazione per una nuova installazione e un’installazione già esistente:


Info
titleNOTA

Prima di installare una nuova edizione di GridVis®, eseguire un backup dei progetti. Per informazioni al riguardo si rimanda al capitolo Projekt-Backup erstellen.

Info
titleNOTA

A seconda che si tratti di una nuova installazione o di un aggiornamento di un’installazione già esistente e a seconda della piattaforma GridVis installata, le schermate mostrate potrebbero differire da quelle reali!

Scroll Ignore
scroll-viewporttrue
scroll-pdftrue
scroll-officetrue
scroll-chmtrue
scroll-docbooktrue
scroll-eclipsehelptrue
scroll-epubtrue
scroll-htmltrue
Layout-Box
floatingleft

Installazione di GridVis®

Linchpin Teaser
iconlinchpin-teaser-icon-play-circle
varianticon
width150px
aligncenter
titleTUTORIAL
type6
newTabtrue
urlhttps://youtu.be/veOLwcatA5U
height150px

Installazione di GridVis® Desktop

Linchpin Teaser
iconlinchpin-teaser-icon-play-circle
varianticon
width150px
aligncenter
titleTUTORIAL
type6
newTabtrue
urlhttps://youtu.be/r5EhdiU14EE
height150px

Scroll Only
scroll-viewporttrue
scroll-pdftrue
scroll-officetrue
scroll-chmtrue
scroll-docbooktrue
scroll-eclipsehelptrue
scroll-epubtrue
scroll-htmltrue

Installazione di GridVis®

Image Added


Installazione di GridVis® Desktop

Image Modified

  • Chiudere tutti i programmi aperti prima di installare GridVis.
  • Avviare l’installazione guidata di GridVis facendo doppio clic sul file eseguibile/exe precedentemente salvato (vedere Kopie von GridVis downloaden) e seguire le istruzioni.
  • Utilizzare i “pulsanti di opzione“ per scegliere tra Aggiornamento di un’installazione esistente o Installazione in un’altra cartella.
  • Nella finestra successiva, leggere e accettare gli accordi di licenza se si desidera utilizzare il software GridVis. Confermare gli inserimenti con il tasto “Avanti“.


  • Se si sta aggiornando un’installazione di GridVis già esistente, controllare e confermare la licenza (casella di controllo Ho controllato la mia licenza). Per ulteriori informazioni sulle licenze, consultare il sito Server ID Janitza. 

Passaggio aggiuntivo durante l’installazione del GridVis-Service:

  • Selezionare una directory di destinazione per i file di installazione e configurazione utilizzando il pulsante Cerca o accettare il percorso impostato.
  • Nelle altre finestre, selezionare il numero di porta del servizio (server http interno, solo per le edizioni Standard e Expert) e l’utilizzo della memoria. Il Service (Servizio) comunica tra il desktop GridVis e Internet tramite il numero di porta (parte di un indirizzo di rete).


  • Prima di fare clic sul pulsante Completa nella finestra finale, annotare il link del Service installato (chiamato anche Servizio), che servirà per richiamare l’interfaccia web in seguito (solo edizioni GridVis Standard e Expert).
  • Fare clic sul pulsante Completa per terminare la configurazione o seguire il link visualizzato per aprire il Service (servizio, indirizzo http/indirizzo di rete). 


Info
titleNota

Si consiglia di concedere la licenza ai progetti GridVis dopo aver installato e avviato il software “GridVis“. Ulteriori dettagli sull’attivazione sono disponibili alla voce Server ID Janitza.