
| Sv translation | ||||||||||||||||||
|---|---|---|---|---|---|---|---|---|---|---|---|---|---|---|---|---|---|---|
| ||||||||||||||||||
| Anker | oben | oben |
| Info | ||
|---|---|---|
| ||
Bitte beachten Sie, dass Ihr Projekt nicht auf einem Netzlaufwerk abliegt! Speichern Sie Ihr Projekt auf Ihrem lokalen PC mit der GridVis-Installation. |
| scroll-viewport | true |
|---|---|
| scroll-pdf | true |
| scroll-office | true |
| scroll-chm | true |
| scroll-docbook | true |
| scroll-eclipsehelp | true |
| scroll-epub | true |
| scroll-html | true |
| floating | left |
|---|
| icon | linchpin-teaser-icon-play-circle |
|---|---|
| variant | icon |
| width | 150px |
| align | center |
| title | TUTORIAL |
| type | 6 |
| newTab | true |
| url | https://youtu.be/45vPG6B16Xw |
| height | 150px |
| Scroll Only | ||||||||||||||||
|---|---|---|---|---|---|---|---|---|---|---|---|---|---|---|---|---|
| ||||||||||||||||
| Info | ||
|---|---|---|
| ||
Bitte beachten Sie: |
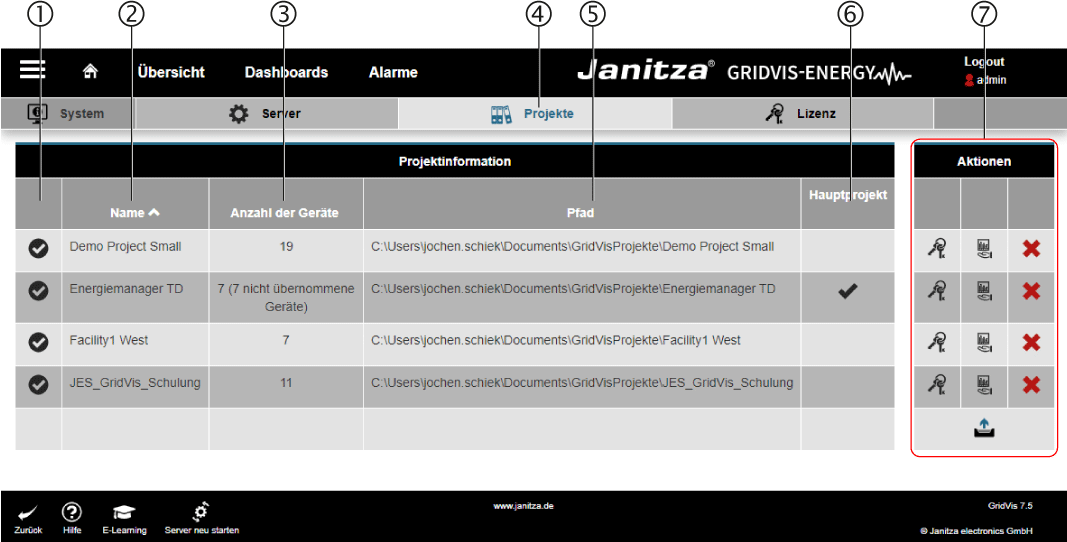
Menü -> Einstellungen -> System -> Projekte
Zustände: ![]() Bereit und
Bereit und ![]() fehlgeschlagen.
fehlgeschlagen.
Zeigt den Projektnamen.
![]() Hinweis:
Hinweis:
Den Projektnamen vergeben Sie mit der GridVis Desktop.
Zeigt die Anzahl der Geräte des Projektes.
Geräte, die nicht von der GridVis Web verwaltet werden, sind ebenfalls aufgeführt.
![]()
Die aktive Schaltfläche wird blau angezeigt.
Ablagepfad (Windows-Ordner) des Projektverzeichnisses.
Ein Haken kennzeichnet, welches Projekt als Hauptprojekt festgelegt ist.
![]() Hinweis:
Hinweis:
Das Hauptprojekt beinhaltet die Benutzerdatenbank sowie die Dashboards und Templates.
Das Hauptprojekt legen Sie im Dialogfeld Kopie von .Server v1.0 fest.
Projekt-Aktionen
![]()
Über die Schaltfläche gelangen Sie in das Dialogfeld Kopie von Lizenz.
Hier erhalten Sie alle Informationen zu Ihrem Projekt und der mit dem Projekt verknüpften GridVis® Edition.
![]()
Auf alle Messgeräte anwenden
Wird diese Schaltfläche betätigt, werden alle Geräte des Projekts direkt von der GridVis® Web verwaltet.
![]() Hinweis:
Hinweis:
Automatisierungen, wie z. B. die automatische Auslesung oder das automatische Zeit setzen werden nur ausgeführt, wenn der Dienst das betroffene Gerät verwaltet.
![]()
![]()
Betätigen Sie dies Schaltfläche, um ein mit der GridVis-Desktop erstelltes Projekt einzubinden.
- Geben Sie im Eingabefeld den Ablagepfad Ihres
Projektverzeichnisses/Projekts ein. - Bestätigen Sie mit Klick auf die Schaltfläche
Laden die Aktion.
| Anzeige untergeordneter Seiten | ||||||
|---|---|---|---|---|---|---|
|
| Sv translation | ||||||||||||||||||
|---|---|---|---|---|---|---|---|---|---|---|---|---|---|---|---|---|---|---|
| ||||||||||||||||||
| Anker | above | above |
| Info | ||
|---|---|---|
| ||
Please ensure that your project is not stored on a network drive! Save your project on your local PC with the GridVis installation. |
| scroll-viewport | true |
|---|---|
| scroll-pdf | true |
| scroll-office | true |
| scroll-chm | true |
| scroll-docbook | true |
| scroll-eclipsehelp | true |
| scroll-epub | true |
| scroll-html | true |
| floating | left |
|---|
| icon | linchpin-teaser-icon-play-circle |
|---|---|
| variant | icon |
| width | 150px |
| align | center |
| title | TUTORIAL |
| type | 6 |
| newTab | true |
| url | https://youtu.be/ucH1ZlhnjCY |
| height | 150px |
| Scroll Only | ||||||||||||||||
|---|---|---|---|---|---|---|---|---|---|---|---|---|---|---|---|---|
| ||||||||||||||||
| Info | ||
|---|---|---|
| ||
Please note: |
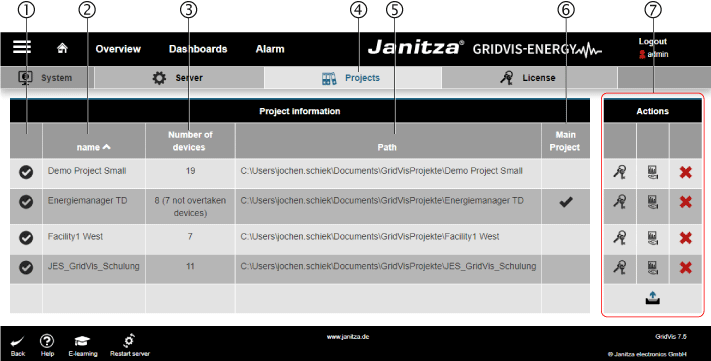
Menu -> Settings -> System -> Projects
States: ![]() Ready and
Ready and ![]() Failed.
Failed.
Shows the project name.
![]() Note:
Note:
Use GridVis Desktop to assign the project name.
Shows the number of devices in the project.
Devices that are not managed by GridVis Web are also listed.
![]()
The button is displayed in blue when active.
Storage path (Windows folder) of the project directory.
A checkmark indicates which project is set as the main project.
![]() Note:
Note:
The main project includes the user database as well as the dashboards and templates.
The main project must be specified in the Kopie von .Server v1.0 dialog box.
Project actions
![]()
The License button
Here you will find all the information about your project and the GridVis® edition linked to the project.
![]()
Apply to all measurement devices
When this button is clicked, all devices in the project are then managed directly by GridVis® Web.
![]() Note:
Note:
Automations, such as Automatic readout or Automatic time setting are only executed if the service manages the device concerned.
![]()
![]()
Use this button to integrate a project created with GridVis Desktop.
- Enter the storage path of your
project directory/project in the input field. - Confirm by clicking the
Load button.
| Anzeige untergeordneter Seiten | ||||||
|---|---|---|---|---|---|---|
|
| Sv translation | ||||||||||||||||||||||||||||||||||||||||||||||||||||||||||||||||||||||||||||||||||||||||||||||||||||||||||||||||||||
|---|---|---|---|---|---|---|---|---|---|---|---|---|---|---|---|---|---|---|---|---|---|---|---|---|---|---|---|---|---|---|---|---|---|---|---|---|---|---|---|---|---|---|---|---|---|---|---|---|---|---|---|---|---|---|---|---|---|---|---|---|---|---|---|---|---|---|---|---|---|---|---|---|---|---|---|---|---|---|---|---|---|---|---|---|---|---|---|---|---|---|---|---|---|---|---|---|---|---|---|---|---|---|---|---|---|---|---|---|---|---|---|---|---|---|---|---|
| ||||||||||||||||||||||||||||||||||||||||||||||||||||||||||||||||||||||||||||||||||||||||||||||||||||||||||||||||||||
Anker | arriba | arriba |
|
| Info | ||
|---|---|---|
| ||
¡Por favor, preste atención a que su proyecto no se encuentre en una unidad de red! Guarde su proyecto en su PC local con la instalación de GridVis. |
| scroll-viewport | true |
|---|---|
| scroll-pdf | true |
| scroll-office | true |
| scroll-chm | true |
| scroll-docbook | true |
| scroll-eclipsehelp | true |
| scroll-epub | true |
| scroll-html | true |
| floating | left |
|---|
| icon | linchpin-teaser-icon-play-circle |
|---|---|
| variant | icon |
| width | 150px |
| align | center |
| title | TUTORIAL |
| type | 6 |
| newTab | true |
| url | https://youtu.be/ucH1ZlhnjCY |
| height | 150px |
| Scroll Only | ||||||||||||||||
|---|---|---|---|---|---|---|---|---|---|---|---|---|---|---|---|---|
| ||||||||||||||||
| Info | ||
|---|---|---|
| ||
Obsérvese: |
Menú -> Settings (Ajustes) -> System (Sistema) -> Projects (Proyectos)
Estados: ![]() Listo y
Listo y ![]() fallido.
fallido.
Muestra el nombre del proyecto.
![]() Aviso:
Aviso:
Usted asigna el nombre del proyecto con GridVis Desktop.
Muestra el número de dispositivos del proyecto.
También se muestran los dispositivos que no son administrados por GridVis Web.
![]()
El botón activo aparece en azul.
Ruta de almacenamiento (carpeta de Windows) del directorio del proyecto.
Una marca de verificación indica qué proyecto está definido como proyecto principal.
![]() Aviso:
Aviso:
El proyecto principal contiene la base de datos del usuario, así como los paneles y las plantillas.
Podrá definir el proyecto principal en el cuadro de diálogo Kopie von .Server v1.0 (Servidor).
Actions (Acciones del proyecto)
![]()
Aquí obtendrá todas las informaciones acerca de su proyecto y de la edición de GridVis® vinculada con el proyecto.
![]()
Aplicar a todos los dispositivos de medición
Si se hace clic en este botón, todos los dispositivos del proyectos serán administrados directamente por GridVis® Web.
![]() Aviso:
Aviso:
Las automatizaciones como, por ejemplo, la lectura automática o el ajuste de hora automático solamente se ejecutan, si el servicio administra el dispositivo en cuestión.
![]()
Haga clic en este botón para integrar un proyecto creado con GridVis Desktop.
directorio de proyecto/proyecto.
Cargar.
| Sv translation | ||||||||||||||||||||||||||||||||||||||||||||||||||||||||||||||||||||||||||||||||||||||||||||||||||||||||||||||||||||
|---|---|---|---|---|---|---|---|---|---|---|---|---|---|---|---|---|---|---|---|---|---|---|---|---|---|---|---|---|---|---|---|---|---|---|---|---|---|---|---|---|---|---|---|---|---|---|---|---|---|---|---|---|---|---|---|---|---|---|---|---|---|---|---|---|---|---|---|---|---|---|---|---|---|---|---|---|---|---|---|---|---|---|---|---|---|---|---|---|---|---|---|---|---|---|---|---|---|---|---|---|---|---|---|---|---|---|---|---|---|---|---|---|---|---|---|---|
| ||||||||||||||||||||||||||||||||||||||||||||||||||||||||||||||||||||||||||||||||||||||||||||||||||||||||||||||||||||
Anker | inizio | inizio |
|
| Info | ||
|---|---|---|
| ||
Si noti che il progetto non si trova su un’unità di rete! Salvare il progetto sul PC locale con l’installazione di GridVis. |
| scroll-viewport | true |
|---|---|
| scroll-pdf | true |
| scroll-office | true |
| scroll-chm | true |
| scroll-docbook | true |
| scroll-eclipsehelp | true |
| scroll-epub | true |
| scroll-html | true |
| floating | left |
|---|
| icon | linchpin-teaser-icon-play-circle |
|---|---|
| variant | icon |
| width | 150px |
| align | center |
| title | TUTORIAL |
| type | 6 |
| newTab | true |
| url | https://youtu.be/ucH1ZlhnjCY |
| height | 150px |
| Scroll Only | ||||||||||||||||
|---|---|---|---|---|---|---|---|---|---|---|---|---|---|---|---|---|
| ||||||||||||||||
| Info | ||
|---|---|---|
| ||
Nota bene: |
Menu -> Impostazioni -> Sistema -> Progetti
Stati: ![]() Pronto e
Pronto e ![]() non riuscito.
non riuscito.
Mostra il nome del progetto.
![]() Nota:
Nota:
Il nome del progetto viene assegnato con GridVis Desktop.
Mostra il numero di dispositivi nel progetto.
Sono elencati anche i dispositivi non gestiti da GridVis Web.
![]()
Il pulsante attivo viene visualizzato in blu.
Percorso di archiviazione (cartella di Windows) della directory del progetto.
Un segno di spunta indica quale progetto è impostato come progetto principale.
![]() Nota:
Nota:
Il progetto principale comprende il database degli utenti, le dashboard e i template.
Viene creato il progetto principale nella finestra di dialogo Kopie von .Server v1.0.
Azioni del progetto
![]()
Qui vengono ricevute tutte le informazioni sul progetto e sull’edizione di GridVis® collegata al progetto.
![]()
Applica a tutti gli strumenti di misura
![]() Nota:
Nota:
Automazioni come ad es. la lettura automatica o impostazione automatica dell’ora vengono eseguite solo se il servizio gestisce il dispositivo interessato.
![]()
![]()
Premere questo pulsante per includere un progetto creato con GridVis-Desktop.
nel campo di immissione.
Carica per confermare l’azione.