
| Sv translation | ||||||||||||||||||||||||||||||||||||||||||||||||||||||||||||||||||||||||||||||||||||||||||||||||||||||||||||||||||||||||||||||||||||||||||||||||||||||||||||||||||
|---|---|---|---|---|---|---|---|---|---|---|---|---|---|---|---|---|---|---|---|---|---|---|---|---|---|---|---|---|---|---|---|---|---|---|---|---|---|---|---|---|---|---|---|---|---|---|---|---|---|---|---|---|---|---|---|---|---|---|---|---|---|---|---|---|---|---|---|---|---|---|---|---|---|---|---|---|---|---|---|---|---|---|---|---|---|---|---|---|---|---|---|---|---|---|---|---|---|---|---|---|---|---|---|---|---|---|---|---|---|---|---|---|---|---|---|---|---|---|---|---|---|---|---|---|---|---|---|---|---|---|---|---|---|---|---|---|---|---|---|---|---|---|---|---|---|---|---|---|---|---|---|---|---|---|---|---|---|---|---|---|---|---|
| ||||||||||||||||||||||||||||||||||||||||||||||||||||||||||||||||||||||||||||||||||||||||||||||||||||||||||||||||||||||||||||||||||||||||||||||||||||||||||||||||||
|
| Info | ||
|---|---|---|
| ||
Bitte beachten Sie, dass Ihr Projekt nicht auf einem Netzlaufwerk abliegt! Speichern Sie Ihr Projekt auf Ihrem lokalen PC mit der GridVis-Installation. |
| Scroll Ignore | ||||||||||||||||||||||||||
|---|---|---|---|---|---|---|---|---|---|---|---|---|---|---|---|---|---|---|---|---|---|---|---|---|---|---|
| ||||||||||||||||||||||||||
|
| Scroll Only | ||||||||||||||||
|---|---|---|---|---|---|---|---|---|---|---|---|---|---|---|---|---|
| ||||||||||||||||
 Projekte - Beschreibung der Dialogeinträge
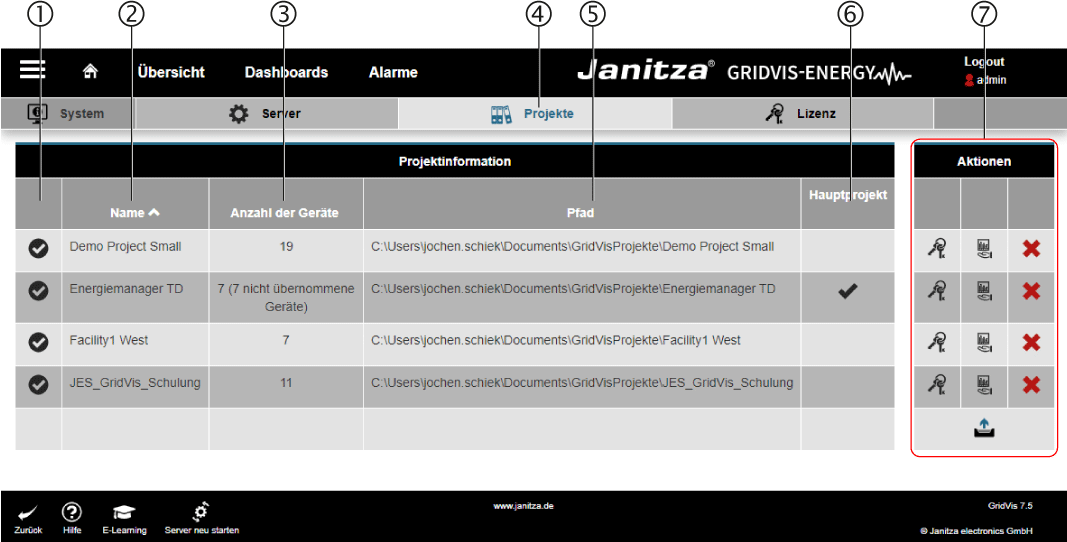
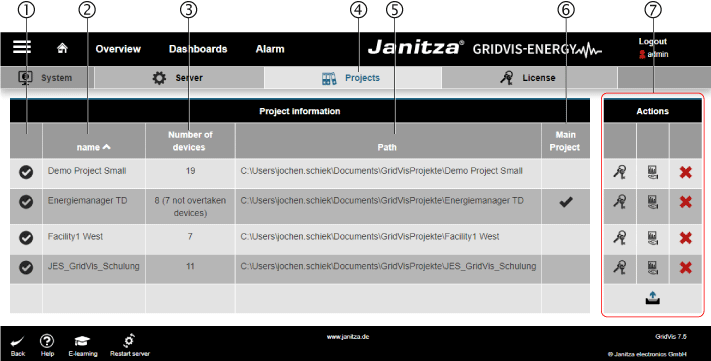
Über das Dialogfeld Projekte erhalten Sie einen Überblick über die in der GridVis-Web integrierten Projekte. Um ein mit der GridVis-Desktop erstelltes Projekt einzubinden, kopieren und laden Sie Ihr Projektverzeichnis aus Ihrem Windows-Ordner in das System. Ihr Projektverzeichnis finden Sie, falls nicht anders konfiguriert, unter dem Windows-Ablagepfad: C:\Users\IhrName\Dokumente\GridVisProjekte\IhrProjekt.
| Info | |
|---|---|
|
| |
Bitte beachten Sie |
, dass Ihr Projekt nicht auf einem Netzlaufwerk abliegt. Speichern Sie Ihr Projekt auf Ihrem lokalen PC mit der GridVis-Installation. |
| Info | ||
|---|---|---|
| ||
Je nach verwendeter Edition der GridVis (Standard, Expert) unterscheiden sich die Benutzer-Oberflächen und der Funktionsumfang |
. |
Menü -> Einstellungen -> System -> Projekte
| Position | Pos. | Icon | Kurztext | Beschreibung | ||||||||||||||||||||||
|---|---|---|---|---|---|---|---|---|---|---|---|---|---|---|---|---|---|---|---|---|---|---|---|---|---|---|
| 1 | StatusZustände: | |||||||||||||||||||||||||
| 2 | NameZeigt den Projektnamen. |
|
| :
| ||||||||||||||||||||||
| 3 | Anzahl der GeräteZeigt die Anzahl der Geräte des Projektes. | |||||||||||||||||||||||||
| 4 |
| Schaltfläche Projekte - Projektinformationen | Die aktive Schaltfläche wird blau angezeigt. | |||||||||||||||||||||||
| 5 | PfadAblagepfad (Windows-Ordner) des Projektverzeichnisses. | |||||||||||||||||||||||||
| 6 | HauptprojektEin Haken kennzeichnet, welches Projekt als Hauptprojekt festgelegt ist. |
| :
| Dialogfeld
| ||||||||||||||||||||||
| 7 | Schaltfläche Lizenz |
| GridVis®
| Schaltfläche Auf alle Messgeräte anwenden |
| GridVis®
|
| die
| das
| werden
| Schaltfläche Projekt entladen |
| GridVis®
| Schaltfläche Projekt laden |
| dies
|
| Sv translation | ||||||||||||||||||||||||||||||||||||||||||||||||||||||||||||||||||||||||||||||||||||||||||||||||||||||||||||||||||||||||||||||||||||||||||||||||||||||||||||||||||||||
|---|---|---|---|---|---|---|---|---|---|---|---|---|---|---|---|---|---|---|---|---|---|---|---|---|---|---|---|---|---|---|---|---|---|---|---|---|---|---|---|---|---|---|---|---|---|---|---|---|---|---|---|---|---|---|---|---|---|---|---|---|---|---|---|---|---|---|---|---|---|---|---|---|---|---|---|---|---|---|---|---|---|---|---|---|---|---|---|---|---|---|---|---|---|---|---|---|---|---|---|---|---|---|---|---|---|---|---|---|---|---|---|---|---|---|---|---|---|---|---|---|---|---|---|---|---|---|---|---|---|---|---|---|---|---|---|---|---|---|---|---|---|---|---|---|---|---|---|---|---|---|---|---|---|---|---|---|---|---|---|---|---|---|---|---|---|---|
| ||||||||||||||||||||||||||||||||||||||||||||||||||||||||||||||||||||||||||||||||||||||||||||||||||||||||||||||||||||||||||||||||||||||||||||||||||||||||||||||||||||||
above | above |
|
| Info | ||
|---|---|---|
| ||
Please ensure that your project is not stored on a network drive! Save your project on your local PC with the GridVis installation. |
|
| Scroll Ignore | ||||||||||||||||||||||||||
|---|---|---|---|---|---|---|---|---|---|---|---|---|---|---|---|---|---|---|---|---|---|---|---|---|---|---|
| ||||||||||||||||||||||||||
|
| Scroll Only | ||||||||||||||||
|---|---|---|---|---|---|---|---|---|---|---|---|---|---|---|---|---|
| ||||||||||||||||
Projects - description of the dialog items
The Projects dialog box gives you an overview of the projects integrated in GridVis Web. To integrate a project created with GridVis Desktop, copy and load your project directory from your Windows folder into the system. Your project directory can be found under the Windows file path, if not configured otherwise: C:\Users\YourName\Documents\GridVisProjects\YourProject.
| Info | |
|---|---|
|
| |
Please ensure that your project is not stored on a network drive. Save your project on your local PC with the GridVis installation. |
| Info | ||
|---|---|---|
| ||
The user interfaces and the range of functions will differ depending on the edition of GridVis used (Standard, Expert) |
. |
Menu -> Settings -> System -> Projects
| Position | Description |
|---|---|
| 1 |
States: | |
| 2 |
Shows the project name. |
|
| |||
| 3 |
Shows the number of devices in the project. | |
| 4 |
![]()
The button is displayed in blue when active. | |
| 5 |
Storage path (Windows folder) of the project directory. | |
| 6 |
A checkmark indicates which project is set as the main project.
|
|
|
| |
| 7 |
Project actions
The License button
|
|
|
Apply to all measurement devices
|
|
|
|
|
|
|
|
|
|
| Sv translation | ||||||||||||||||||||||||||||||||||||||||||||||||||||||||||||||||||||||||||||||||||||||||||||||||||||||||||||||||||||||||||||||||||||||||||||||||||||||||||||
|---|---|---|---|---|---|---|---|---|---|---|---|---|---|---|---|---|---|---|---|---|---|---|---|---|---|---|---|---|---|---|---|---|---|---|---|---|---|---|---|---|---|---|---|---|---|---|---|---|---|---|---|---|---|---|---|---|---|---|---|---|---|---|---|---|---|---|---|---|---|---|---|---|---|---|---|---|---|---|---|---|---|---|---|---|---|---|---|---|---|---|---|---|---|---|---|---|---|---|---|---|---|---|---|---|---|---|---|---|---|---|---|---|---|---|---|---|---|---|---|---|---|---|---|---|---|---|---|---|---|---|---|---|---|---|---|---|---|---|---|---|---|---|---|---|---|---|---|---|---|---|---|---|---|---|---|---|
| ||||||||||||||||||||||||||||||||||||||||||||||||||||||||||||||||||||||||||||||||||||||||||||||||||||||||||||||||||||||||||||||||||||||||||||||||||||||||||||
arriba | arriba |
|
| Info | ||
|---|---|---|
| ||
¡Por favor, preste atención a que su proyecto no se encuentre en una unidad de red! Guarde su proyecto en su PC local con la instalación de GridVis. |
|
| Scroll Ignore | ||||||||||||||||||||||||||
|---|---|---|---|---|---|---|---|---|---|---|---|---|---|---|---|---|---|---|---|---|---|---|---|---|---|---|
| ||||||||||||||||||||||||||
|
| Scroll Only | ||||||||||||||||
|---|---|---|---|---|---|---|---|---|---|---|---|---|---|---|---|---|
| ||||||||||||||||
Proyectos: descripción de las entradas del cuadro de diálogo
A través del cuadro de diálogo Projects (Proyectos) obtendrá una vista general de los proyectos integrados en GridVis Web. Para integrar un proyecto creado con GridVis Desktop, copie y cargue el directorio de su proyecto de su carpeta Windows al sistema. Si no está configurado de otra manera, encontrará el directorio de su proyecto bajo la ruta de almacenamiento de Windows: C:\Usuarios\SuNombre\Documentos\ProyectosGridVis\SuProyecto.
| Info | ||
|---|---|---|
| ||
Por favor, preste atención a que su proyecto no se encuentre en una unidad de red. Guarde su proyecto en su PC local con la instalación de GridVis. |
| Info | |
|---|---|
|
| |
Dependiendo |
¡Dependiendo
de la edición de GridVis utilizada (Standard, Expert) difieren las interfaces de usuario y la gama de funciones |
. |
Menú -> Settings (Ajustes) -> System (Sistema) -> Projects (Proyectos)
| Pos. | Icono | Texto breve | Descripción | |||||||||||||||||||||
|---|---|---|---|---|---|---|---|---|---|---|---|---|---|---|---|---|---|---|---|---|---|---|---|---|
| 1 | EstadoEstados: | |||||||||||||||||||||||
| 2 | name (Nombre) | Muestra el nombre del proyecto. |
| |||||||||||||||||||||
| 3 | Number of devices (Número de dispositivos) | Muestra el número de dispositivos del proyecto. | ||||||||||||||||||||||
| 4 |
| Botón Projects (Proyectos) - información del proyectoEl botón activo aparece en azul. | ||||||||||||||||||||||
| 5 | Path (Ruta de acceso)Ruta de almacenamiento (carpeta de Windows) del directorio del proyecto. | |||||||||||||||||||||||
| 6 | Main Project (Proyecto principal) | Una marca de verificación indica qué proyecto está definido como proyecto principal. |
|
| diálogo
| |||||||||||||||||||
| 7 |
| GridVis®
| Botón Aplicar a todos los dispositivos de medición |
| GridVis®
|
| la
| o el
| solamente
| Botón Eliminar proyecto |
| GridVis®
| Botón Cargar proyecto |
|
| Sv translation | |||||||||||||||||||||||||||||||||||||||||||||||||||||||||||||||||||||||||||||||||||||||||||||||||||||||||||||||||||||||||||||||||||||||||||||||||||||||||||||||||||||
|---|---|---|---|---|---|---|---|---|---|---|---|---|---|---|---|---|---|---|---|---|---|---|---|---|---|---|---|---|---|---|---|---|---|---|---|---|---|---|---|---|---|---|---|---|---|---|---|---|---|---|---|---|---|---|---|---|---|---|---|---|---|---|---|---|---|---|---|---|---|---|---|---|---|---|---|---|---|---|---|---|---|---|---|---|---|---|---|---|---|---|---|---|---|---|---|---|---|---|---|---|---|---|---|---|---|---|---|---|---|---|---|---|---|---|---|---|---|---|---|---|---|---|---|---|---|---|---|---|---|---|---|---|---|---|---|---|---|---|---|---|---|---|---|---|---|---|---|---|---|---|---|---|---|---|---|---|---|---|---|---|---|---|---|---|---|
| |||||||||||||||||||||||||||||||||||||||||||||||||||||||||||||||||||||||||||||||||||||||||||||||||||||||||||||||||||||||||||||||||||||||||||||||||||||||||||||||||||||
inizio |
|
| Info | ||
|---|---|---|
| ||
Si noti che il progetto non si trova su un’unità di rete! Salvare il progetto sul PC locale con l’installazione di GridVis. |
|
| Scroll Ignore | ||||||||||||||||||||||||||
|---|---|---|---|---|---|---|---|---|---|---|---|---|---|---|---|---|---|---|---|---|---|---|---|---|---|---|
| ||||||||||||||||||||||||||
|
| Scroll Only | ||||||||||||||||
|---|---|---|---|---|---|---|---|---|---|---|---|---|---|---|---|---|
| ||||||||||||||||
Progetti - Descrizione delle voci della finestra di dialogo
La finestra di dialogo Progetti offre una panoramica dei progetti integrati in GridVis Web. Per includere un progetto creato con GridVis-Desktop, copiare e caricare la directory del progetto dalla cartella di Windows nel sistema. La cartella del progetto, se non configurata diversamente, si trova nel percorso di archiviazione di Windows: C:\Users\IhrName\Dokumente\GridVisProjekte\IhrProjekt.
| Info | ||
|---|---|---|
| ||
Si noti che il progetto non si trova su un’unità di rete. Salvare il progetto sul PC locale con l’installazione di GridVis. |
| Info | |
|---|---|
|
|
A seconda dell’edizione di GridVis utilizzata (Standard, Expert), le interfacce utente e la gamma di funzioni differiscono |
. |
Menu -> Impostazioni -> Sistema -> Progetti
| Posizione | Pos. | Icona | Testo breve | Descrizione | ||||||||||||||||||||||||
|---|---|---|---|---|---|---|---|---|---|---|---|---|---|---|---|---|---|---|---|---|---|---|---|---|---|---|---|---|
| 1 | StatoStati: | |||||||||||||||||||||||||||
| 2 | NomeMostra il nome del progetto.
|
| :
| |||||||||||||||||||||||||
| 3 | Numero di dispositiviMostra il numero di dispositivi nel progetto. | |||||||||||||||||||||||||||
| 4 |
| Pulsante Progetti - Informazioni sul progettoIl pulsante attivo viene visualizzato in blu. | ||||||||||||||||||||||||||
| 5 | PercorsoPercorso di archiviazione (cartella di Windows) della directory del progetto. | |||||||||||||||||||||||||||
| 6 | Progetto principaleUn segno di spunta indica quale progetto è impostato come progetto principale. |
| :
| dialogo
| ||||||||||||||||||||||||
| 7 |
| GridVis®
| Pulsante di comando Applica a tutti gli strumenti di misura |
| GridVis®
|
| :
| la
| o
| vengono
| Pulsante Scarica progetto |
| GridVis®
| Pulsante Carica progetto |
|